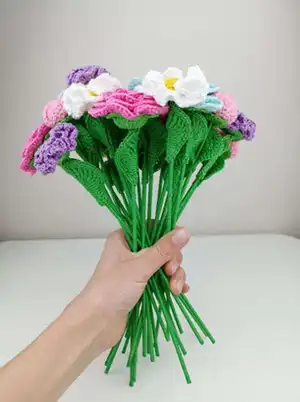
Create a handmade bouquet of 25 delicate crochet flowers using simple motifs and a few common tools. This pattern guides you step-by-step through roses, daisies, blue flowers, buds, carnations, leaves, sepals and how to assemble them onto wired stems. You can customize colors, yarn weight and stem length to make a bouquet that fits your style or occasion. Perfect as a thoughtful gift or charming home decoration.
Progress Tracker
0% Complete
— General Info :
Info :
The bouquet includes 25 flowers: 5 roses, 5 daisies, 5 blue flowers, 5 buds and 5 carnations.
Info :
Colors used: for leaves, stems and sepals - green; for roses - bright pink; for daisies - white and yellow; for blue flowers - two shades of blue; for buds - soft pink; for carnations - purple.
Info :
Necessary materials: yarn (two colors are used for photo tutorial - yellow and green), hook, scissors, a needle, floral wire, measuring tape, pliers, glue.
Info :
This bouquet is made of cotton yarn, brand YarnArt "Begonia" 169m/50g. The hook used is 2 mm in size. Stems 10 inches (25 cm) tall. The size of the flowers is from 1.7 inches (4.5 cm) to 2.3 inches (6 cm). The thicker the yarn, the larger the flower you will get. Leaves made of thin yarn should be used doubled for larger leaves. For the stem, used a flower wire 1.1 mm thick and 10 inch (25cm) long (can also use 0.8 or 0.9 mm). Silicone glue, universal glue or hobby glue are suitable for gluing parts.
— Leaf :
Info :
I will make each flower 25 cm (10 inches) long. The length of the stem is selected according to the size of the flowers that will be planted on the stem. Using pliers, cut the required length of wire for the stem.
Info :
Apply glue to the edge of the wire and fasten the yarn firmly.
Info :
Gradually apply glue to the wire and wind the yarn; firmly fix the yarn on the edge of the wire, cut the yarn.
Row 1 :
CH 7 (foundation chain for leaf).
Row 2 :
CH 1, SC 1 in the first chain (the pattern performs the second row on the back side of the chains for convenience).
Row 2 (continued) :
HDC 1 in the second chain.
Row 2 (continued) :
DC 1 in the third chain.
Row 2 (continued) :
DC 2 in the fourth chain.
Row 2 (continued) :
TR 2 in the fifth chain.
Row 2 (continued) :
DTR 3 in the sixth chain.
Row 2 (continued) :
DTR 7 in the seventh chain (peak shaping at end of chain).
Next :
Then perform stitches in the same chains, according to the stitches that have already been made on the opposite side to mirror the first side.
Mirror row :
DTR 3 in the same chain where DTR 3 have already been made (returning along opposite edge).
Mirror row (continued) :
TR 2 in the same chain where TR 2 have already been made.
Mirror row (continued) :
DC 2 in the same chain where DC 2 have already been made.
Mirror finishing :
DC 1 in the same chain where DC 1 have already been made, HDC 1 in the next chain, SC 1 in last chain; CH 1 turn.
Row 3 :
CH 1, SC 1 in the same SC (begin shaping and smoothing the edges).
Row 3 (continued) :
SC 1 in HDC.
Row 3 (continued) :
SC 1 in the first DC of three, SC 1 in the second DC, SC 1 in the third DC, SC 1 in the first TR of two, SC 1 in the second TR (scattering along the curve).
Row 3 (continued) :
SC 2 in the first DTR of thirteen.
Row 3 (continued) :
SC 2 in the second DTR, SC 2 in the third DTR, SC 2 in the fourth DTR, SC 2 in the fifth DTR, SC 3 in the sixth DTR.
Row 3 (continued) :
SC 1 in the seventh DTR, CH 2, SC 3 in the eighth DTR, SC 2 in the ninth DTR (continuing to shape curvature).
Row 3 (continued) :
SC 2 in the tenth DTR, SC 2 the eleventh DTR, SC 2 in the twelfth DTR, SC 2 in the thirteenth DTR.
Edge finishing :
SC 1 in the first TR of two, SC 1 in the second TR, SC 1 in the first DC of two, SC 1 in the second DC, and repeat SC 1 in the next each stitchens (finish and tidy edge).
Final rows :
CH 2, ST in the first SC of this row, done; fasten and trim the ends of the yarn. (The same leaves are made for each type of flower.)
Info :
If cotton yarn is used, the leaf can be easily ironed to flatten and shape.
— Sepal :
Info :
Sepal: magic ring base, forming 6 or 7 leaves around a central ring to cup the flower.
Row 1 :
Magic ring, CH 1, SC 14 in the magic ring. Tighten the magic ring and SL ST in the first SC.
Row 2 :
CH 3 from the first SC, DC 1 in the first SC to start the petal attachment sequence.
Row 2 (continued) :
DC 2 in the second SC, repeat DC 2 in each SC around to form the first round of sepal points.
Row 3 :
CH 4, TR 3-cluster in the next DC 3 to make the petal tip; ST in the next DC to anchor.
Row 3 (continued) :
CH 4 and repeat TR cluster sequence to create 6-8 sepal tips around, ST in the beginning of this row. Done. Fasten and trim ends of yarn.
Info :
Check whether the size of the hole of the sepal is suitable for the thickness of the stem; if not, enlarge or tighten the magic ring slightly. If cotton yarn is used, the sepal can be easily ironed.
Info :
For the sepal, create 6 leaves by repeating the leaf petal unit and attach the sepal onto the stem using glue; trim ends and press to shape.
— Rose :
Row 1 :
CH 41 (foundation chain for rose petal ribbon).
Row 2 :
CH 2. I perform the second row in the back side of the chains; HDC 1 in the second chain, HDC 1 in the third chain, HDC 1 in the fourth chain, HDC 1 in the fifth chain — repeat HDC 1 in each chain until end of row.
Row 3 :
CH 2 from the first HDC; repeat until end of row: HDC 1 in each HDC — this forms a neat HDC strip as the base for petals.
Row 4 :
CH 3 from the first HDC, DC 1 in the first HDC, CH 3, DC 1 in same or next HDC according to pattern shaping; then CH 3 and DC 1 in subsequent HDC to form arch petals.
Row 4 (continued) :
Repeat sequence across row creating arches; skip some HDCs as instructed to form arches and clusters that will become petal shapes.
Row 5 :
CH 1. For the petal clusters: SC 1 in the first DC, DC 9 under the first arch of CH 3 (the CH 3 forms an arch), SC 1 in next chain — repeat DC 9 under each arch of CH 3 across row to create many petal arches (21 petals will turn out for full strip length).
Row 5 (continued) :
For final petal shaping perform DC 9 under second arch of CH 3 and SC 1 in next chain to turn the strip into a twisted ribbon shape ready for rolling into a rose.
Assembly :
All parts + glue. Determine the edge of the wire on which the yarn began to be wound (usually this edge looks worse than the edge where the thread ended) — it is on this edge that the rose is wound. Apply glue to the first petal and on the areas shown, start winding the ribbon on the stem with the first petal, close the stem well so that it is not visible and continue winding; then gradually wind the ribbon on the stem, apply glue and wind further. Then attach the sepal on the stem, apply glue and stick to the flower. Apply glue to the narrow edge of the leaf and glue to the stem.
Rose finishing :
After winding the rose ribbon and securing with glue, press gently and trim excess threads. Repeat to make required number of roses (for example five pink roses for the bouquet).
— Flower (single small flower used for daisies/blue flowers/buds) :
Info :
Flower motif is worked in two layers: a central small circle and one or two layers of petals as shown in charts.
Flower Row 1 :
Magic ring. CH 1, SC 10 in the magic ring. Tighten the magic ring, SL ST in the first SC of this row.
Flower Row 2 :
CH 3 from the first SC, TR 2 in the second SC to start petal, CH 2, and TR 2 in next SC, CH 3 to form the first small petal arch. Continue TR clusters and CH spacing to form first layer of petals (repeat across all 5 petals for small flower).
Flower Row 2 (continued) :
TR 2, CH 2, TR 2 forming each petal; ST into beginning of the row to close; CH 4 spaces used between petals where needed.
Flower Row 3 :
CH 1 then create petal attachments: TR clusters under next DC, CH spacing, ST into next DC to anchor petals, repeat around until desired petal count (commonly 5 or 6 petals depending on motif).
Layering :
For a two-layer flower make the first layer of petals then join a second layer by pulling yarn through selected SCs to the other side and crocheting the second layer of petals into the arches created by the first layer. Fasten and trim ends.
— Central part of the flower :
Row 1 :
Magic ring. CH 1, SC 6 in the magic ring. Tighten the magic ring, SL ST in the first SC.
Row 2 :
CH 1, SC 2 in the first SC; repeat SC 2 in each SC around to make SC 12 for the central disk. Fasten and trim the edges of the yarn. This central part is glued into the center of the flower if desired for a tidy look.
— Assembly & Stem finishing :
Step 1 :
All parts + glue. Apply glue to the edge of the wire and fasten yarn for stem covering. Wind yarn tightly and gradually along the wire with small amounts of glue to secure; trim the yarn at the bottom when finished.
Step 2 :
Check the fit of the sepal and central hole of the flower for the stem thickness; adjust the magic ring if needed to get a snug fit for the stem to pass through the sepal hole.
Step 3 :
Glue the first petal of the rose ribbon to the stem and start winding the ribbon on the stem, closing the stem well so that it is not visible and continue winding. Apply glue in small amounts to hold the ribbon and petals in place while forming the bloom.
Step 4 :
After the flower is fixed, glue the sepal to the underside of the bloom and attach leaves to the stem using glue on the narrow edge of the leaf; press and hold until set.
Step 5 :
Final trimming: once glue is dry, check alignment and trim stray yarn ends. Arrange stems into bouquet and secure with ribbon or floral tape as desired.
This crochet bouquet pattern gives you everything you need to create a lasting floral arrangement that never wilts. Customize the palette to match a wedding, birthday, or home decor and make bouquets for gifting or decoration. Each flower is built from small motifs with clear photos and tips to guide you through shaping and assembly. 🌸🧶