🧢 Beautiful ✨ Detailed πŸ’ Adorable

Clownfish (Nemo) Amigurumi Pattern

Clownfish (Nemo) Amigurumi Pattern
4.9β˜… Rating
2-3 Hours Time Needed
2.5K Made This
βœ‚οΈ

Intermediate Level

Ideal for those with basic crochet experience, featuring slightly more advanced stitches and techniques to expand your skills.

⏱️

Bite-Sized Project

Finishes in 2-4 hoursβ€”perfect for an afternoon of creative relaxation.

🧸

Cute Companion

An adorable friend to cherish, handcrafted with love to bring comfort and joy for years to come.

About This Clownfish (Nemo) Amigurumi Pattern

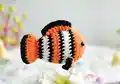
This pattern creates a small, striped clownfish (Nemo-inspired) amigurumi worked in Super Bulky yarn. You will crochet the body from the base up through the tail with clear color-change instructions for the orange, black and white stripes. Dorsal fins are picked up from existing rounds so no separate sewing is required.

Clownfish (Nemo) Amigurumi Pattern crochet pattern - detailed view of completed project

The pattern uses standard amigurumi shaping techniques: increases, decreases and simple stitch groupings for fins. It is quick to make and perfect for gifting or decorating a nursery.

Why You'll Love This Clownfish (Nemo) Amigurumi Pattern

I absolutely love this pattern because it captures the personality of a clownfish with minimal pieces and clever color changes. I enjoy how fast it works up using Super Bulky yarn, making it a rewarding project to finish in a single sitting. The pick-up method for the dorsal fins is one of my favorite touches β€” no complicated sewing needed and the fins sit naturally on the body. I also appreciate how adaptable the pattern is; you can easily change colors or scale the size by altering yarn weight and hook size.

Clownfish (Nemo) Amigurumi Pattern step 1 - construction progress Clownfish (Nemo) Amigurumi Pattern step 2 - assembly progress Clownfish (Nemo) Amigurumi Pattern step 3 - details and accessories Clownfish (Nemo) Amigurumi Pattern step 4 - final assembly and finishing

Switch Things Up

I love how easy it is to customize this clownfish by simply changing colors; swap orange for pastels to create a whimsical baby mobile.

For a larger version, I switch to bulky or aran weight yarn and a larger hook to make a plush, cuddle-sized fish.

I often add embroidered smiles or small felt cheeks to change the expression and give each fish a unique personality.

Try using safety eyes of different sizes or embroidered eyes for a softer, baby-safe toy option.

Make a set of fish in complementary colors to create an aquarium of little friends β€” mix stripes and solid bodies for variety.

I sometimes add metallic thread to a few stripes for a subtle shimmer that catches light and looks magical on a shelf.

If you want posable fins, add thin wire inside the fin pieces before closing for a playful, adjustable pose.

To make a keychain, use thinner yarn and a smaller hook to scale down the pattern, then attach a key ring to the top fin.

For a durable toy, securely back the safety eyes with extra washers or sew around them with matching yarn to prevent loosening.

I recommend experimenting with different stuffing levels: slightly firmer for display pieces, softer for baby toys to keep them squishy and cuddly.

Consider making tiny accessories like a sailor hat or a small crochet seaweed for display, giving each fish a little story or scene.

Common Mistakes & How to Fix Them

βœ— Skipping color changes cleanly can leave loose loops and messy joins; carry the yarn neatly or cut and weave ends immediately after each color change to keep stripes tidy. βœ— Forgetting to stuff gradually causes lumps and uneven shape; stuff in small increments while shaping to maintain a smooth, consistent body. βœ— Not counting stitches after increases or decreases leads to incorrect shaping; count your stitches at the end of each round especially after rounds with multiple increases or decreases. βœ— Attaching safety eyes too late can shift placement and distort the face; attach eyes between rounds specified (R5-R6) before heavy stuffing and secure tightly. βœ— Using a hook that is too large for Super Bulky yarn makes the fabric too open and stuffing visible; use the recommended hook size or go down one size for a tighter finish.

Clownfish (Nemo) Amigurumi Pattern

Create a charming clownfish amigurumi with this easy-to-follow pattern designed for crochet lovers. You will crochet the body from the bottom up and add bold stripes and dorsal fins for a playful look. The pattern uses super bulky yarn and clear color-change steps to make a fast, satisfying project you can gift or display. Perfect for practicing shaping, color changes, and simple finishing techniques.

Intermediate 2-3 Hours

Materials Needed for Clownfish (Nemo) Amigurumi Pattern

β€” Main Fabric

  • 01
    Super Bulky yarn (Category 6) - Orange (primary color), approximately 50-100g
  • 02
    Super Bulky yarn (Category 6) - Black (accent stripes), approximately 20-50g
  • 03
    Super Bulky yarn (Category 6) - White (accent stripes), approximately 20-50g
  • 04
    Fiberfill stuffing - small amount to firmly stuff body and tail
  • 05
    Plastic safety eyes 8mm (2 pieces) for eyes

β€” Tools Required

  • 01
    Crochet hook size 3.5mm (E)
  • 02
    Stitch marker
  • 03
    Sewing needle
  • 04
    Scissors
  • 05
    Hot glue gun (optional for securing eyes or details)
  • 06
    Yarn needle for weaving ends
  • 07
    Plastic safety eyes 8mm (2 pieces)
  • 08
    Polyester stuffing (fiberfill)

Progress Tracker

0% Complete

β€” Body :

Round 1 :

6 SC in an MR (6)

Round 2 :

6 INC (12)

Round 3 :

(SC, INC) 6 times (18)

Round 4 :

(2 SC, INC) 6 times (24)

Round 5 :

(3 SC, INC) 6 times (30)

Round 6 :

30SC (30)

Info :

Change to Black yarn

Round 7 :

30SC (30)

Info :

Change to White yarn

Round 8-9 :

30SC (30)

Info :

Change to Black yarn

Round 10 :

30SC (30)

Info :

Change to Orange yarn

Round 11 :

30SC (30)

Round 12 :

(3SC, DEC) 6 times (24)

Info :

Change to Black yarn

Round 13 :

24SC (24)

Info :

Change to White yarn

Round 14 :

24SC (24)

Round 15 :

(2SC, DEC) 6 times (18)

Info :

Change to Black yarn

Round 16 :

18SC (18)

Info :

Change to Orange yarn

Round 17 :

(SC, DEC) 6 times (12)

Info :

*Stuffing*

Round 18 :

Crochet 2 side together with 6SC

Round 19 :

Turn, 2CH, DC-INC 6 times (12)

Info :

Change to Black yarn

Round 20 :

Turn, CH, 12SC (12)

Info :

Weave in the yarn end and cut

β€” Dorsal Fins :

Dorsal Fin (P1) :

Part 1: Begin with Orange yarn (Make 2). Pick up the yarn from row 8, apart 8 stitch. Row 1: (Chains 1, HDC, 3DC, HDC) in one stitch (5). Change to Black yarn. Row 2: Turn, CH, 5SC (5). Weave in the yarn end and cut.

Dorsal Fin (P2) :

Part 2: Begin with Orange yarn. Pick up the yarn from R7 to R16, in the vertical line from head to tail. Row 1: (Chains 1, SC, 7DC, SC) in one stitch (9). Change to Black yarn. Row 2: Turn, CH, 9SC (9). Weave in the yarn end and cut.

Info :

Attach the eyes at R5-R6, apart 8 stitch

Assembly Instructions

  • Attach the safety eyes at rounds R5-R6, placing them 8 stitches apart and secure the back washers tightly.
  • Pick up and crochet dorsal fins as instructed, then weave in ends and position fins on the top and side of the body for symmetry.
  • Attach dorsal fin Part 1 pieces to the body where picked up from R8 (make 2) and secure with yarn tail or sewing needle, matching photos for placement.
  • Sew the two sides of the body together along the tail opening after stuffing, making sure stuffing is even and the tail shape forms naturally.
  • Weave in all yarn ends neatly on the inside and use hot glue sparingly for extra eye security if desired.

Important Notes

  • πŸ’‘Use stitch markers to mark the beginning of each round to avoid losing track when changing colors or counting rows.
  • πŸ’‘Stuff the body gradually through the opening so shaping stays smooth and avoid overstuffing which can distort stripes.
  • πŸ’‘Attach safety eyes before heavy stuffing to ensure correct placement and a stable finish.
  • πŸ’‘Weave in and secure color-change ends as you go to reduce bulk and keep stripes neat.

This adorable Clownfish pattern brings a splash of ocean charm to your handmade collection. 🐠 Worked in Super Bulky yarn, it crochets up quickly and makes a delightful gift or nursery decoration. 🧢 Enjoy the bold stripes and clever pick-up fin technique as you bring Nemo to life!

You ask,

we answer.

FAQs

What size will the finished piece be?

The finished amigurumi measures approximately 10-12 cm long when using Super Bulky yarn and a 3.5mm hook; size may vary with different yarn weights.

Can I use different yarn weights for this pattern?

Yes, you can use different yarn weights, but this will change the final size and density; choose an appropriate hook and expect more or fewer stitches per inch.

Do I need prior crochet experience for this pattern?

This pattern is rated intermediate and assumes familiarity with single crochet, increases, decreases, half double crochet and basic color changes.

How long does this project typically take to complete?

Most crocheters finish this project in 2-4 hours, depending on experience and whether you weave in ends as you go.