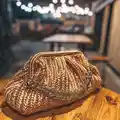
About This Clutch The Best Pattern
This pattern teaches you how to crochet a structured raffia clutch called "Clutch The Best" using a herringbone single crochet technique. You will work a flat canvas, shape and fold it, then join and finish the bag with a hidden clasp frame and chain. The instructions include measurements, gauge and practical tips for working with raffia yarn.

Perfect for creating a polished handmade accessory, the pattern includes full row-by-row directions and steaming/finishing tips. Suitable for intermediate crocheters comfortable with consistent tension and finishing techniques.
Why You'll Love This Clutch The Best Pattern
I absolutely love this pattern because it transforms simple raffia yarn into a very chic and structured clutch that looks professional. I enjoyed developing the loose herringbone single crochet rows which give the bag its distinctive texture and flexibility. I love that the pattern includes practical tips for straightening and steaming raffia — those small steps make a big difference in the final look. I also appreciate the clear folding and joining instructions which make assembling the bag straightforward and satisfying.
Switch Things Up
I love changing the look of this clutch by switching raffia colors to create a two-tone or striped version; try a contrasting trim for a modern twist.
I sometimes make the bag larger or smaller by adding or removing rows; to change size just add more chain foundation and increase the number of rows for a bigger clutch.
I find adding a fabric lining gives the bag extra structure and a neat interior finish — I often sew a simple cotton lining and slip it inside before attaching the frame.
For a softer, more casual version I will use a slightly bulkier raffia-style yarn and a larger hook to make a chunkier texture and bigger clutch.
I also like swapping the metal chain for a leather strap or wristlet loop for different carrying styles — they are easy to attach to the snap hook rings.
I sometimes embellish the flap or front with beads or a crocheted flower for a personalised look; small sewn details can make each bag unique.
If I want a structured top, I glue a thin strip of interfacing inside the fold before attaching the frame for extra stiffness and neat edges.
I recommend trying different clasp frame sizes to change the silhouette; a narrower frame gives a sleeker clutch while a wider frame produces more internal space.
I occasionally embroider a simple monogram on the inside before lining for a custom gift; use contrasting thread that complements the raffia tone.
If I want a more eco-friendly option, I choose recycled raffia substitutes and swap the metal hardware for wooden or plastic rings to reduce weight and make it travel-friendly.
Common Mistakes & How to Fix Them
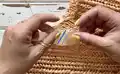
✗ Twisting the raffia while crocheting causes uneven stitches and tension; keep the yarn untwisted and facing the front side as instructed to maintain an even herringbone texture.
✗ Pulling loops too tight will make the canvas stiff and small; work the herringbone stitches very loosely and aim for the specified row width to match gauge.
✗ Not straightening or fluffing raffia before starting makes the yarn hard to work and uneven in appearance; steam or fluff the yarn as recommended to restore its shape before crocheting.
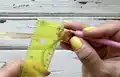
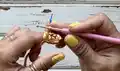
✗ Failing to glue and secure yarn ends with PVA when joining skeins will cause unraveling later; overlap the ends about 5 mm, glue with PVA, let dry, then wrap the thread lightly for strength.
✗ Skipping the steaming and clamping steps for folds will result in poor shaping; always steam the fold and clamp with a binder clip to get clean, stable edges.