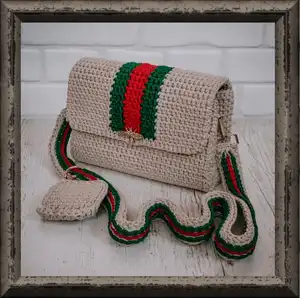
Make a stylish crocheted clutch with bold center stripes and a structured canvas body. This pattern walks you through creating the canvas, side panels, purse necklace, and a sturdy shoulder strap with clear step-by-step photos and instructions. Youll finish with hardware installation and neat finishing techniques for a professional result. Perfect for gifting or elevating your accessory collection.
Progress Tracker
0% Complete
— Canvas :
1 row :
Crochet 32 SC from the 2nd loop from the hook, CH. Insert the hook under loops on the wrong side of the chain.
Recommendation :
when crocheting SC, we pull the working thread just above the level of the loop.
Instruction :
Insert the hook in the last SC and pull out the end of the thread. Turn.
Instruction :
Crochet in the end of the thread in the next row.
2 row :
32 SC on the back loop only, CH. Turn.
3 row :
32 SC on the back loop of the previous row and the front loop of the pre previous row only, CH. Turn.
4 row :
32 SC on the back loop of the previous row and the front loop of the pre previous row only, CH. Turn.
5 row :
32 SC on the back loop of the previous row and the front loop of the pre previous row only, CH. Turn.
6 - 52 rows :
32 SC on the back loop of the previous row and the front loop of the pre previous row only, CH. Turn.
Info :
Divide the green skein into 2 skeins. Take the red skein and the 2nd ivory skein.
53 row :
(11 SC with the ivory cord, 3 SC with the green cord, 4 SC with the red cord, 3 SC with the green cord, 11 SC with the ivory cord) on the back loop of the previous row and the front loop of the pre previous row only, CH. Turn (32). Crochet SC with the thread of the next color before changing the color of the thread.
Info :
Place the ends and the working threads to back of the work.
54 - 112 rows :
(11 SC with the ivory cord, 3 SC with the green cord, 4 SC with the red cord, 3 SC with the green cord, 11 SC with the ivory cord) on the back loop of the previous row and the front loop of the pre previous row only, CH. Turn (32).
Info :
Tighten the ends between the stitches. Cut the ends, process with fire.
Info :
After 112 row, cut all threads, leaving the ivory cord.
113 row :
(1 Dec, 13 SC, 2 CH, skip two loops, 13 SC, 1 Dec) on the back loop of the previous row and the front loop of the pre previous row only, CH. Turn (30).
Info :
Place the ends to back of the work.
Instruction :
Hide the ends, process with fire.
114 row :
(1 Dec, 26 SC, 1 Dec) on the back loop of the previous row and the front loop of the pre previous row only, CH (28). Crochet SC over CH on the back loop only.
Instruction :
Don't turn the canvas. Insert the hook under the last SC, pull the loop. Crochet SlSt from left to right to the end of the row.
Info :
Cut the thread. Pull out the end. Tighten and hide the end. Process with fire.
— Side part (*2) :
Prepare :
Take the ivory cord. Crochet 11 CH.
1 row :
Crochet 10 SC from the 2nd loop from the hook, CH. Insert the hook under loops on the wrong side of the chain.
Instruction :
Insert the hook in the last SC and pull out the end of the thread. Turn. Crochet in the end of the thread in the next row.
2 row :
(1 Inc, 8 SC, 1 Inc) on the back loop only, CH. Turn (12).
3-24 rows :
12 SC on the back loop of the previous row and the front loop of the pre previous row only, CH. Turn.
25 row :
(4 SC, 4 SC through d-ring, 4 SC) on the back loop of the previous row and the front loop of the pre previous row only, CH. Turn (12).
26 row :
12 SC on the back loop of the previous row and the front loop of the pre previous row only, CH. Turn.
27 row :
12 SC on the back loop of the previous row and the front loop of the pre previous row only, CH. Don't turn the canvas.
Instruction :
Insert the hook under the last SC, pull the loop. Crochet SlSt from left to right to the end of the row. Cut the thread. Pull out the end. Tighten and hide the end. Process with fire.
Info :
Similarly crochet the 2nd side part.
— Assembly :
Prepare :
Take the piece of the ivory cord 39 inches (1 m) long.
Join :
Join the canvas and the right side part with the wrong sides. Insert the hook on both sides, over and pull out the thread. At the very beginning, make two stitches to secure the end of the thread.
Sew :
Next, make one stitch in each row. Try to capture two loops in each side.
Corners :
In the corners make three stitches in one place of the side part, and move one row along the canvas.
Finish :
At the end make two securing stitches. Pull out the ends to the wrong side, strengthen and hide both ends.
Install legs :
You can install the legs now. Count two rows from the fold and 2-3 SC from the sides. Insert the screw from the wrong side and fasten the leg with our hands. Then screw with small Phillips screwdriver.
Left side :
Next sew in the left side part. Take the piece of the ivory cord 39 inches (1 m) long. Join the left side part and the canvas with the wrong sides at the level of the right. Make two stitches to secure the end of the thread. Next, sew in the same way as the right side.
— Install the lock :
Top part :
Insert the top part of the lock in the hole.
Instruction :
Straighten the yarn from the wrong side, so that the canvas does not cover the holes.
Instruction :
Cover with the 2nd part of the top part of the lock on the wrong side.
Instruction :
Insert and tighten the bolts.
Lower part :
Close the valve and try on where the lower part of the lock should be. Insert this part in the middle of the canvas. In my example, 7 rows below the edge.
Instruction :
Put the holder on the back side on the antennae. Try to close the lock. Tighten the antennae, if everything is ok.
— Purse-necklace :
Prepare :
Take the ivory cord. Crochet 8 CH.
1 row :
7 SC from the 2nd loop from the hook, CH. Insert the hook under loops on the wrong side of the chain.
Instruction :
Insert the hook in the last SC and pull out the end of the thread. Turn. Crochet in the end of the thread in the next row.
2 row :
(1 Inc, 5 SC, 1 Inc) on the back loop only, CH. Turn (9).
3-12 rows :
9 SC on the back loop of the previous row and the front loop of the pre previous row only, CH. Turn.
13 row :
(1 Dec, 5 SC, 1 Dec) on the back loop of the previous row and the front loop of the pre previous row only, CH (7).
Instruction :
Don't turn the canvas. Insert the hook under the last SC, pull the loop. Crochet SlSt from left to right to the end of the row. Cut the thread. Pull out the end. Tighten and hide the end. Process with fire.
Join :
Similarly crochet the 2nd part. Don't cut the thread. Pull the loop, insert the 2nd part through the loop. Tighten the loop. Join two parts of the purse necklace with the wrong sides. Insert the hook in the top left corner. Pull the loop, crochet 1 CH. Crochet 3 SC in 1 through eyelet of the small snap hook.
Finish :
Next crochet 4 SC, 3 SC in 1, 7 SC, 3 SC in 1, 5 SC, 3 SC in 1. Cut the thread, pull out the end. Strengthen and hide the end. Process with fire.
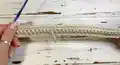
— Shoulder strap :
Prepare :
Take the ivory cord. Leave the end 27 1/2 inches (70 cm) long.
Attach :
Insert the hook through the eyelet of the snap hook, yarn over. Twist clockwise. Crochet CH.
Work :
Crochet 5 SC with the end of the thread. Pull out the end in the last loop.
Loop technique :
Insert the hook in the 1st SC, yarn over, pull the loop. Insert the hook in the 2nd, 3rd, 4th and 5th SC by turns, pull more 4 loops. There are 5 loops on the hook now.
Step 2 :
Yarn over, crochet 1st loop. There are 5 loops on the hook now.
Step 3 :
Yarn over, crochet 2 loops together. There are 4 loops on the hook now.
Step 4 :
Yarn over, crochet 2 loops together. There are 3 loops on the hook now.
Step 5 :
Yarn over, crochet 2 loops together. There are 2 loops on the hook now.
Step 6 :
Yarn over, crochet 2 loops together. One loop left on the hook.
Repeat :
Repeat 1-6 steps. Crochet to the required length of the handle, which is about 43 1/2 inches (1.1 m).
Adjust :
If your snap hook width is different, then you can crochet more or less number of the loops in the row.
Finish :
Crochet the last row through the 2nd snap hook. Cut the thread, pull out the end. Tighten and hide the end. Process with fire.
Stripe finish :
Take the red cord. Insert the hook in the middle of the strap, pull the loop. Crochet SlSt in each row along the entire length of the strap. Take the green cord. Insert the hook in the 2nd SC of the strap, pull the loop. Crochet SlSt in each row along the entire length of the strap. Insert the hook in the 4th SC of the strap, pull the loop. Crochet SlSt in the each row along the entire length of the strap. Crochet in the D-ring at a distance of 8 inches (20 cm) from the snap hook.
This lovely striped clutch pattern helps you craft a polished, boutique-style accessory from cord and simple stitches. The structured canvas and hardware make it durable and elegant, perfect for everyday use or special occasions. Make one for yourself or gift a handmade statement piece! 🧶✨