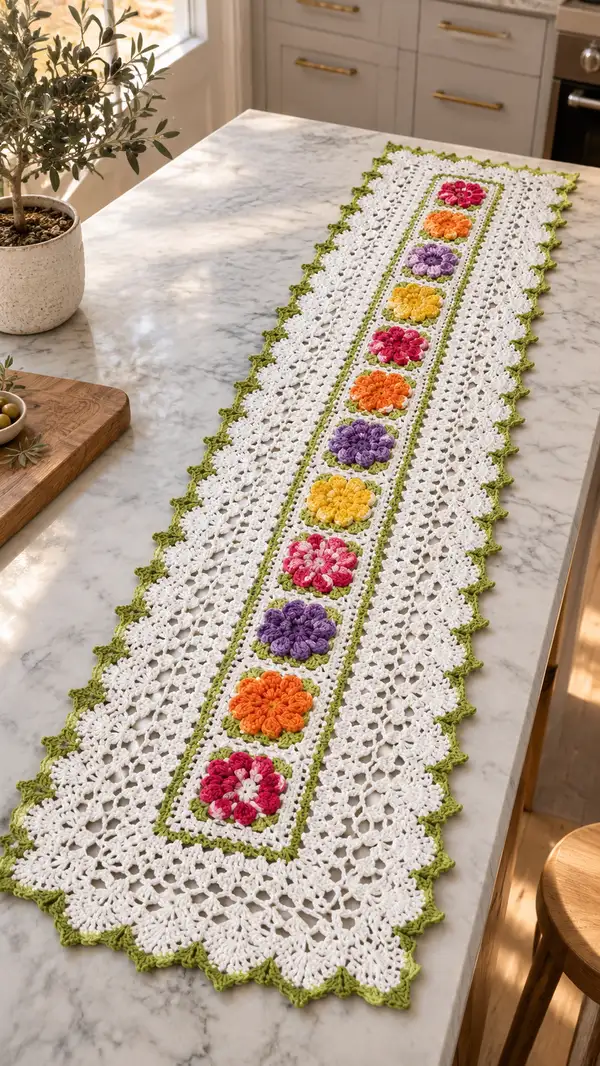
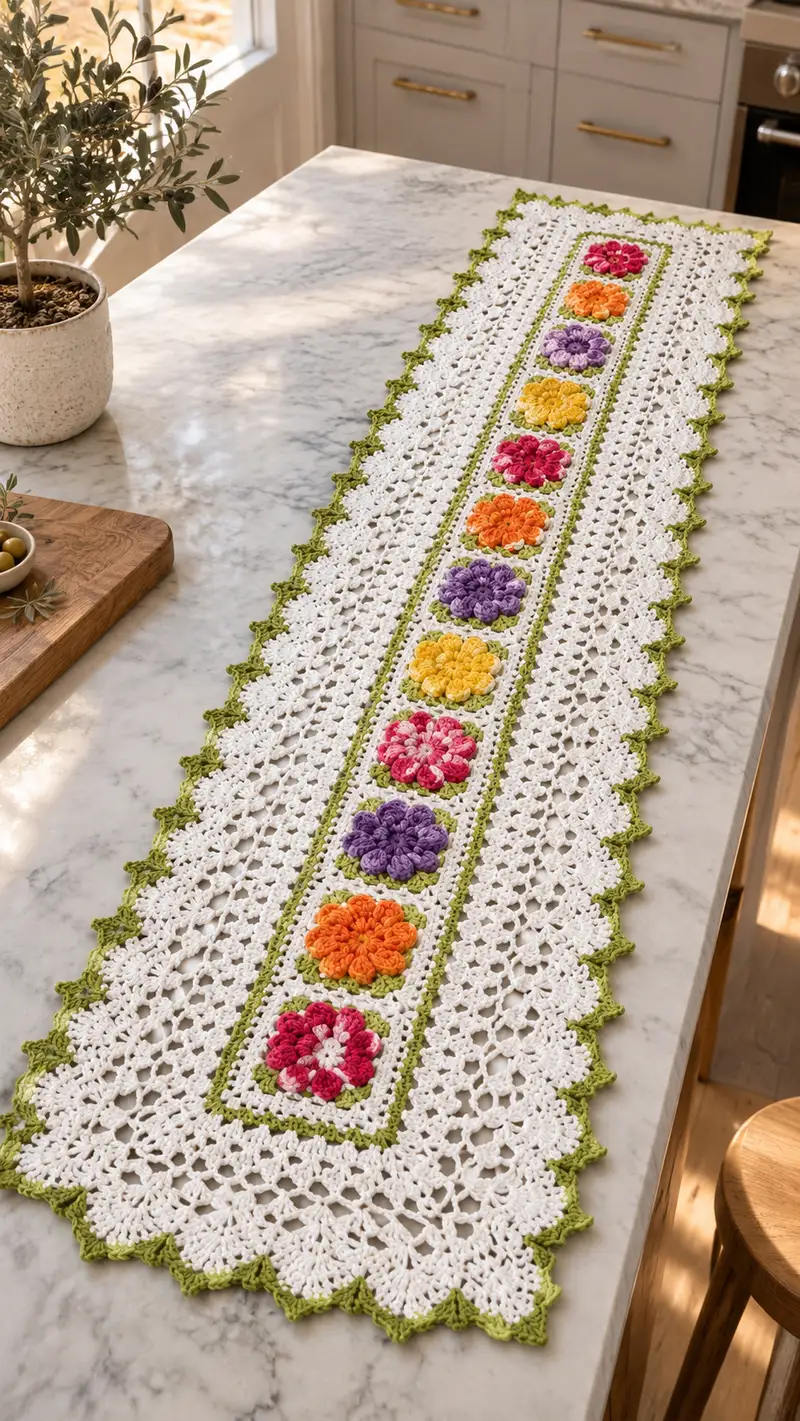
A long, lacy white table runner with a central strip of eight raised floral square motifs in bright pink, orange, yellow and purple, trimmed in fresh green. The runner blends classic granny-lace stitches with 3D puff petals for a tactile centerpiece. Designed to sit along a kitchen island or dining table, it brings spring color and delicate texture to any surface. Clear step-by-step instructions guide you through motifs, joining, lacy side panels and scalloped edging.
Progress Tracker
0% Complete
— Notes & Gauge :
Info :
Gauge is not critical for the runner but for consistent size you should have approximately 10 dc x 6 rows = 4" in pattern stitch when using 4.0mm hook and specified yarn. Adjust hook size to match tension. Work motifs flat and block to match dimensions before joining.
Info :
Definition: puff = yarn over, insert hook into indicated stitch, pull up a loop; repeat 4 more times (so you have 6 loops on hook), yarn over and pull through all loops, ch1 to close puff. Puff counts as one stitch. Use a consistent number of loops for each puff and use same tension for every puff.
— Flower Motif (Make 8) :
Info :
Each motif is a square with a raised 3D puff flower center and a green corner-start frame to help visually join into the central strip. Make 8 motifs in alternating flower colors. Work each motif starting with flower color for petals, then switch to green for corner blocks, then white for the square frame.
Round 1 :
With flower color, ch 2 and make 8 sc into a magic ring (8)
Round 2 :
2 sc in each st around (16)
Round 3 :
(1 sc, inc) x 8 (24)
Round 4 :
1 sc in each st around (24)
Info :
Round 4 creates a small base for the puff petals. Keep these rounds tight as the puff stitches rely on a firm base.
Round 5 :
*Ch1, make a puff in next st, ch1, skip next st* repeat to make 8 puff petals around. Finish with sl st to first puff base (24 counting each puff as one cluster)
Info :
Make every puff by inserting hook into the stitch, pull up loop, repeat 4 more times (total 6 loops on hook), yo and draw through all loops, ch1. Puff counts as one stitch. Keep petals evenly spaced. After finishing the 8th puff, join tidy with a sl st to base ch1 or first sc.
Round 6 :
Switch to contrast (small white or cream) for tiny center jewel (optional). Ch1, 1 sc in each puff base and in each ch1 space around (24)
Round 7 :
Change to Leaf Green. Ch3 (counts as dc), *ch1, dc into next st* around to create a small lacy halo. Join with sl st to top of ch3 (24)
Info :
Green round helps corners form and gives a visual connecting color for joining later. Carry or fasten off as preferred, but leave a 12-15" tail for weaving if you will join by sewing.
Round 8 :
With Leaf Green, (sc, ch3, sc) into every 6th stitch around to form 8 corner ch-spaces. Arrange repeats evenly: (3 sc, ch3, 3 sc) pattern around to create square shaping. End with sc to close - work adjustments to keep square shape (approx 32 sts plus 8 ch-sps)
Round 9 :
Change to White. Work into ch3 corner spaces and between sets as follows: In each corner ch3: (2 dc, ch2, 2 dc) (creates corner shell). Between corners work: *ch3, skip 3 sts, sc in next st, ch3* to create edge chain spaces. Keep even repeats to maintain a square that measures roughly 4.5" across before blocking.
Info :
At this stage the motif starts to square up. Block each motif flat to the same dimensions (measure across). If you prefer a larger frame, continue additional rounds of granny-lace in white before joining.
Round 10 :
With White, around entire square work: *sc evenly in each dc and sc row edge, ch3 between groups to create mesh*, aiming to end with 48 even edge counts. This round evens the square border and prepares for larger joining rounds (approx 48 sts including chain-spaces).
Round 11 :
With White, (ch3, dc) in each ch3 space along sides, and (2 dc, ch2, 2 dc) in corners. Work evenly to expand square to approximately 6" square before blocking (count 4 dc clusters per side with chain-sps between).
Round 12 :
With White, 1 sc in each stitch around working into tops of dc and into ch-spaces as follows: sc along side evenly, work (sc, ch3, sc) in each corner ch2 to square up. End with sl st. (Final count depends on side expansion; aim for even counts to match other motifs)
Info :
Fasten off leaving 12-15" tail if you plan to join motifs by sewing. Repeat these 12 rounds to make a total of 8 motifs. Block each motif square to uniform dimensions before joining. Use blocking pins and a light spray or wet-block method suited to your yarn.
— Joining Motifs into Central Strip :
Info :
Arrange 8 motifs in a straight strip with the green corners oriented to form continuous green border along the short edges of each square. You can join motifs either by whip stitch using tails or by a one-row join-as-you-go method described below. We describe the Join-As-You-Go (JAYG) round that simultaneously joins and frames motifs.
Join Round 1 :
With White, join to the side of motif 1 at a mid-side st. Ch1, 1 sc in same st and along edge to next corner, (sc, ch3, sc) in corner. Continue along the side until you reach the adjacent motif edge; when you reach a matching side stitch on motif 2, sl st into motif 2 to join, then continue working along motif 2 edge, sc evenly, joining where edges meet with sl st every 6-8 stitches to secure. Continue to join motifs 1-8 in this way forming one long strip. Count: each side connection uses sl st joins at even intervals; total working stitches vary by motif size.
Info :
Use pins to align motif edges, ensuring petals align and green corner blocks form continuous green chain. Keep join tension loose enough for a flat seam — not so tight that motifs pucker.
Join Round 2 :
Work a Round of sc in White around the entire assembled strip to create a uniform edge for attaching the lacy panels: 1 sc in each exposed edge stitch and 3 sc in corner ch3 spaces. Work evenly so the strip edge measures flat. (st count varies with motif expansion.)
Info :
After this round the strip should feel like a continuous panel with neat edges. Block the joined strip flat before continuing to the side lacy panels. This helps the lace panels join smoothly.
— Side Lacy Panels (Work Each Side, Mirror) :
Info :
The runner has wide lacy panels on both sides of the central motif strip. These are worked directly onto the strip edge. Work one side fully, then mirror for the opposite side. The lacy panel uses repeating shell and chain-space rows to create an open, airy backdrop. The panels will be worked in White.
Round 1 :
With White, join at a short side of the central strip corner. Ch4 (counts as tr), 2 tr into same sp, *ch3, skip 3 sts along strip edge, (3 tr) into next sp* repeat along edge until you reach the opposite corner, finish (2 tr, ch4) in corner. This creates the first shell foundation for the full side. (Count will vary but maintain consistent shells along the length.)
Round 2 :
Turn and ch3, dc into the top of the first tr, *ch3, skip ch3 sp, (3 dc) into center of next shell* across. At corners work (2 dc, ch2, 2 dc). Join with sl st. This gives a row of solid dc shells separated by chain arches.
Round 3 :
Ch1, sc across the tops of dc and into ch-arches as follows: sc in each dc and 3 sc into each ch3 arch to widen the spaces. This evens the edge and preps for another lacy row.
Round 4 :
Ch4 (counts as tr), *skip 2 sc, (2 tr, ch2, 2 tr) into next sc to form shell*, repeat across, finishing corner with symmetrical shell to square up. This expands panel outwards from the central strip. The panel should now be noticeably wider.
Info :
Work the first four rounds carefully and block before continuing. These initial rounds determine panel alignment and width. If you desire a narrower panel, omit Round 4 or reduce repeats.
Round 5 :
Ch3, dc into each st and into ch2 corners, but make 3 dc clusters into the shell centers to accent the lacy pattern. Between each cluster ch5 and work a dc cluster into the next shell center. This begins forming the triangular lacy motif that repeats.
Round 6 :
Ch1, sc across the row working 3 sc into chain-5 arches to anchor. Work evenly. This round should have consistent counts across the width. Count and make sure you have matching numbers of arches for next row.
Round 7 :
Ch5, skip first sc and work sc into next sc, *ch3, skip next 3 sc, shell (2 dc, ch2, 2 dc) into next sc* across. This adds a diamond-like openwork pattern. Keep repeats symmetrical; you should see an expanding lace where rows form triangles pointing away from the center strip.
Round 8 :
Repeat Round 3 style: sc row stabilizing the arches. Work 2 sc into each small arch and 3 sc into each larger arch to keep tension even. This secures the shapes before more expansion.
Info :
At this point check the width of the panel. The photo shows a fairly broad border; for a proportional look make 10-14 repeats of these 4-5 row lace sets on each side (see repeats below). Each repeat set increases panel width by roughly 0.5-0.75" depending on yarn and tension.
Rounds 9-28 (Repeat Pattern) :
Repeat Rounds 4-8 four times (or until you reach desired width) increasing shell counts evenly across each repeat. Each cycle adds a band of lacy space. Work rows in this sequence: Expand-shell round, dc cluster round, sc stabilization round, arch/shell round, sc stabilization round. Aim to reach approximately 6.5" to 7.5" from strip edge to outer edge on each side for an island-width runner. (Do equal repeats for both sides of the strip.)
Info :
Place stitch markers at outer-most points on a sample row to ensure both side panels will mirror each other. Use these markers to match repeats when you begin the opposite side.
Round 29 :
After final lace repeat, work one round of 1 sc in each stitch around entire side panel edge to even the edge and prepare for the outer scalloped border. Insert extra sc in corners as needed (3 sc in corner spaces) to keep the panel flat.
Round 30 :
Ch1, sc across, and place a stitch marker every 10 sc to help count base stitches for scallop placement. You will use these markers to position scallops evenly around the entire runner edge, including across motif ends and corners.
Info :
Repeat full Side Lacy Panel sequence on the opposite side of the central strip, mirroring each round exactly. When both sides are completed and blocked, ensure both outer edges are even and the runner lays flat before proceeding to the outer scalloped border.
— Outer Green Scallop Border :
Info :
The scallop edging is worked in Leaf Green to frame the runner and echo the small green corners around each motif. Work a continuous border around the entire runner, starting from a corner and working around the long sides and across the short ends.
Round 1 :
Join Leaf Green at an outer point. Ch1, sc evenly across outer edge stitch counts. Work 1 sc in each sc around; place 3 sc in corner spaces. This base round evens the outer edge for scallop placement. Count total stitches around — this is your base number for scallop placement. (Example: if each long side has 180 sc and each short end 20 sc, total base ~400 sc.)
Round 2 :
*Ch3, skip 2 sc, sc in next sc* repeat around. This establishes small arches that will host the scallops. Adjust spacing to make an even number of arches around the runner so scallops are symmetric.
Round 3 :
Scallop round: In each ch3 arch work: (sc, hdc, 3 dc, hdc, sc). Work (sc, hdc, 3 dc, hdc, sc) into every ch3 space around to create full scallops. When reaching corners, work scallop into corner space and insert an extra sc into seam to maintain flatness.
Info :
Each scallop uses 7 stitches across and sits centered on the ch3 arch. If arch counts didn't divide evenly by scallop repeat, slightly shift the first and last scallop of the side so the corners have symmetrical scallop spacing. Use pins to block scallops into shape while wet or using steam.
Round 4 :
Optional picot highlight: With Leaf Green, sl st into center dc of each scallop, ch3, sl st in same st to make a tiny picot. Repeat across scallops for a delicate pointed finish. Fasten off and weave in ends neatly.
Info :
If you prefer a double-colour scallop, work one contrasting sc round in white between the base sc round and the green scallops. This adds a tidy white band between lace and green edge, similar to the photo where a narrow green band frames the central motifs.
— Finishing Rounds & Blocking :
Round 1 :
Weave in all loose ends using tapestry needle. For all color changes and tail-ends, weave back and forth at least 4 times through yarn strands inside fabric and trim. Make sure no tails are left that will show from front side.
Info :
Block the completed runner by dampening the finished piece and stretching it to required shape on blocking mats. Pin scallops and outer lace points to open the pattern fully. Allow to dry completely before removing pins.
Round 2 :
Final inspection: Check all joins and seams. If motifs separate slightly, add a hidden mattress stitch through the squares from the wrong side to stabilize. Remove any protruding ends; if necessary, add a few reinforcement stitches in green along the long central seam to keep the strip flat.
Info :
Your runner is now complete. Gently steam any remaining unevenness and press on low setting with protective cloth if using cotton-blend yarn. Store flat to preserve scalloped border shape.
— Optional Variation: Wider Runner or Tablecloth :
Info :
To make a wider runner, add additional motifs in rows on either side of the central strip and fill gaps with extra lacy panels using the same repeat pattern. For a short table-length version, reduce motif count (for example 4-6 motifs) and proportionally reduce lace repeats.
Info :
You may also swap bloom colors or create an ombre effect along the central motifs. For a subtler look, use tone-on-tone pastels for the petals and a soft sage green for the edging.
You've created a cheerful, sophisticated table runner that mixes playful 3D flowers with elegant lace — a perfect handmade centerpiece for family meals and special occasions. The raised puff petals and soft scalloped edging add charming texture, while the bright colors bring seasonal cheer. Enjoy the satisfaction of a project that blocks beautifully and shows off your crochet skills. 🧶🌸 Share a photo of your finished runner — I'd love to see your color choices! 🎉