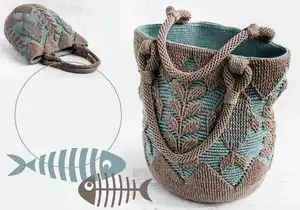
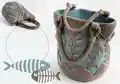
Make a beautiful Corfu Bag with textured embossed crochet stitches and contrasting colors. This pattern guides you through a DK-weight crochet tote with a round bottom, embossed leaf motifs, reinforced upper edge, and spiral cord handles. You will get clear step-by-step rounds, charts, and photo instructions to help you complete a stylish, durable bag you'll be proud to carry.
Progress Tracker
0% Complete
— Bag bottom :
Info :
Optional oblong bottom: refer to complete instructions on page 21 and continue from Round 27 for the bag. Chart 1 on p.5. Note: In this section the bag bottom is made entirely with front post stitches, so they are not highlighted.
Inc Rnd 1 :
with Yarn2 ch4, ss in 1st ch, ch2 (counts as dc), 8dc (make them as short as possible) in ch4-ring, ss in 2nd ch of beg ch-2. (9dc)
Inc Rnd 2 :
ch2 (doesn't count as st throughout bag bottom), F2i (in beg ch-2 from pr), 8 F2i, sk ch-2 (throughout bag bottom), ss (in 1st F throughout bottom). (18F)
Inc Rnd 3 :
ch2, F2i (in 1st F from pr (ignore ch-2) throughout bottom), F, [F2i, F]x8, ss. (27sts)
Inc Rnd 4 :
ch2, [2F, F2i]x9, ss. (36sts)
Inc Rnd 5 :
ch2, [F2i, 3F]x9, ss. (45sts)
Inc Rnd 6 :
ch2, 2F, [F2i, 4F]x8, F2i, 2F, ss. (54 sts)
Inc Rnd 7 :
ch2, 4F, [F2i, 5F]x8, F2i, F, ss. (63sts)
Inc Rnd 8 :
ch2, [6F, F2i]x9, ss. (72sts)
Inc Rnd 9 :
ch2, [F2i, 7F]x9, ss. (81sts)
Inc Rnd 10 :
ch2, 2F, [F2i, 8F]x8, F2i, 6F, ss. (90sts)
Inc Rnd 11 :
ch2, 4F, [F2i, 14F]x5, F2i, 10F, ss. (96sts)
Inc Rnd 12 :
ch2, 6F, [F2i, 15F]x5, F2i, 9F, ss. (102sts)
Inc Rnd 13 :
ch2, 8F, [F2i, 16F]x5, F2i, 8F, ss. (108sts)
Inc Rnd 14 :
ch2, 10F, [F2i, 17F]x5, F2i, 7F, ss. (114sts)
Inc Rnd 15 :
ch2, 12F, [F2i, 18F]x5, F2i, 6F, ss. (120sts)
Inc Rnd 16 :
ch2, 14F, [F2i, 19F]x5, F2i, 5F, ss. (126sts)
Inc Rnd 17 :
ch2, 16F, [F2i, 20F]x5, F2i, 4F, ss. (132sts)
Inc Rnd 18 :
ch2, 18F, [F2i, 21F]x5, F2i, 3F, ss. (138sts)
Inc Rnd 19 :
ch2, 20F, [F2i, 22F]x5, F2i, 2F, ss. (144sts)
Inc Rnd 20 :
ch2, 22F, [F2i, 23F]x5, F2i, F, ss. (150sts)
Inc Rnd 21 :
ch2, [24F, F2i]x6, ss. (156sts)
Inc Rnd 22 :
ch2, [F2i, 38F]x4, ss. (160sts)
Inc Rnd 23 :
ch2, 2F, [F2i, 39F]x3, F2i, 37F, ss. (164sts)
Inc Rnd 24 :
ch2, 4F, [F2i, 40F]x3, F2i, 36F, ss. (168sts)
Inc Rnd 25 :
ch2, 6F, [F2i, 41F]x3, F2i, 35F, ss. (172sts)
Inc Rnd 26 :
ch2, 8F, [F2i, 42F]x3, F2i, 34F, with Yarn1 ss. (176sts)
Info :
Mark stitches for making B3i: pm in 1st F of Rnd 26, [sk 21F, pm in next F]x7 (21F rem to 1st F). (176sts)
— Bag sides :
Info :
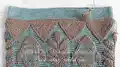
Chart 2 on next page. Written instructions do not remind you to switch yarn. Make highlighted stitches with Yarn2, all other stitches with Yarn1. See Special stitches and abbreviations on p.4 and General rules for embossed crochet on p.4.
Rnd 27 (RS) :
with Yarn1 ch2 (counts as 1st B of B3i), shallow B2i in 1st F from pr (counts as 2nd and 3rd B of B3i), [*F2t, 17F, F2t*, shallow B3i]x7, rep bet *'s, ss in 2nd ch of beg ch-2.
Rnd 28 :
ch2 (counts as 1st B of B2i), B in same st (in ch-2 from pr; counts as 2nd B of B2i), [*B, B2i, F2t, 15F, F2t*, B2i]x7, rep bet *'s, ss in 2nd ch of beg ch-2.
Rnd 29 :
ch2 (counts as 1st B of B2i), B in ch-2 from pr (counts as 2nd B of B2i), [*3B, B2i, F2t, 13F, F2t*, B2i]x7, rep bet *'s, ss in 2nd ch of beg ch-2.
Rnd 30 :
ch2 (counts as 1st B of B2i), B in ch-2 from pr, [*2B, F, 2B, B2i, F2t, 11F, F2t, B2i, 5B, B2i, F2t, 11F, F2t*, B2i]x3, rep bet *'s, ss in 2nd ch of beg ch-2.
Rnd 31 :
ch2 (counts as 1st B of B2i), B in ch-2 from pr, [*3B, F, 3B, B2i, F2t, 9F, F2t, B2i, 7B, B2i, F2t, 9F, F2t*, B2i]x3, rep bet *'s, ss in 2nd ch of beg ch-2.
Rnd 32 :
ch2 (counts as B), [*4B, F3i, 5B, F2t, 7F, F2t, B2i, 9B, B2i, F2t, 7F, F2t*, B]x3, rep bet *'s, ss in 2nd ch of beg ch-2.
Rnd 33 :
ch2 (counts as B), [*2B, B2t, F2i, hdc bet F's, F, hdc in bet F's, F2i, B2t, 3B, F2t, 5F, F2t, B2i, F, 9B, F, B2i, F2t, 5F, F2t*, B]x3, rep bet *'s, ss in 2nd ch of beg ch-2.
Rnd 34 :
ch2 (counts as B), [*B, B2t (2nd leg in 2 posts), 2 F2i, B in hdc, F, B in hdc, 2 F2i, B2t (1st leg in 2 posts), 2B, F2t, 3F, F2t, B2i, B, F2i, B2t, 5B, B2t, F2i, B, B2i, F2t, 3F, F2t*, B]x3, rep bet *'s, ss in 2nd ch of beg ch-2.
Info :
Shift beg of rnd next to the embossed element to minimize visibility of ch-2 at the beg of each round: turn to WS, 7 ss (in prev 7sts: F, 4B, B2i), turn.
Rnd 35 :
ch2 (counts as B), [*B2t (2nd leg in 2 posts), F2i, 3F, B2i, F, B2i, 3F, F2i, B2t (1st leg in 2 posts), B, F2t, F, F2t, B2i, 2B, 2 F2i, B2t (1st leg in 2 posts), B3t, B2t (2nd leg in 2 posts), F2i, 2B, B2i, F2t, F, F2t*, B]x3, rep bet *'s, ss in 2nd ch of beg ch-2.
Rnd 36 :
ch2 (counts as B), [*B (in 2 posts), 5F, B2i, B, F, B, B2i, 5F, 2 B (1st in 2 posts), F3t (1st and 3rd legs in 2 posts), B2i, 3B, F2i, 3F, B3t (1st and 3rd legs in 2 posts; 2nd leg in 3 posts), 3F, F2i, 3B, B2i, F3t (1st and 3rd legs in 2 posts)*, B]x3, rep bet *'s, ss in 2nd ch of beg ch-2.
Rnd 37 :
ch2 (counts as B), [*B, F2t, F, F2t, B2i, 2B, F3i, 2B, B2i, F2t, F, F2t, 2B (finish with Yarn1), with Yarn2 F (in 3 posts of F3t) and finish with Yarn1, 4B, B2i, 4F, F3t (2nd leg in 3 posts), 4F, B2i, 4B (finish last B with Yarn1), with Yarn2 F (in 3 posts); finish with Yarn1*, B]x3, rep bet *'s, ss in 2nd ch of beg ch-2.
Video Part 8 Rnds 38, 39 :
https://youtu.be/ivDW6bsuTHU
Rnd 38 :
ch2 (counts as 1st B of B2i), B in same st (in 1st B after F from pr; counts as 2nd B of B2i), [*8B (6th in F; finish last B with Yarn1), with Yarn2 F3t (1st and 3rd legs in 2 posts; finish with Yarn1), 4B, F2i, hdc in bet F's, F, hdc in bet F's, F2i, 4B and finish last B with Yarn1, with Yarn2 F3t (1st and 3rd legs in 2 posts), 8B (3rd in F), B2i, 3F, F3t (2nd leg in 3 posts), 3F*, B2i]x3, rep bet *'s, ss in 2nd ch of beg ch-2.
Rnd 39 :
ch2 (counts as 1st B of B2i), B in same st (in ch-2 from pr), [*B2i, 9B (last is shallow B in F3t), 2 B2t, 2 F2i, B in hdc, F, B in hdc, 2 F2i, 2 B2t, 4B (1st is shallow B in F3t), F2i, F, F2t (1st leg in next F, sk B2t, 2nd leg in next F), F in same st as 2nd leg of prev F2t, 12F, F2t (1st leg in same st as last of 12F, sk B2t, 2nd leg in next F), F, F2i*, B]x3, rep bet *'s, ss in 2nd ch of beg ch-2.
Rnd 40 :
ch2 (counts as 1st B of B2i), B in same st (in ch-2 from pr), [*10B, B2t, B2t (both legs in 2 posts), F2i, 3F, F2t, 3F, B2i, F, B2i, F2i, B2t (both legs in 2 posts), B2t, 10B, B2i, F3t (1st and 3rd legs in 2 posts; 2nd leg in 3 posts)*, B2i]x3, rep bet *'s, ss in 2nd ch of beg ch-2.
Rnd 41 :
ch2 (counts as 1st leg of B2t), B in 1st B after ch-2 from pr (counts as 2nd leg of B2t), [*10B, B2t (both legs in 2 posts), 5F, B2i, B, F, B, B2i, 5F, B2t (both legs in 2 posts), 10B, B2t, F3i (in 3 posts)*, B2t]x3, rep bet *'s, sk ch-2, ss in 1st B.
Rnd 42 :
ch2 (counts as 1st leg of B2t), B in 2nd B after ch-2 from pr (counts as 2nd leg of B2t), [*10B (last in 2 posts), F2t, F, F2t, B2i, 2B, F3i, 2B, B2i, F2t, F, F2t, 10B (1st in 2 posts), B2t (2nd leg in 2 posts), F2i, F, F2t*, B]x3, rep bet *'s, sk ch-2, ss in 1st B.
Rnd 43 :
ch2 (counts as 1st leg of B2t), B in 2nd B after ch-2 from pr (counts as 2nd leg of B2t), [*9B and finish last st with Yarn1, with Yarn2 F3t (1st and 3rd legs in 2 posts) and finish with Yarn1, 4B, F2i, hdc in bet F's, F, hdc in bet F's, F2i, 4B and finish last st with Yarn1, with Yarn2 F3t (1st and 3rd legs in 2 posts) and finish with Yarn1, 9B, B2t (2nd leg in 2 posts), F2i, 3F, F2i*, B2i]x3, rep bet *'s, ss in 2nd ch of beg ch-2.
Rnd 44 :
ch2 (counts as 1st leg of B2t), B in 2nd B after ch-2 from pr (counts as 2nd leg of B2t), [*9B (last is shallow B in F3t), 2 B2t, 2 F2i, B in hdc, F, B in hdc, 2 F2i, 2 B2t, 6B (1st is shallow B in F3t), B2i, F and finish with Yarn1, fish stripe: with Yarn1 F2i, 3 F, F2i, and finish with Yarn2, F*, B2i]x3, rep bet *'s, ss in 2nd ch of beg ch-2.
Rnd 45 :
ch2 (counts as 1st leg of B2t), B in 2nd B after ch-2 from pr...
Infos :
Rounds 45 through 69 continue in similar embossed patterning with fish stripes noted: where instruction indicates 'fish stripe: with Yarn1 XF and finish with Yarn2' switch colors accordingly. Refer to chart 2 for exact placement for Rnds 26-86 and corresponding video parts for complex stitch techniques.
— Upper edge backing :
Info :
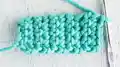
To achieve consistent gauge throughout the pattern, 16 sts are decreased in order to align the gauges of sc blo and F stitches.
Dec Rnd 70 :
ch1 (doesn't count as st), sc blo in same st, [*3 sc blo, sc2tog blo, 8 sc blo, sc2tog blo*, 5 sc blo]x7, rep bet *'s, 4 sc blo, ss blo in 1st sc. (144sts)
Rnd 71-86 :
ch1 (doesn't count as st), sc blo in same st, 143 sc blo, ss blo in 1st sc. Fasten off after Rnd 86. (144sts)
— Reinforcing upper edge backing with buckram :
Info :
Measure and cut interfacing to approximately 7cm x 80cm. Turn bag inside out, apply buckram to wrong side of the upper edge backing, overlap short edges, baste and stitch. Use zig-zag or stretchable stitch to secure interfacing. Finally fold backing and hand-stitch edge to wrong side if not adding lining.
— Handles :
Handle attaching strip (x4) Row 1 (RS) :
Locate 8 middle sts of Round 69 positioned above any fish, join Yarn2 in front cord, making strip as instructed in photos: see Flat part to attach strap to D-ring and handle attaching strip instructions. Work single crochet rows as described in photo steps and leave 20cm / 8" tail for seam.
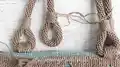
Spiral cord handles (x2) :
With Yarn2 leave 30cm/12" tail, make 78cm / 30 3/4" long 8-sts spiral cord starting with one 4sc-row (video shows 10 rows). Fasten off leaving 30cm /12" tail. Measure while cord is fully stretched. Insert optional non-stretchable tape to prevent excessive stretch.
Loop at the end of spiral cord handle (x4) :
Measure and mark distance of 15cm / 5 7/8" from each end of the handle. Create loop and cover with loop seam cover as instructed in photos and video. Thread tapestry needle with 30cm /12" tail and sew border row to marked spot on the cord; weave in tail.
Loop seam cover :
With Yarn2 ch14 and work 9 rows of slip stitch rib. Fasten off leaving 30cm/12" tail. Thread tapestry needle with the tail and position the strip over the loop seam. Secure seam by tying off and weaving in tails.
Attach handles to the bag (x4) :
Insert handle attaching strip into the loop at the end of the handle ensuring loop seam cover faces inner side of bag. Thread tapestry needle with 30cm/12" tail from the strip. Fold strip to WS and sew each stitch at the edge of the strip securely to both loops of one of the 8 stitches from which the strip was started (picture 7). Secure seam by tying off and weave in loose tail. Repeat 4 times.
Optional lining :
Measure finished bag, add seam allowances. Stitch sides together from upper edge to 5cm/2" mark, overcast the upper edge, press and edgestitch, insert drawstring into 2cm /3/4" slit at bottom, tuck lining under bag's upper edge backing and hand-stitch to wrong side using small invisible stitches.
This Corfu Bag pattern combines embossed texture, strong construction, and beautiful color contrast to create a tote you'll love to use every day. It includes charts, videos, and step-by-step photos to guide you through complex stitches and assembly. Make a reinforced upper edge and spiral cord handles for a professional finish — a true handmade treasure. 🧶✨👜