🧢 Beautiful ✨ Detailed πŸ’ Adorable

Cowboy Cat Hat Pattern

Cowboy Cat Hat Pattern
4.3β˜… Rating
1-2 Hours Time Needed
3.3K Made This
βœ‚οΈ

Intermediate Level

Ideal for those with basic crochet experience, featuring slightly more advanced stitches and techniques to expand your skills.

⏱️

Quick Make

Complete in under 2 hoursβ€”lightning fast fun for instant gratification and quick gifts.

πŸ‘’

Casual Chic

Relaxed style with a modern twist, perfect for everyday wear while maintaining that handcrafted uniqueness.

About This Cowboy Cat Hat Pattern

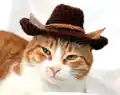
This pattern creates a small cowboy hat designed to fit adult cats (approximately 7-15 lbs) and toy or miniature dogs. The hat is worked top-down in the round with strategically placed ear holes and a turned-up brim for the cowboy silhouette. It uses two yarn weights for the body and decorative band, and includes finishing tips to create the classic indent and pinched sides.

Cowboy Cat Hat Pattern crochet pattern - detailed view of completed project

Includes full round-by-round instructions, a simple tan band, and optional chin straps for extra security. Photographs and notes clarify placement and finishing for a polished, wearable result.

Why You'll Love This Cowboy Cat Hat Pattern

I absolutely love this pattern because it transforms simple stitches into a playful, wearable accessory for pets that brings smiles. I enjoy how quickly the hat comes together while still offering fun shaping with the ear holes and brim. The small size and minimal materials make it perfect for quick gifts or a last-minute costume addition. I also love that the finishing options let you customize how permanent or removable the cowboy look becomes.

Cowboy Cat Hat Pattern step 1 - construction progress Cowboy Cat Hat Pattern step 2 - assembly progress Cowboy Cat Hat Pattern step 3 - details and accessories Cowboy Cat Hat Pattern step 4 - final assembly and finishing

Switch Things Up

I love how easy it is to customize this hat by changing colors β€” you can swap the brown body for bright or pastel shades to suit any mood.

I often use bulky yarn for a chunkier, softer brim and switch to worsted for the band to add contrast.

I sometimes make the hat larger by using a thicker hook and more rounds before creating ear holes to fit larger dogs.

To create a miniature keychain or doll hat, I use fingering yarn and a much smaller hook for a tiny, detailed version.

I add embellishments like little studs, a crocheted star, or embroidery on the tan band to personalize each hat.

I also experiment with brim shape by adding an extra round or two of increases to make a wider brim for a more dramatic look.

For a more secure fit on squirmy pets, I sew a soft ribbon inside the band or attach Velcro tabs under the chin straps.

I sometimes line the band with felt for added structure and to keep it from stretching out over time.

I recommend trying different yarn textures β€” boucle or faux fur trims can make a novelty western-inspired hat that stands out.

I encourage you to test-ch it and make small adjustments to ear hole spacing so it sits comfortably over your pet's ears for the best fit and look.

Common Mistakes & How to Fix Them

βœ— Skipping the magic ring or making a loose starting circle can create an uneven top; form a tight magic ring and pull it closed before continuing. βœ— Forgetting to work continuously in the round through Round 9 will misplace ear holes; do not slip stitch to join until Round 9 as noted. βœ— Miscounting stitches after increases in early rounds causes mismatched ear placement; count your stitches after each increasing round and correct mistakes before proceeding. βœ— Attaching the chin straps in the wrong place will make them misaligned and uncomfortable; attach to the underside at the center two dc stitches from Round 10 as specified. βœ— Using a much larger or smaller hook without checking gauge will change hat size drastically; check the gauge swatch and adjust hook to match the recommended 12 dc x 5 rows = 4" square.

Cowboy Cat Hat Pattern

Make a charming cowboy-style hat perfectly sized for adult cats and small toy dogs. This intermediate crochet pattern guides you through a top-down construction with ear holes, a decorative band, and optional chin straps. The pattern is quick to work up, uses common stitches, and includes finishing tips to get that authentic cowboy look on your pet.

Intermediate 1-2 Hours

Materials Needed for Cowboy Cat Hat Pattern

β€” Main Fabric

  • 01
    Bulky / 5 weight yarn (Red Heart Saver Chunky or similar) Brown (20gr/.75oz, 34m/38yd)
  • 02
    Worsted / 4 weight yarn (Red Heart Super Saver or similar) Tan (>1gr/.1oz, >2m/yd)

β€” Tools Required

  • 01
    4.5mm / 7 crochet hook or as needed to obtain gauge (see below)
  • 02
    3.5mm / E-4 crochet hook (optional - for scaling the pattern down for kittens or smaller pets)
  • 03
    Yarn needle for finishing

Progress Tracker

0% Complete

β€” Hat :

Round 1 :

in brown form a magic ring, sc 8 in the magic ring [8]

Info :

-- Note: do not ss to join, you will work continuously in the round until Round 9 --

Round 2 :

sc 2 in each st all the way around [16]

Round 3 :

sc in each st all the way around [16]

Round 4 :

*(sc in the next 3 sts, sc 2 in the next st), repeat from * 3 more times [20]

Round 5 :

sc in each st all the way around [20]

Round 6 :

*(sc in the next 4 sts, sc 2 in the next st), repeat from * 3 more times [24]

Round 7 :

sc in each st all the way around, ss into the next st [24]

Round 8 :

repeat round 7, ss to join [24]

Round 9 :

(this round forms the ear holes) Ch 2 (does not count as stitch), Dc 2 in each of the next 6 sts, Ch 10, sk the next 6 sts, Dc 2 in each of the next 6 sts, Ch 10, sk the next 6 sts, ss to join [24]

Round 10 :

ch 1, * (sc in the first 3 sts, sc 2 in the next st), repeat from * 2 more times, Working around the ch 10 sp, (hdc 1, dc 10, hdc 1), *(sc in the first 3 sts, sc 2 in the next st), repeat from * 2 more times Working around the next ch 10 sp, (hdc 1, dc 10, hdc 1), ss to join. [54]

Round 11 :

turn, ch 1, sc in each st all the way around (creates a solid edge and helps the edges of the hat turn up like a cowboy hat). Ss to join and fasten off. [54]

β€” Band :

Band (P1) :

In tan, ch 35, ss to join. Place the band around the center of the hat and sew on the hat.

β€” Chin straps (2 - optional) :

Chin straps :

Attach your yarn to the underside of the hat around the center 2 dc stitches from Round 10 above (should be the 5th and 6th dc, located at the middle of the ear hole). Ch 25, fasten off. Repeat on the other side.

β€” Finishing :

Finishing :

Weave in any ends. Turn the sides of the hat (near the ear holes) upwards. Push the top of the hat in down slightly so that it is indented about .5" and pinch the sides together to create the "cowboy" look.

Info :

Alternately, to make the indent permanent, turn the hat inside out, fold in half so the ear holes line up, and sew both sides together along Round 2. Turn right side out.

β€” Supplemental Photos :

Photo 1 :

Finished hat, alternate colors (pink example shown).

Photo 2 :

Hat modeled, alternate color (black hat on cat shown).

Photo 3 :

Where to attach your yarn if working chin straps (photo shows underside with arrow to center of ear hole).

Photo 4 :

Folding down and pinching shut the top of the hat to form the cowboy indent.

Assembly Instructions

  • Place and sew the tan band around the center of the hat after joining it in a ch 35 loop; position it evenly and stitch through the band and hat to secure.
  • Attach chin straps by fastening yarn to the underside of the hat at the center two dc stitches from Round 10 (the 5th and 6th dc at the middle of the ear hole), ch 25, and fasten off; repeat on the opposite side.
  • Turn the sides of the hat (near the ear holes) upwards and push the top of the hat down slightly to create a .5" indent, then pinch the sides together to form the cowboy shape before stitching or tacking if desired.
  • To make the indent permanent, turn the hat inside out, fold it in half aligning the ear holes, sew both sides together along Round 2, then turn the hat right side out.
  • Weave in all loose ends securely using a yarn needle and trim excess yarn for a clean finish.

Important Notes

  • πŸ’‘The hat is worked in the round from the top down; follow rounds carefully for correct shaping.
  • πŸ’‘Beginning chains do not count as stitches across this pattern; always follow the written stitch counts.
  • πŸ’‘Slip stitches at the end of each round are made in the top of the first dc from that round to create a clean join.
  • πŸ’‘Stitch counts are shown after each round in [brackets]; check counts as you go to avoid shaping errors.

This cute Cowboy Cat Hat pattern makes a playful accessory for cats and small dogs, perfect for photos or a themed outfit. It combines simple top-down shaping with a turned-up brim to create an authentic cowboy look. Try it in fun colorways and add a tiny band for extra charm! 🧢🐱

You ask,

we answer.

FAQs

What size will the finished piece be?

The finished hat measures approximately 3.5 inches tall with a 12 inch circumference and 2.5 inch ear holes, designed to fit adult cats (approx. 7-15 lbs).

Can I scale this pattern down for kittens or smaller pets?

Yes, to scale down use a 3.5mm / E-4 hook and switch to Worsted / 4 weight yarn; follow the pattern as written with the smaller hook and yarn to reduce finished dimensions.

Do I need to join with a slip stitch each round?

No, do not slip stitch to join after Round 1; work continuously in the round until Round 9 as noted, then follow joining instructions in Rounds 7-11 where indicated.

How do I make the cowboy indent permanent?

Turn the hat inside out, fold it in half so the ear holes line up, sew both sides together along Round 2, then turn the hat right side out to maintain the indentation.