🧢 Beautiful ✨ Detailed πŸ’ Adorable

Hulk Amigurumi Pattern

Hulk Amigurumi Pattern
4.3β˜… Rating
2-4 Hours Time Needed
3.1K Made This
βœ‚οΈ

Beginner Friendly Level

Perfect for those just starting their crochet journey, with clear instructions and simple techniques

⏱️

Bite-Sized Project

Finishes in 2-4 hoursβ€”perfect for an afternoon of creative relaxation.

🧸

Cute Companion

An adorable friend to cherish, handcrafted with love to bring comfort and joy for years to come.

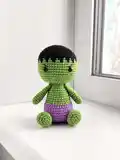
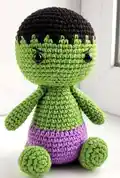
About This Hulk Amigurumi Pattern

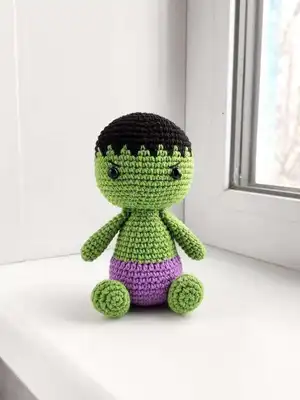
This pattern creates a small 13 cm (about 5.1 in) Hulk-style amigurumi with a cute oversized head and simple body. It uses basic single crochet shaping, color changes for hair and shorts, and minimal assembly. The finished toy is perfect for gifting or collecting and can be customized with yarn and eye choices.

Hulk Amigurumi Pattern crochet pattern - detailed view of completed project

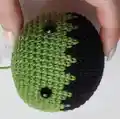
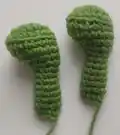
Uses simple stitches and continuous spiral crochet for even shaping. Includes detailed rounds for head, body, arms, legs and finishing.

Why You'll Love This Hulk Amigurumi Pattern

I absolutely love this pattern because it turns simple stitches into a charming little character that is instantly recognizable. I enjoy how quickly the body and head come together, making it satisfying to see progress after each round. I also love the playful hairline detail created with color changes β€” it gives so much personality with very little effort. This design is forgiving and friendly for newer crocheters while still fun to customize. Making one always puts a smile on my face and I hope it does the same for you.

Hulk Amigurumi Pattern step 1 - construction progress Hulk Amigurumi Pattern step 2 - assembly progress Hulk Amigurumi Pattern step 3 - details and accessories Hulk Amigurumi Pattern step 4 - final assembly and finishing

Switch Things Up

I love customizing this pattern by changing the color palette; try pastel greens and lilacs for a softer look or bright neons for a playful version.

I often make the doll larger or smaller by swapping yarn weight and hook size β€” bulky yarn with a larger hook gives a chunky toy, thin yarn makes a mini keychain version.

I like adding embroidered mouth variations to change the expression β€” a small smile, a surprised O, or a stitched frown all give different personalities.

Swap the safety eyes for embroidered eyes or buttons for a different aesthetic; felt appliques also make cute eyes for a handcrafted feel.

Try adding tiny crocheted accessories like a cape, belt, or tiny props to create themed characters or seasonal variants.

I sometimes insert a small length of wire into the arms for a posable effect β€” it allows simple posing but keep it safe and secure if the toy is for children.

You can experiment with textured stitches for the shorts or hair to add surface interest and contrast to the smooth body.

I also recommend varying stuffing density; firmer stuffing gives a sturdier toy for play, while softer stuffing makes a cuddly display piece.

For a gift, personalize with an initial embroidered on the back or a small crocheted heart sewn to the body for an extra special touch.

Don’t be afraid to mix yarn brands and colors β€” sometimes combining small leftover skeins creates the most charming, unique amigurumi creations.

Common Mistakes & How to Fix Them

βœ— Not using a stitch marker when working in a spiral leads to lost rounds and miscounted stitches; place a marker at the beginning of each round and move it up as you go. βœ— Stuffing too early or too much can distort shaping and create lumps; stuff gradually and firmly as you work, especially when increasing or decreasing. βœ— Changing colors without securing ends can cause loose loops and gaps at color transitions; catch the new color on the last pull-through of the previous stitch and weave in ends neatly. βœ— Forgetting to align openings before sewing limbs causes uneven placement on the body; press the openings, align three stitches side by side, and pin parts before stitching them down.

Hulk Amigurumi Pattern

Create an adorable mini Hulk amigurumi with this easy, step-by-step pattern. Youll work in continuous rounds to shape the head, body, arms and legs, with clear instructions for color changes and finishing. Perfect as a handmade gift or shelf buddy, this pattern uses simple stitches and beginner-friendly shaping. Make your own little green hero and personalize it with embroidered details.

Beginner Friendly 2-4 Hours

Materials Needed for Hulk Amigurumi Pattern

β€” Main Fabric

  • 01
    YarnArt Jeans yarn in green (main body color) - amount as needed for a small amigurumi
  • 02
    YarnArt Jeans yarn in purple (shorts) - amount as needed
  • 03
    YarnArt Jeans yarn in black (hair) - amount as needed
  • 04
    Recommended yarn weight as used by YarnArt Jeans (DK/light worsted)
  • 05
    Approximate finished size: Approx.13cm (about 5.1 inches) tall using the materials stated

β€” Tools Required

  • 01
    Crochet hook Clover Soft Touch 2.00 mm (or hook suitable for your yarn)
  • 02
    8 mm black safety eyes (2 pieces)
  • 03
    Toys filler / polyester stuffing
  • 04
    Black thin thread (for embroidered eyebrows)
  • 05
    Scissors
  • 06
    Tapestry needle (yarn needle) for sewing and weaving ends
  • 07
    Pins for assembly
  • 08
    Stitch marker

Progress Tracker

0% Complete

β€” General Info :

Info :

Skill level -easy. Pattern does not contain crochet tutorials! You should have basic crochet skills. Approx.13cm (about 5.1 inches) tall using the materials stated in the pattern. You may use any size yarn for this amigurumi, just make sure to use the hook size suggestion on the yarn label. Use safety eyes that are a suitable size for the yarn you are using.

β€” Materials :

Infos :

-The hook suitable under your yarn. I have Clover Soft Touch 2.00 mm. -Yarn: green, purple and black colors. I used Β«YarnArtJeansΒ» yarn. -8 mm black safety eyes. -Toys filler. -Black thin thread (eyebrows). -Toys filler. -Scissors. -Tapestry needle. -Pins. -Stitch marker.

β€” Terms used :

Infos :

MR -magic ring. sc-single crochet. ch-chain stitch. slst-slip stitch. blo-through back loops only. inc-increase (stitch 2 times into the next stitch). dec -invisible decrease (crochet 2 sc together using invisible method). hdc -half double crochet. (...)xn -repeat instructions in brackets n times. R -round.

β€” Notes :

Infos :

Change colors in crochet. Loop your new yarn color over your hook. Crochet your new yarn color back through the two loops on your hook. -Crochet continuously in a spiral, unless otherwise specified. -In order to not lose track of the number of worked stitches in each round, use a stitch marker to mark the beginning of each round -a thin thread of contrasting color. -Crochet tightly enough so the filler is not visible through the holes between loops. -Tightly and gradually fill all the details of the toy in the process of crocheting. -Size of the finished toy can vary depending on the materials used, the density of crocheting and filling, etc.

β€” Body + head :

Round 1 :

6 scMR (6)

Round 2 :

6 inc(12)

Round 3 :

(1 sc, inc)x6 (18)

Round 4 :

(2 sc, inc)x6 (24)

Round 5 :

(3 sc, inc)x6 (30)

Round 6 :

(4 sc, inc)x6 (36)

Round 7 :

(5 sc, inc)x6 (42)

Round 8-10 :

42 sc (3 rounds) (42)

Round 11 :

(5 sc, dec)x6 (36)

Round 12 :

36 sc (36)

Round 13 :

36 hdc (36)

Info :

Continue on with green.

Round 14 :

(4 sc, dec)x6 (30)

Round 15 :

30 sc (30)

Round 16 :

(13 sc, dec)x2 (28)

Round 17 :

28 sc (28)

Round 18 :

(12 sc, dec)x2 (26)

Round 19 :

26 sc (26)

Round 20 :

(11 sc, dec)x2 (24)

Round 21 :

24 sc (24)

Round 22 :

(2 sc, dec)x6 (18)

Round 23 :

18 sc (18)

Info :

Cut the yarn. Stuff the body firmly.

β€” Arm x2 :

Info :

Crochet with green.

Round 1 :

6 sc MR(6)

Round 2 :

(2 sc, inc)x2 (8)

Round 3-8 :

8 sc (8)

Info :

Stuff only half of the arms.

Round 9-13 :

8 sc (8)

Info :

Do not stuff of the arms. This way the arm doesn't stick out too much after sewing it to the body. Press the opening with your fingers, aligning 3 stitches side by side. Break the yarn and leave a long tail to sew arms to body.

β€” Head :

Info :

Crochet with black yarn.

Round 1 :

6 sc MR(6)

Round 2 :

6 inc(12)

Round 3 :

(1 sc, inc)x6 (18)

Round 4 :

(2 sc, inc)x6 (24)

Round 5 :

(3 sc, inc)x6 (30)

Round 6 :

(4 sc, inc)x6 (36)

Round 7 :

(5 sc, inc)x6 (42)

Round 8 :

(6 sc, inc)x6 (48)

Round 9 :

(7 sc, inc)x6 (54)

Round 10-11 :

54 sc (2 rounds) (54)

Info :

In the next 12 and 13 rounds we will alternate green and black colors.

Round 12 :

(green 1 sc, black 2 sc)x18 (54)

Round 13 :

(green 2 sc, black 1 sc)x18 (54)

Info :

Continue on with green.

Round 14-19 :

54 sc (6 rounds) (54)

Round 20 :

(7 sc, dec)x6 (48)

Round 21 :

(6 sc, dec)x6 (42)

Info :

Place safety eyes between rounds 16 and 17, 11 stapart.

Round 22 :

(5 sc, dec)x6 (36)

Round 23 :

(4 sc, dec)x6 (30)

Round 24 :

(3 sc, dec)x6 (24)

Info :

Start to stuff the head.

Round 25 :

(2 sc, dec)x6 (18)

Round 26 :

Only through back loops, (1 sc, dec)x6 (12)

Round 27 :

6 dec. Leave the thread for sewing.

β€” Leg x2 :

Info :

Start working with green yarn.

Round 1 :

6 sc MR(6)

Round 2 :

6 inc(12)

Round 3 :

inc, 3 sc, 3 inc, 3 sc, 2 inc(18)

Round 4 :

7 sc, 3 inc, 8 sc (21)

Round 5 :

Only through back loops, 21 sc (21)

Round 6 :

7 sc, 3 dec, 8 sc (18)

Round 7 :

4 sc, 4 dec, 6 sc (14)

Round 8 :

2 sc, 4 dec, 4 sc (10)

Round 9 :

(3 sc, dec)x2 (8)

Info :

Stuff only half of the legs.

Round 10-15 :

8 sc(6 rounds) (8)

Round 16 :

Only 5 sc. Do not stuff of the legs. Press the opening with your fingers, aligning 3 stitches side by side. Break the yarn and leave a long tail.

β€” Finishing :

Info :

Sew the head to the body. Sew the legs to the body. Sew the arms to the body symmetrically. Embroider eyebrows.

Assembly Instructions

  • Place and attach the head to the top opening of the body using the long tail left from the head (Round 27) and sew securely with a yarn needle, closing the gap as you stitch.
  • Sew the two legs to the bottom front of the body, spacing them evenly so the toy can sit, and use pins to position before stitching for symmetry.
  • Position the arms on either side of the body at the shoulder area and sew with a long tail, aligning three stitches side by side so they lay naturally against the body.
  • Insert 8 mm safety eyes between head rounds 16 and 17, spaced 11 stitches apart, before closing the head and completing stuffing.
  • Embroider thin black eyebrows with black thread above the eyes to add expression, using the photos as reference for placement.

Important Notes

  • πŸ’‘Use a stitch marker to keep track of the beginning of each round, especially when working in continuous spiral rounds.
  • πŸ’‘Stuff body and head firmly but gradually while working, adding small amounts of filler to avoid lumps and maintain shape.
  • πŸ’‘When changing colors, loop the new yarn over the hook and pull through both loops to secure a neat color change and minimize loose ends.
  • πŸ’‘Press openings of arms and legs together, aligning 3 stitches side by side before sewing to ensure even attachment and natural placement.

This sweet little Hulk amigurumi is a quick and rewarding make for any crochet lover. Customize colors and facial details to create your own tiny hero with a personal touch. Perfect as a gift, a desk buddy, or a playful shelf friend. 🧢🧡✨

You ask,

we answer.

FAQs

What size will the finished piece be?

The finished amigurumi measures approximately 13 cm (about 5.1 inches) tall when using the recommended yarn and a 2.00 mm hook.

Can I use different yarn weights for this pattern?

Yes, you can use different yarn weights, but the final size will change; adjust the hook size accordingly to keep stitch density similar.

Do I need prior crochet experience for this pattern?

This pattern is rated beginner friendly, so basic knowledge of single crochet, increases, and decreases is recommended for best results.

How long does this project typically take to complete?

Most crocheters finish this mini amigurumi in about 2-4 hours, though time may vary depending on experience and personalization.