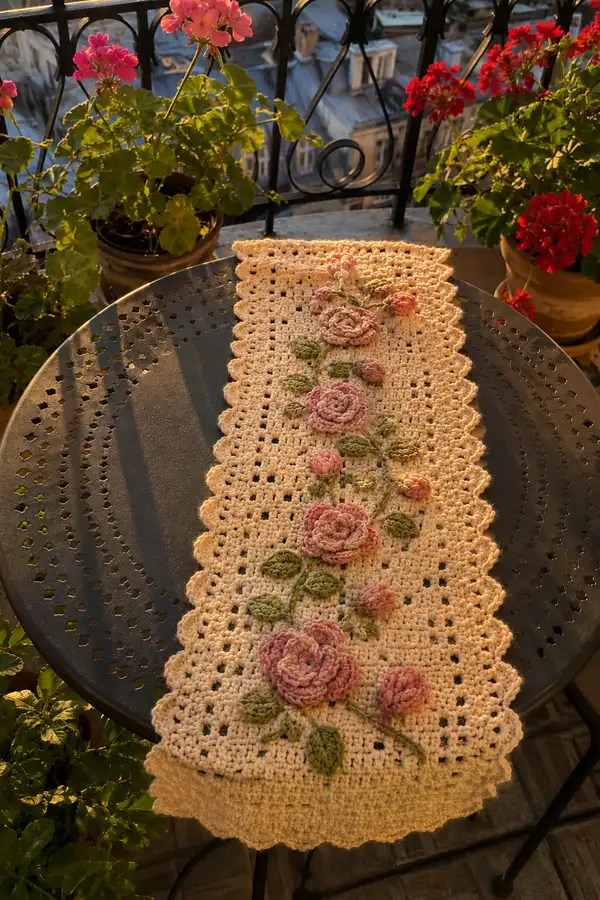
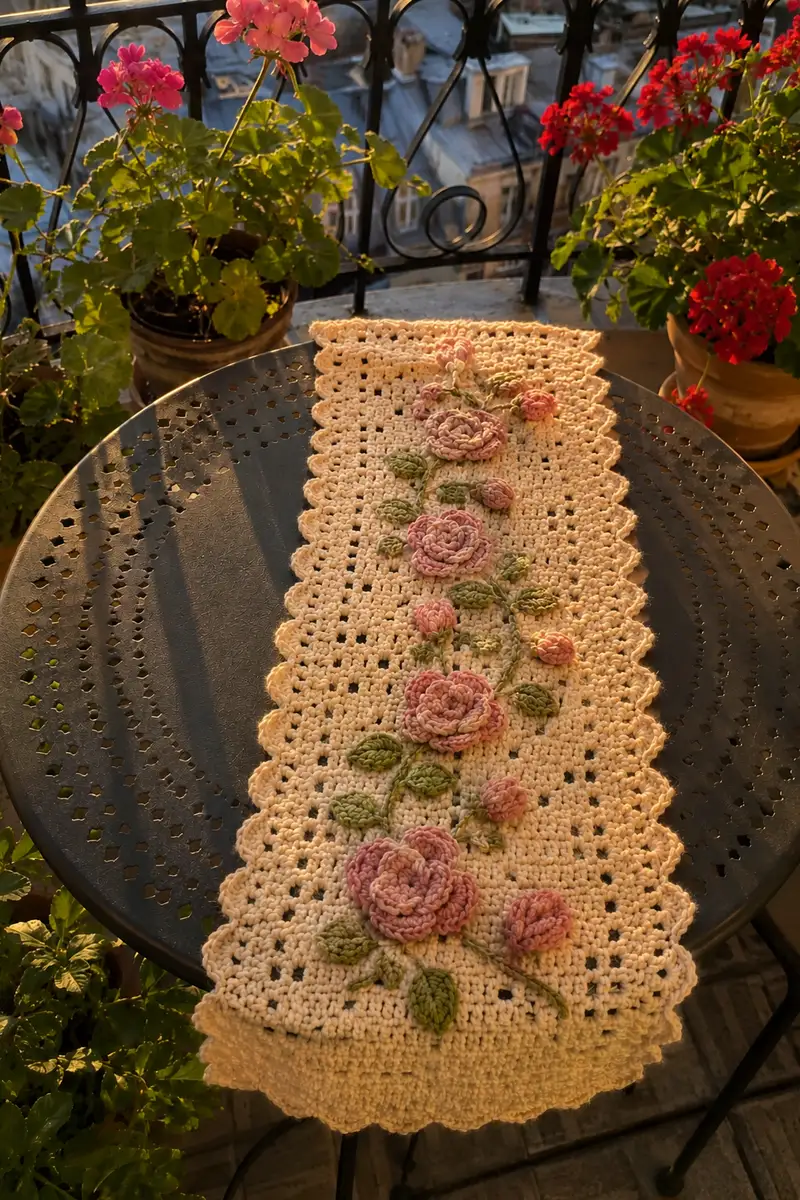
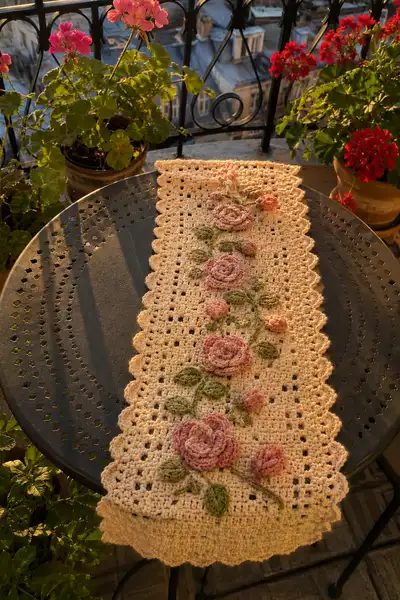
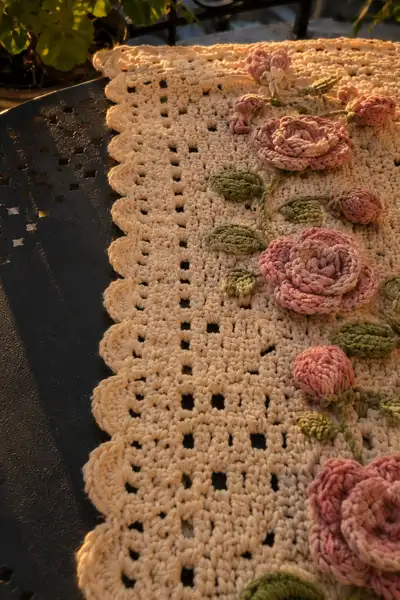
A soft cream table runner embroidered with dimensional cottage roses and leafy vines, finished with a delicate scalloped edge. The runner features an openwork grid body that highlights the textured 3D roses in dusty pinks and sage greens for a romantic vintage look. Perfect for a small bistro table, dresser, or centerpiece, this pattern guides you through the openwork foundation, sculpted roses, raised buds and leaves, and the scalloped finishing border.
Progress Tracker
0% Complete
— Runner Base (Openwork Body) :
Note :
This runner is worked flat in rows. Foundation chain should be multiple of 6 plus 3 to allow the openwork repeat and turning chains. The sample photographed is worked with worsted-cotton on a 4.0mm hook for a final width of approximately 10.5 inches (111 sts).
Materials :
Cream main yarn, 4.0mm hook. Foundation chain: 111 ch + 3 turning ch (counts as first dc). Gauge is not critical for pattern repeats but will affect final dimensions.
Row 1 :
Make foundation chain 111, ch 3 (counts as first dc), dc in 4th ch from hook and in each ch across — work 111 dc across including the turning ch as first dc (111)
Row 2 :
Ch 3 (counts as dc), *sk next 2 sts, (2 dc, ch 2, 2 dc) in next st (this creates an open filet cluster), sk next 2 sts, dc in next st; rep from * across ending with dc in final st. Maintain 111 'stitch-equivalents' across (111)
Info :
Row 2 sets the openwork grid. The (2 dc, ch 2, 2 dc) cluster creates square openings that will repeat every 6 stitches. Use stitch markers at the first and last repeat positions to ensure width remains even.
Row 3 :
Ch 3, turn. Dc in each dc across, and in each ch-2 space work dc—this evens the row back to 111 dc (111)
Row 4 :
Ch 3, turn. *Sk next 2 sts, (2 dc, ch 2, 2 dc) in next st, sk next 2 sts, dc in next st; rep across (111)
Row 5 :
Ch 3, turn. Dc in each st and ch-space across (111)
Info :
Keep your tension consistent. If your fabric starts to ripple, check turning chain placement and that clusters are centered over previous clusters. Place markers every 12 repeats (72 sts) for easier counting on long rows.
Row 6 :
Repeat Row 4 (openwork clusters) (111)
Row 7 :
Repeat Row 5 (solid dc row) (111)
Row 8 :
Repeat Row 4 (openwork clusters) (111)
Row 9 :
Repeat Row 5 (solid dc row) (111)
Info :
Alternate the open cluster rows with solid dc rows to build the grid. Work evenly for a rectangular shape; the sample runner repeats this pair for a total of 26 pattern rows in the central portion before a narrower repeated section for floral placement.
Row 10 :
Repeat Row 4 (openwork clusters) (111)
Row 11 :
Repeat Row 5 (solid dc row) (111)
Row 12 :
Repeat Row 4 (openwork clusters) (111)
Row 13 :
Repeat Row 5 (solid dc row) (111)
Row 14 :
Repeat Row 4 (openwork clusters) (111)
Info :
At this point you have a clear band of openwork and solid rows. You may measure the runner's length to decide where to place the primary rose vine — the sample places the top rose approx 6 rows from the top edge, centralized along the long axis. Use pins to mark placement now if you like.
Row 15 :
Repeat Row 5 (solid dc row) (111)
Row 16 :
Repeat Row 4 (openwork clusters) (111)
Row 17 :
Repeat Row 5 (solid dc row) (111)
Row 18 :
Repeat Row 4 (openwork clusters) (111)
Row 19 :
Repeat Row 5 (solid dc row) (111)
Info :
For a longer runner, continue the established openwork/sold sequence until you reach desired length; the sample works 42 center rows before beginning the scalloped edging. Keep note of total rows for symmetrical placement of motifs.
Row 20 :
Repeat Row 4 (openwork clusters) (111)
Row 21 :
Repeat Row 5 (solid dc row) (111)
Row 22 :
Repeat Row 4 (openwork clusters) (111)
Row 23 :
Repeat Row 5 (solid dc row) (111)
Row 24 :
Repeat Row 4 (openwork clusters) (111)
Info :
If you prefer a denser background, substitute hdc for dc on the solid rows for a slightly smaller gauge and firmer fabric. Keep motif placement adjusted if gauge changes.
Row 25 :
Repeat Row 5 (solid dc row) (111)
Row 26 :
Repeat Row 4 (openwork clusters) (111)
Row 27 :
Repeat Row 5 (solid dc row) (111)
Row 28 :
Repeat Row 4 (openwork clusters) (111)
Row 29 :
Repeat Row 5 (solid dc row) (111)
Info :
Count the number of openwork squares (ch-2 spaces) across each cluster row. You will use these as alignment points for pinning large roses and buds; the spacing is regular and repeats every 6 stitches in width.
Row 30 :
Repeat Row 4 (openwork clusters) (111)
Row 31 :
Repeat Row 5 (solid dc row) (111)
Row 32 :
Repeat Row 4 (openwork clusters) (111)
Row 33 :
Repeat Row 5 (solid dc row) (111)
Row 34 :
Repeat Row 4 (openwork clusters) (111)
Info :
If you are making the runner exactly like the sample, stop here after Row 42 and proceed to scalloped edging first. If you want to add additional rows for a longer runner, continue in established repeats until desired length. Record the exact row where you want the center rose to appear; in the sample the center rose sits approx at Row 22 measured from one short end.
Row 35 :
Repeat Row 5 (solid dc row) (111)
Row 36 :
Repeat Row 4 (openwork clusters) (111)
Row 37 :
Repeat Row 5 (solid dc row) (111)
Row 38 :
Repeat Row 4 (openwork clusters) (111)
Row 39 :
Repeat Row 5 (solid dc row) (111)
Info :
When you have completed the base grid and are satisfied with the length, fasten off leaving a long tail for the edging if you prefer to do the scallop in the same yarn. Otherwise change color now if desired for the border.
Row 40 :
Repeat Row 4 (openwork clusters) (111)
Row 41 :
Repeat Row 5 (solid dc row) (111)
Row 42 :
Repeat Row 4 (openwork clusters) (111)
Info :
Fasten off and weave ends, then block the base rectangle to measurement — this ensures the scalloped edge sits flat and the appliques align properly. Use blocking pins along the edges and a light damp blocking if cotton yarn is used.
— Scalloped Shell Edge (Both Long Sides & Short Ends) :
Info :
We will work a scalloped shell edge around the entire runner. Start on one long side. Join yarn with a sl st in the corner, ch 1 (does not count), evenly place 1 sc per row edge to create a foundation for shells — count 111 stitches along each long side for placement.
Round 1 :
Along long side: sc evenly along the edge, placing approximately 111 sc (one into each row edge). Work 3 sc into each corner to round it (111 sc across long side plus corners)
Info :
Try to place one sc per row edge. If your count differs by a couple of sts, adjust by adding or skipping at corners to keep scallops evenly spaced. Mark every 12th sc to maintain rhythm.
Round 2 :
Ch 1, turn. *Skip 2 sc, work (5 dc) in next sc (shell made), skip 2 sc, sl st into next sc to anchor; rep across long edge and work shells around short ends as well producing scallops all the way around (approx 18 shells along each long side depending on tension)
Round 3 :
Fasten off and weave in ends. Optionally work a reverse sc row inside the runner (one sc in each final dc and between shells) to create a neat inner border if desired.
Info :
Check the scallop rhythm visually and unblock again if necessary. The shell size (5 dc) can be adjusted to 4 or 6 dc for smaller or larger loops; keep uniformity around entire perimeter.
— Large Rose (Make 3) :
Note :
These roses are worked flat in a spiral and then sewn into a circular coil to create the 3D rose. Use variegated dusty pink yarn and a 3.25mm hook for tight rosettes. Each large rose finishes at approx 3.0-3.5 inches diameter.
Round 1 :
Using 3.25mm hook, ch 36. (You will work a foundation that will be rolled up into a rose.)
Round 2 :
Row along chain: sc in 2nd ch from hook and in next 2 ch, *hdc in next 3 ch, dc in next 6 ch, tr in next 6 ch, dc in next 6 ch, hdc in next 3 ch, sc in last 3 ch — this creates graduated petal heights along the strip. Total sts = 36 (36)
Info :
The counts above are grouped; be sure to maintain the same number of stitches across the chain. The tall trs will curl and create open petals when rolled. If you prefer denser petals, reduce tr counts and add more dc groups.
Round 3 :
Fasten off leaving a long tail for sewing. Coil the strip starting at one short end, slightly overlapping the petal edges as you roll. Use the long tail and a yarn needle to whip-stitch the base of the coil together, catching through each layer to secure. Shape petals outward as you go to create a natural rose spiral.
Info :
When seaming the base, catch the bottom loops only to minimize visible stitches on petal faces. Adjust tightness of coil for fuller or looser rose effect. Make 3 large roses and set aside.
— Medium Rose (Make 2) :
Round 1 :
Ch 24 with 3.25mm hook. Sc in 2nd ch from hook and next 2 ch, *hdc in next 3 ch, dc in next 6 ch, hdc in next 3 ch, sc in last 3 ch — total 24 sts (24)
Round 2 :
Fasten off leaving long tail. Coil and sew as for large rose but with fewer petal layers to make a medium bloom (approx 2.25-2.75 inches diameter).
Info :
Use slightly tighter tension to keep the medium rose compact. Optionally add a small dab of fiberfill in the center before closing to make it pop.
— Small Rosebud (Make 6-8) :
Round 1 :
With 3.25mm hook, ch 10. Sc in 2nd ch from hook and across (9 sc) (9)
Round 2 :
Change to working in a short spiral: *ch 1, turn, (sc in next 2, hdc in next 2, dc in next 3) — fasten off leaving tail and roll tightly into a small bud, secure with whip stitch (approx 1 inch diameter)
Info :
Small buds can be stitched closed more tightly for a rounder form. Add a tiny amount of stuffing if you want a fuller bud — use no more than a pinch so the bud remains small.
— Leaves (Make 10-14) :
Note :
Leaves are worked flat in sage green to be appliqued. Vary sizes to match the runner photo: small leaves ~1 inch, medium ~1.5-2 inches.
Leaf Small - Round 1 :
Using 3.25mm hook, ch 7. Sc in 2nd ch from hook, hdc in next, dc in next 2, hdc in next, sc in last — do not turn; now work other side of chain: sc in 2nd ch from hook along opposite side, sl st to join at tip. Fasten off (approx 7 sts each side)
Leaf Small - Round 2 :
With tip at center, embroider central vein: using a length of sage green yarn, make a surface chain stitch from base to tip on leaf, securing ends at base with a few small stitches.
Leaf Medium - Round 1 :
Ch 9. Sc in 2nd ch from hook, hdc in next 2, dc in next 3, hdc in next 2, sc in last. Work along opposite side of chain mirroring increases. Fasten off and shape gently with fingers (approx 11 sts total)
Info :
For more natural leaves, block each leaf lightly with pins to create a gentle cupped surface. Use a small iron on low cotton setting through a pressing cloth if yarn allows.
— Stems & Vine Embroidery :
Info :
Stems are worked as surface chain stitches or slip-stitch embroideries over the blocked runner. Use sage green yarn and a tapestry needle or a blunt embroidery needle for surface slip stitch. Plan the vine path with pins or washable marker.
Step 1 :
Decide vine path: in sample the vine runs down the center axis of the runner with flowers staggered to one side. Pin applique roses and leaves in place before securing stems to check balance.
Step 2 :
To embroider stem: bring sage yarn up from the wrong side at starting point, insert needle a short distance (approx 4-6 sts) ahead, pull to create a small chain loop on the surface, repeat to create a continuous chain (surface slip stitch) following pinned line. Keep tension even so stitches lie flat against fabric.
Info :
For a raised look, work a twisted chain stitch: pull a short loop, twist once, then anchor; repeat. Alternatively, use a slender cord or bullion knots for thicker stems.
— Attaching Roses, Buds & Leaves :
Info :
Pin each rose and leaf in final position before sewing. Use the previously counted cluster rows and ch-2 grid openings to align motif centers. The sample centers large roses over full clusters so that petals overhang slightly into adjacent solid rows.
Step 1 :
Place the largest rose at the bottom third of the runner, the medium rose near the center, and the top large rose near the opposite end. Space smaller buds around each rose in groups of 2-3. Adjust by eye for pleasing spacing.
Step 2 :
Sew each rose by catching the base coil to the runner fabric with the long tail (use a yarn needle), taking 4-6 evenly spaced stitches around the underside of the coil to secure. Hide the thread tail between layers and knot on the underside of the runner.
Step 3 :
Sew leaves by aligning base of leaf to stem and whip stitch across base only so leaf body remains free and slightly raised. Add a few tiny stitches at the tip to anchor if necessary.
Info :
For durability, take a few extra securing stitches on large roses where frequent handling or washing is expected. Bury tail ends under the base and weave back into the runner fabric for a clean finish.
— Additional Decorative Touches (French Knots, Tiny Bud Cluster) :
Step 1 :
French knot centers: With small length of pale cream or light pink, create 3-5 French knots near rose centers or in bud clusters to add visual interest. Use an embroidery needle through right side, wrap yarn 1-2 times, and pull through tightly. Secure knot’s tail on the wrong side.
Step 2 :
Tiny bead cluster: if desired, use 3 small seed-like stitches of cream yarn or tiny beads sewn under a bud cluster to simulate unopened petals seen in the photo.
Info :
Test French knot tension on a scrap first — too tight will pull fabric and too loose will be floppy. Keep these accents small to preserve vintage look.
— Final Finishing :
Step 1 :
Weave in all ends from base, roses and leaves. Use a yarn needle to bury tails across several stitches to prevent unraveling. Trim close but not flush to avoid accidental release of threads.
Step 2 :
Block finished runner to final measurements. Pin scalloped edges evenly and lightly mist or steam block per yarn instructions. Allow to dry fully before removing pins.
Info :
Spot clean appliques when possible; cotton will wash but repeated machine washing may flatten rose texture. If laundering, use a delicates bag and lay flat to dry to keep shape.
This Cream Cottage Rose and Leaf Table Runner brings vintage charm and handcrafted warmth to any table setting. Each scalloped edge and layered rose is an opportunity to slow down and enjoy creating. The combination of openwork grid and sculpted appliques is endlessly satisfying — ideal for gifting or keeping as a cozy accent. 🧶🌸 Your finished runner will be a delicate heirloom that brightens small corners and shared moments. Enjoy every stitch and don’t forget to share your creation! ✨