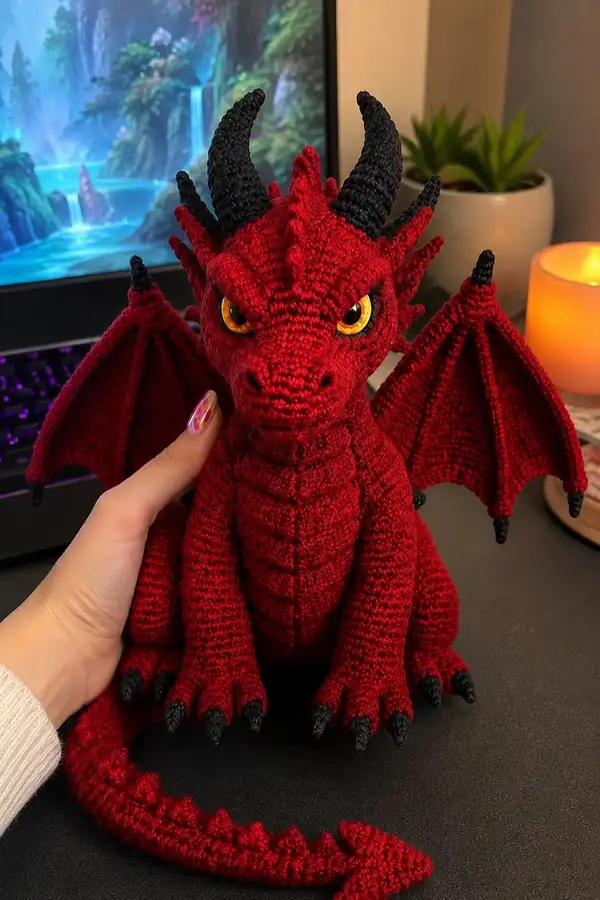
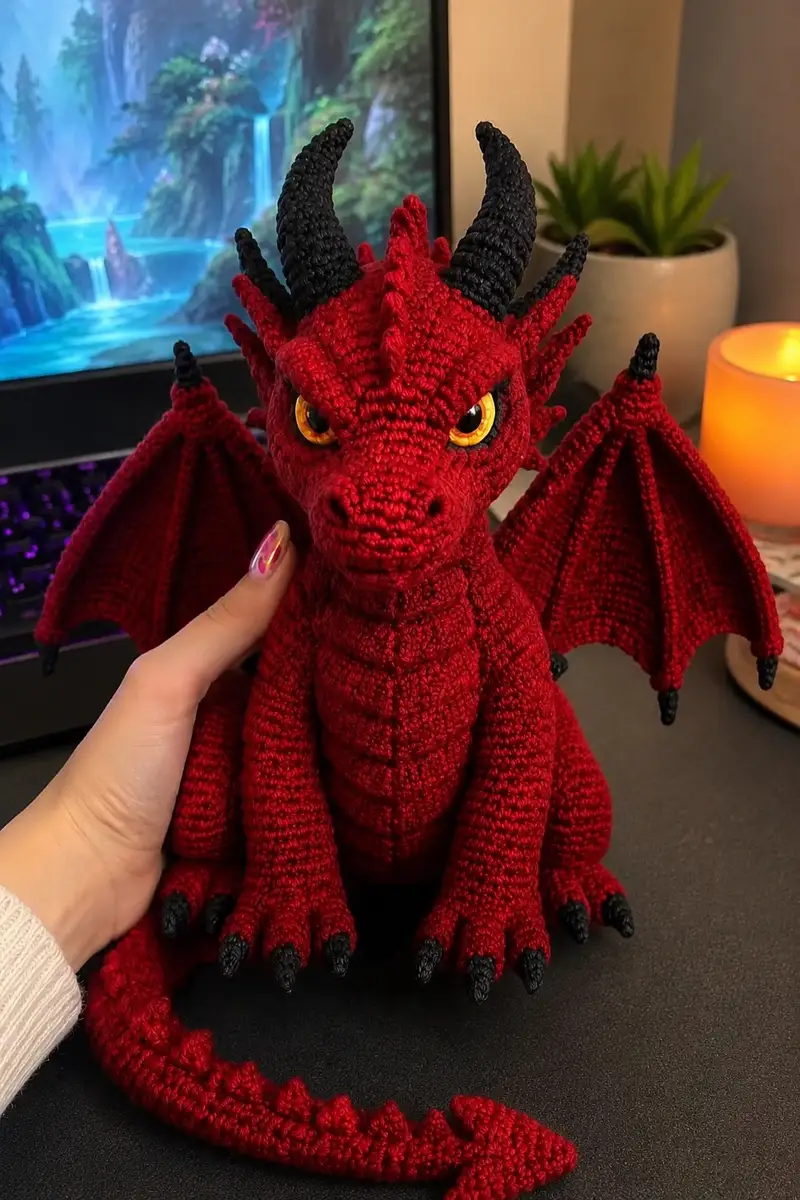
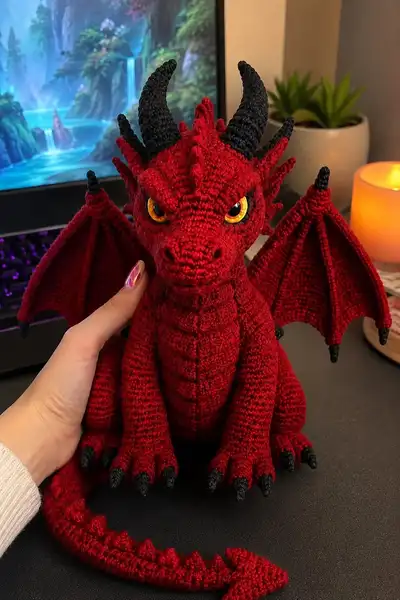
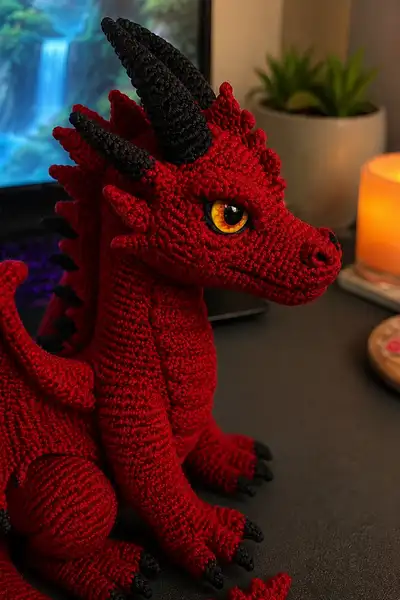
This fierce yet cuddly crimson dragon amigurumi features rich deep-red textured scales, contrasting black horns and claws, and striking yellow glass eyes. The design includes articulated wings, a sculpted elongated snout, layered back spines, and detailed claws — all worked in tight amigurumi stitches for a polished finish. The finished dragon sits upright, with a poseable, tapered tail and strongly defined chest plates that give it a majestic, hand-sculpted look. Perfect for an experienced crocheter looking for a characterful, display-worthy project.
Progress Tracker
0% Complete
— Head & Snout :
Round 1 :
6 sc in magic ring (6)
Round 3 :
(1 sc, inc) x 6 (18)
Round 4 :
(2 sc, inc) x 6 (24)
Round 5 :
(3 sc, inc) x 6 (30)
Round 6 :
(4 sc, inc) x 6 (36)
Round 7 :
(5 sc, inc) x 6 (42)
Round 8 :
(6 sc, inc) x 6 (48)
Info :
Head shaping begins here. Work tightly and keep stitch marker in first stitch of every round. Place safety eyes between Rounds 13-15; eyes should sit roughly 10-12 stitches apart depending on desired fierce expression.
Round 9-12 :
1 sc in each st (48)
Round 13 :
(6 sc, dec) x 6 (42)
Info :
At the end of round 13, insert safety eyes between rounds 13 and 14 spaced 10-12 sts apart. If using glass eyes, back them with a small disc of black yarn to make them stand out. Mark reference stitches horizontally for later placement of horns and spikes.
Round 14 :
1 sc in each st (42)
Round 15 :
(5 sc, dec) x 6 (36)
Round 16 :
1 sc in each st (36)
Info :
Begin to shape the muzzle by working the next rounds using short rows on front portion to elongate the snout. Identify the 12 stitches at the front centre (6 on each side of the center seam) where the muzzle will extend.
Round 17 :
Work in rounds but when you reach the 12 front muzzle stitches, work an extra 12 sc in those 12 sts (working 2 sc in each of the 12 front stitches) then finish round as 1 sc in remaining sts — total (36+12)=48 (48)
Round 18 :
1 sc in each st (48)
Round 19 :
Work 1 sc in each st for 20 sts, then work (sc, inc) across 12 muzzle sts to sculpt the snout tip (add 6 sts), then 1 sc remaining sts. Stitch count (48+6)=54 (54)
Info :
Start stuffing the head lightly now. The snout area needs firm but not rock-hard stuffing. Use small pinchfuls to get into the narrow muzzle correctly.
Round 20 :
1 sc in each st (54)
Round 21 :
(7 sc, dec) x 6 (48)
Round 22 :
(6 sc, dec) x 6 (42)
Info :
Use these decreases to bring the skull back into shape above the snout while preserving the muzzle's length. Continue stuffing as you go; ensure cheeks are adequately filled for smooth finish and the seam under the eyes is neat.
Round 23 :
(5 sc, dec) x 6 (36)
Round 24 :
1 sc in each st (36)
Round 25 :
(4 sc, dec) x 6 (30)
Round 26 :
(3 sc, dec) x 6 (24)
Info :
At this stage, the top of the head should be slightly narrower; add more stuffing to round off shape. Keep tension consistent to avoid ridges - ridges can be used later to create scaled look if desired.
Round 27 :
(2 sc, dec) x 6 (18)
Round 28 :
(1 sc, dec) x 6 (12)
Info :
Fasten off leaving a long tail for sewing if you will join head to body later. Finish stuffing through the neck opening; don't overstuff as this will make seam-to-body attachment difficult. Use a yarn needle to pull the opening closed if attaching separately.
— Neck & Upper Torso (join to Body later) :
Round 1 :
6 sc in magic ring (6)
Round 3 :
(1 sc, inc) x 6 (18)
Round 4 :
(2 sc, inc) x 6 (24)
Round 5 :
1 sc in each st (24)
Round 6 :
(3 sc, inc) x 6 (30)
Info :
The neck is elongated to create the graceful curve seen in the photos. Work even rounds to build height; use a stitch marker every 6-8 rounds to track height and keep neck straight.
Round 7-12 :
1 sc in each st (30) — work 6 rounds for neck length (each round = 30)
Round 13 :
(4 sc, inc) x 6 (36)
Round 14-18 :
1 sc in each st (36)
Info :
Begin shaping the upper torso and chest plates now. The chest uses horizontal ridges created by working alternate rounds in BLO to create defined 'plates' down the front. Mark the center front stitches to guide later rounds for belly plates.
Round 19 :
1 sc in each st BLO (36)
Round 20 :
1 sc in each st (36)
Round 21 :
1 sc in each st BLO (36)
Round 22-26 :
1 sc in each st (36) — continue even rounds to build torso height
Info :
Keep this neck/upper torso piece open at the bottom if you plan to sew into the body opening. If you want the head and neck to be removable, leave a long tail for sewing and fasten off here.
— Main Body :
Round 1 :
6 sc in magic ring (6)
Round 3 :
(1 sc, inc) x 6 (18)
Round 4 :
(2 sc, inc) x 6 (24)
Round 5 :
(3 sc, inc) x 6 (30)
Round 6 :
(4 sc, inc) x 6 (36)
Round 7 :
(5 sc, inc) x 6 (42)
Round 8 :
(6 sc, inc) x 6 (48)
Round 9-14 :
1 sc in each st (48)
Info :
At round 9-14 the body gets wide to form the ribcage and belly. If adding a different belly color, change to lighter red or darker red here using an Info step and carry yarn inside the body.
Round 15 :
(6 sc, dec) x6 (42)
Round 16 :
(5 sc, dec) x6 (36)
Round 17 :
1 sc in each st (36)
Round 18 :
(3 sc, inc) x9 (45)
Info :
This increase creates a slight belly curve for a sitting pose; if you want a rounder belly, increase across one additional round. Begin stuffing the body from the bottom up once you have 50% height.
Round 19-24 :
1 sc in each st (45)
Round 25 :
(3 sc, dec) x9 (36)
Round 26 :
(2 sc, dec) x9 (27)
Round 27 :
(1 sc, dec) x9 (18)
Info :
Leave a larger opening if you plan to insert the neck piece: do not close the body completely. Instead, leave an opening equal to the neck diameter and sew the neck in place with round-to-round mattress stitch for strength.
— Belly Plates (worked onto torso) :
Info :
Create belly plates by working rows across the center front after body is attached. Use BLO rounds to create ridged plates. Each plate consists of 2 rounds: 1 row BLO then 1 regular sc row. Repeat down center 6-8 times to mimic the scaled plates in the photo.
Plate Row 1 :
Find center 8-10 stitches; work 1 sc in each st BLO across the plate width (8-10)
Plate Row 2 :
1 sc in each st across (8-10)
Info :
Repeat Plate Rows 1-2 down the centre front to make 6-8 plates. Decrease plate width gradually toward the lower belly to create tapered plates like the reference photo.
— Legs (Make 2) :
Round 1 :
6 sc in magic ring (6)
Round 3 :
(1 sc, inc) x6 (18)
Round 4 :
(2 sc, inc) x6 (24)
Round 5-7 :
1 sc in each st (24)
Info :
Work a short oval foot by increasing around then working even rounds to form the toes later. Mark the top center of the foot for later attachment to the leg shaft.
Round 8 :
(3 sc, inc) x6 (30)
Round 9-14 :
1 sc in each st (30) — build leg height
Round 15 :
(3 sc, dec) x6 (24)
Round 16 :
1 sc in each st (24)
Round 17 :
(2 sc, dec) x6 (18)
Round 18-22 :
1 sc in each st (18) — finish leg shaft
Info :
Stuff foot firmly and leg shaft lightly. Leave top unfastened with long tail for sewing to body. For the sitting pose, make legs slightly shorter than typical to keep center of gravity low.
— Toes & Claws (Make 6 claws per foot - small cones) :
Round 1 :
5 sc in magic ring (5)
Round 2 :
(1 sc, inc) x5 (10)
Round 3 :
1 sc in each st (10)
Round 4 :
(2 sc, dec) x3 + 1 sc (7)
Round 5 :
(1 sc, dec) x2 + 1 sc (5)
Round 6 :
1 sc in each st (5)
Round 7 :
Switch to black yarn. 1 sc in each st (5)
Round 8 :
Dec twice and fasten off, leaving a tail to sew (1-2)
Info :
Sew three claws across the front of each foot and two small claws on the sides for a total of 6 per foot. Sew claws through foot fabric into the toe spaces, tightening to create a natural spread.
— Arms / Forelimbs (Make 2) :
Round 1 :
6 sc in magic ring (6)
Round 3 :
(1 sc, inc) x6 (18)
Round 4-6 :
1 sc in each st (18)
Round 7 :
(2 sc, inc) x6 (24)
Round 8-12 :
1 sc in each st (24)
Round 13 :
(2 sc, dec) x6 (18)
Round 14-18 :
1 sc in each st (18) — adjust length to match photo; stuff hand area firmly then fill arm shaft lightly
Info :
Sew arms to body at approximately rounds 18-22 of the torso, positioning slightly forward for a seated posture. Use strong whip stitch and pass through arm and body multiple times for security.
— Wings (Make 2 panels + membrane) :
Wing Panel Round 1 :
Ch 11, sc in 2nd ch from hook and across (10)
Wing Panel Round 2 :
Ch 1 turn, sc across (10)
Wing Panel Round 3 :
Ch 1 turn, inc at each end (2 inc), sc across (12)
Wing Panel Round 4-6 :
1 sc in each st (12)
Wing Panel Round 7 :
(2 sc, inc) x3 (15)
Wing Panel Round 8-12 :
1 sc in each st (15)
Info :
The wing membrane attaches along a curved edge to the panel. To create the ribbed look, work rows of BLO across the membrane edge and then single rounds in regular sc to form ribs. Pin wings in shape and insert a thin wire along the top edge if you want them poseable.
Membrane Rounds 1-3 :
With main yarn, join at wing tip, ch 1 then 1 sc in each st across membrane edge; repeat for 3 rows building a slightly triangular membrane. Work alternate rows in BLO to create visible ribs.
Membrane Rounds 4-7 :
Work 1 sc across but add 3 sc at the outer tip to ruffle slightly. At final round, switch to black for outer edge: 1 sc in each st with black to define the wing tip.
Info :
Sew wing panels to the back from rounds 18-22 of the torso. The inner wing root should attach just behind the shoulders, spaced evenly and symmetrically. Pin, check balance, then sew firmly. If using wire, insert it before final stitching and secure the wire ends inside the wing panel.
— Horns (Make 3: 2 large, 1 smaller central) :
Round 1 :
6 sc in magic ring (6)
Round 3 :
(1 sc, inc) x6 (18)
Round 4-6 :
1 sc in each st (18)
Round 7 :
(2 sc, dec) x6 (12)
Round 8-11 :
1 sc in each st (12)
Round 12 :
(1 sc, dec) x4 (8)
Round 13-16 :
1 sc in each st (8) — tapering the cone
Round 18 :
Fasten off leaving long tail to sew. Stuff lightly and shape into a curved cone. Work larger horns by adding an extra even round before tapering.
Info :
Attach horns to top of skull: two large horns angled back and one smaller horn centered at the brow as reference photo. Sew through base several times and add glue if using glass beads inside for extra security.
— Back Spines / Finlets (Make 12-14) :
Round 1 :
Ch 4, 1 sc in 2nd ch from hook, 1 sc in next, 3 sc in last ch to create a triangular spike, then work along the other side of chain: 1 sc in next, sl st to join (approx 6-8 sts)
Round 2 :
1 sc around to define spike edge (6-8)
Round 3 :
Fasten off and leave tail for sewing. Make 12-14 spikes of graduated size; larger spikes near shoulders, smaller toward tail tip.
Info :
Sew spikes evenly along the center back from the head to the base of the tail. Pin them in place first to ensure even spacing and angle them slightly outward for a natural look.
— Tail :
Round 1 :
6 sc in magic ring (6)
Round 3 :
(1 sc, inc) x6 (18)
Round 4-8 :
1 sc in each st (18) — build base tail girth
Round 9 :
(2 sc, dec) x6 (12)
Round 10-24 :
1 sc in each st (12) — extend tail length to desired measurement; use additional rounds for longer tail
Round 25 :
(1 sc, dec) x4 (8)
Round 26-29 :
1 sc in each st (8)
Tail Tip :
Ch 6, sc back along chain to create arrowhead tip, join to tail end and sew around to secure. Fasten off leaving tail to sew arrowhead in place.
Info :
Create a row of small spikes along the top of tail by sewing the finlets made earlier spaced closely together. Stuff tail moderately firm to hold posture when sitting.
— Face Details & Embellishments :
Info :
Create eyebrows and ridges above the eyes by crocheting small crescents: ch 6, sc across, sl st to turn, decrease slightly to form a tapered ridge. Make two and sew above eyes to deepen expression. For nostrils, embroider two small vertical slits using black yarn on the snout tip where visible.
Eye Rim :
With black yarn, work 1 sc around each eye opening (12-14 sts) to create a bold rim and make eyes pop. Sew eyes in place before final head closing and adjust stuffing as needed for expression.
Info :
If using safety eyes, secure washers, then add a small dab of fabric glue behind washers for extra security. Embroider eyelids with a few short stitches if you want a narrower, ferocious gaze.
— Final Assembly :
Info :
Block wings and press them into desired pose. Pin all limb and spike positions before sewing. Use matching yarn and mattress stitch or whip stitch. Reinforce joints by sewing through body multiple times and burying yarn tails inside.
Step :
Sew head to body opening or attach neck piece to body. Weave tail through body base if the tail is inserted through an opening; otherwise sew tail base centered on back bottom edge.
Info :
After all pieces are attached, go back and check symmetry: adjust stuffing, shape horns and spikes, and tighten any loose sewing. Weave in ends neatly to the inside of the body.
Finishing Touches :
Optionally add surface embroidery for extra scale definition using single crochet surface slip stitches along belly plates. Add a soft blush with fabric paint to the cheeks if desired. Ensure no loose ends remain and trim excess securely.
This majestic crimson dragon is a joyful combination of sculptural shaping and little details that bring it to life — from the layered belly plates to the dramatic black horns and claws. Every stitch adds character as the pieces come together into a display-worthy companion. I hope you enjoy making each section as much as I enjoyed designing the pattern — it’s the kind of project that makes you proud at every step. 🐉🧶✨