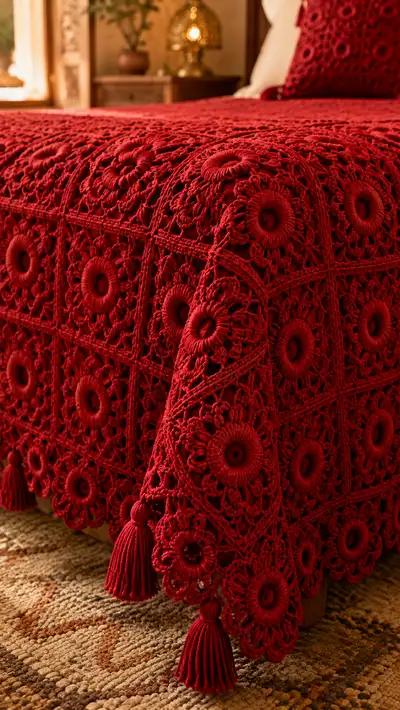
This luxurious crimson bedspread is constructed from raised floral granny squares, richly textured centers and lacy connecting stitches. The pattern recreates the deep rope-like center rings, sculpted petal rounds and delicate openwork edges, finished with tasselled corners for a timeless, Moroccan-inspired look. Designed to drape elegantly over a double bed, this project combines classic motifs with a bold single-color statement.
Progress Tracker
0% Complete
— Overview :
Info :
This pattern makes a floral granny square bedspread assembled from identical floral squares. The motif is designed to be worked in worsted cotton-blend yarn to achieve the dense, sculpted texture shown. The bedspread pictured fits a double/queen bed and measures approximately 85 x 96 inches depending on gauge and joining tension. Make and block a gauge swatch to determine motif size; the sample motif in this pattern measures approximately 6.5 inches square after blocking when worked with a 4.0mm hook.
Info :
Construction steps: 1) Crochet main floral squares, 2) Block squares, 3) Join squares using join-as-you-go or whip stitch, 4) Work edging rounds across assembled bedspread, 5) Add tassels to corners. This pattern includes full, round-by-round instructions for the main motif (36 rounds), a corner/edge motif variation (16 rounds), join rounds (18 rounds), full spread border (20 rounds), and pillow cover adaptation (20 rounds), plus tassel instructions (8 rounds equivalent).
— Materials & Gauge :
Info :
Recommended yarn: worsted (#4) cotton-blend for drape and stitch definition. Gauge: one finished motif (after blocking) = approx. 6.25-6.75 inches square. Tension varies; adjust hook if your motif is larger/smaller than the target.
Info :
Measure one motif across diagonal and side after blocking to estimate number of motifs needed for your bed size. The pictured bedspread uses a grid of 12 x 14 motifs (168 motifs total) for the approximate dimensions shown — adjust to fit your mattress or desired coverage.
— Main Floral Square Motif (Make many) :
Round 1 :
6 sc in magic ring (6)
Round 3 :
(1 sc, 1 inc) x 6 (18)
Round 4 :
(2 sc, 1 inc) x 6 (24)
Round 5 :
(3 sc, 1 inc) x 6 (30)
Info :
Rounds 1-5 establish a tight center; work these rounds with a slightly smaller hook (3.5mm) if you prefer an extra-tight ring. Keep stitches small and compact so the later wrapped ring looks sculptural.
Round 6 :
(4 sc, 1 inc) x 6 (36)
Round 7 :
1 sc in each st (36)
Round 8 :
1 sc in each st (36)
Info :
This establishes a firm base before forming the raised wrapped center ring. At the end of Round 8, fasten off leaving a long tail (approx. 18-24 inches) for wrapping if you choose the wrapped ring method described below. Alternatively you may proceed to Round 9 without fastening and work center wraps directly.
Info :
Wrapped center ring technique (creates the donuts seen in the photo): Using the long tail or a new strand, wrap yarn around a small object (narrow dowel, 3/8" ring or your fingers) 28-36 times to create a thick cord. Join by working sc evenly around the wrapped cord as you secure it to the center: insert hook under wraps and sc through previous Round 8 stitches to anchor. See Round 9-12 for anchoring rounds.
Round 9 :
Join new yarn to front of motif at any stitch. *sc around 3 wraps and sc into next base stitch* repeat across to make an anchored wrapped ring. Work 36 sc total around the wrapped cord and into the 36 base sts to secure it (36)
Round 10 :
1 sc in each st around anchored ring (36)
Round 11 :
(1 sc, ch3, sk1) x 12 forming 12 ch-spaces evenly between base sts (36)
Info :
These ch-spaces will serve as petal anchors. If your ch-spaces are too small or too large, unpick and re-distribute to maintain symmetry. Mark every 3rd base stitch to help position 12 petals evenly around the ring.
Round 12 :
*Into each ch-space: (ch1, 5 puff (yarn over, insert, pull up loop) close together, ch1, sl st into ch-space)* repeat around to form 12 puff petals. After completing all petals, sl st to first puff top to join (12 puff petals)
Round 13 :
Ch1, sc into top of first puff, *(ch3, sc into top of next puff) x 11* finish with sl st to initial sc (12 ch-3 loops connecting petal tops)
Round 14 :
Working into each ch-3 loop: (3 dc, ch2, 3 dc) forming small shell petals around each puff (12 shells totaling 72 dc + 12 ch2 spaces)
Info :
These shell rounds create the pronounced textured petals. Use consistent tension on the dc groups so shells sit nicely and do not flatten; block later to shape shells evenly.
Round 15 :
Ch1, sc into center of each shell, *(ch5, sc into next shell center) x 11* join (12 ch-5 arches)
Round 16 :
Into each ch-5 arch: *(sc, hdc, 3 dc, hdc, sc) forming larger petal arches* repeat around (12 larger petals)
Round 17 :
1 sc in each stitch and st around the completed petal round to even out edges (count will vary; expected approx. 84 sc)
Info :
After Round 16 the motif begins to read more like a round flower. From this point we transition to square shaping using corner shells and chain spaces to build the square frame.
Round 18 :
*(sc 10, ch4, sc 10) across to form base for square sides — work evenly around petals so that you have 4 groups for sides with 4 ch-4 corner loops* (approx. 84 sc total before corner chains)
Round 19 :
In each corner ch-4: (sc, ch3, 3 dc, ch3, sc) to form a defined corner; along each side: 1 sc in each of the 10 sc of side rows. End with sl st to join (counts will vary depending on distribution; expected approx. 112 sts including corners)
Round 20 :
Ch3 (counts as dc), *(2 dc, ch2, 3 dc) into each corner ch-3 space; across each side work (1 dc, ch1, sk1) pattern evenly creating 9-11 dc per side* join (expected approx. 148 dc and 4 corner shells)
Info :
At this stage the motif is a rounded square; check your counts by measuring side length. The standard motif should be about 6.5 inches blocked. If your sides are too short, add an extra repeat of a dc-ch1 across sides in the next round; if too long, reduce by one ch-1 space per side.
Round 21 :
1 sc in each st around working evenly including around corner shells (expected approx. 148 sc)
Round 22 :
Working in FLO for texture: 1 sc BLO in each st around (148)
Round 23 :
*(ch5, sl st into 3rd ch from hook to create small picot-arch, sc into next 7 sts) repeat across each side and around corner shells* finish to create a lacy connecting line (counts vary)
Info :
These lace arches add the network that will join with neighboring squares. Keep arch size consistent so joins later sit flat without puckering.
Round 24 :
1 sc in each st across to stabilise (expected approx. 148 sc)
Round 25 :
Edge: *Into each side between corner shells: (sc 2, ch3, sc 2) across; corners: (sc, ch5, sc)* This prepares the motif for final join loops (creates small ch-3 link spaces and ch-5 corner space)
Round 26 :
Work a decorative round: *(sl st into next st, ch7, sl st into same st) repeat across side sc spaces to create a chain loop motif across each side; in corner ch-5: (sc, ch9, sc)* (this will create ornamental openwork seen between squares)
Info :
If you prefer a slightly denser join, replace the ch7 loops with ch5 loops. The photographed bedspread uses generous open loops to create visible lacy channels between motifs.
Round 27 :
1 sc in each st to tidy loop bases (expected approx. 148 sc)
Round 28 :
BLO round: 1 sc BLO in each st (148) — this creates a subtle ridge that helps motifs sit snugly next to one another
Round 29 :
Optional: Add a final decorative scallop round by working *(sc in next 2 sts, 5 dc in next st, sc in next 2 sts)* around sides; in corners make larger scallop (sc, 7 dc, sc) to emphasize corner petal cluster
Round 30 :
Fasten off and weave in ends. Block motif generously to square measurements. Repeat to create required number of motifs. Expected finished motif size after blocking: 6.5" square (approx. 16.5cm)
Info :
Make a sample of 4 motifs and join them to test gauge and joining tension before committing to whole spread. This saves unraveling large sections later.
— Corner/Edge Variation Motif (Make as needed for borders) :
Round 1 :
6 sc in magic ring (6)
Round 3 :
(1 sc, 1 inc) x 6 (18)
Round 4 :
(2 sc, 1 inc) x 6 (24)
Round 5 :
1 sc in each st (24)
Round 6 :
Form 8 puff petals evenly: *(ch3, 4 puff, ch3, sl st into next base stitch)* repeat 8 times and secure (8 puff petals)
Round 7 :
From the puff round create partial square: work *sc across next 6 sts, ch4 for corner, sc across next 6 sts* repeat creating 4 side groups (expected approx. 36 sc plus 4 ch-4 corners)
Round 8 :
In each corner ch-4: (sc, ch3, 3 dc, ch3, sc) and sc across sides to form a small corner motif (approx. 52 sts)
Round 9 :
1 sc around to tidy (expected approx. 52 sc)
Round 10 :
Add 1 round of ch-loops on sides: *(ch5, sl st into base) repeat to make join loops for edge alignment* finish and fasten off
Info :
Use this smaller motif for outer borders and to fill gaps created by the rectangular layout if your grid does not end in a full square. Block these to exact dimensions to match adjacent full motifs.
— Join-As-You-Go and Assembly Rounds :
Info :
This section describes the join-as-you-go method used in the sample. You can alternatively join finished squares using a whip/stitch or mattress stitch. Join-as-you-go is preferred for a seamless look and fewer ends to weave in.
Round 1 (Join Step 1) :
Place two motifs right sides together at their meeting side. With WS of mot A facing you and mot B behind, attach yarn in a side ch-loop on Motif A and work sc into corresponding loop on Motif B then sc into next loop on A, continuing across: *(sc into next join loop of B, sc into next loop of A)* repeat until side is joined. Fasten off. This creates a neat 1-row join.
Round 2 (Join Step 2) :
For the second row of the grid, pick up motif and join along two edges (one side previously joined, one new) by repeating the sc-swap technique: work sc into one motif loop then sc into adjacent motif loop, keeping tension even. At intersection points where 4 motifs meet, work sc through all adjacent loops (sc through 3 or 4 loops as fits) to anchor intersections firmly.
Info :
When joining, keep stitches loose enough to allow the assembly to lay flat, but firm enough to avoid wide gaps. Pin motifs together before joining for best alignment. Use blocked motifs to avoid needing heavy adjustment.
Round 3 (Grid Stabilizing) :
After joining every motif into the desired grid, work a stabilizing row around the entire assembled spread: attach yarn at any side seam and work 1 sc in each join stitch and 1 sc in each side stitch across every motif edge to create a continuous frame (expected stitch count varies by grid size).
Round 4 (Info) :
If any seam appears too open, reinforce by working a second sc round along the seam from the right side, or work a slip-stitch edgestitch to flatten joins. For large spreads, consider sewing a staggered grid of interior anchor stitches to prevent slippage during use.
Round 5 (Optional Decorative Join) :
To echo the lacy look in the original, work into the join spaces a decorative chain-lace: *(ch5, sl st into next join space, sc into next seam st)* repeat along entire seam network. This creates visible lines that read across the assembled blanket.
Round 6 :
Once all squares are joined and seams reinforced, fasten off and weave in all ends. Press gently with steam if fiber allows; do not over-flatten the puff petals.
— Full Bedspread Border (20 Rounds) :
Info :
Border rounds are worked around the entire assembled spread to tidy and harmonize edges, accentuate corners and support tassel placement. Work border on the assembled bedspread after all joins and blocking are complete.
Round 1 :
Attach yarn to any outer seam and work 1 sc evenly around entire perimeter, working (sc, ch1) in corners to maintain square shaping — continue to end (st count varies by perimeter length)
Round 2 :
1 sc in each st around (same count as Round 1)
Round 3 :
Work 1 round BLO sc to create a subtle ridge (same count)
Info :
BLO rounds form a neat line that frames the assembled squares. Keep consistent use of BLO so ridge alignment remains uniform around the perimeter.
Round 4 :
*Along each side: (sc 3, ch5, sc 3) making decorative loop spaces; in corners: (sc, ch9, sc)* work evenly
Round 5 :
Into each ch-5 loop: work (sc, hdc, 3 dc, hdc, sc) to form scallop petals across sides; corners: (sc, 7 dc, sc) — fasten off after completing all sides
Round 6 :
Attach yarn and work 1 sc across scallop bases to tidy (expected count depends on number of scallops)
Round 7 :
Work a decorative picot round: *(sc 2, ch3, sl st into ch-3) across scallop top to create lacy points across border*
Round 8 :
1 sc in each st to stabilize points (same count)
Info :
If you prefer a denser border like the sample, repeat rounds 4-8 again to build a more substantial scalloped edge. The photographed bedspread uses two decorative layers for a bold finish.
Round 9 :
Work a tall ornamental round: *(ch7, sl st into base to create tall loop, sc across base stitches)* repeat around, spacing loops evenly (gives the filigree look on the photograph)
Round 10 :
Into each tall loop: *(sc, 5 dc, sc)* form droplet-shaped bosses around edges to echo motif centers
Round 11 :
1 sc in each st to tidy (counts variable)
Round 12 :
Final edging: *(sc in next 3 sts, 7 dc in next st, sc in next 3 sts)* repeat for large scallops; in corners make larger 9-dc scallop to produce a deep ornamental corner
Round 13 :
Finish with a neat sl st round through back loops only to create a uniform back edge for a clean finish and to hide bulk from tassel attachments
Info :
After finishing the border, block again lightly to set scallops and scallop spacing. Mark where tassels will sit (corners and mid-edge if desired) and prepare to attach tassels while working through both border rounds and sl st anchors for maximum security.
— Pillow Cover Adaptation (Make 2) :
Info :
Pillow covers pictured are constructed from 4 x 4 grid of the main motif, joined as described. The following rounds adapt motif size and joining treatment to form two 4-motif square pillow fronts with matching backs.
Round 1 :
Make 16 motifs sized to match pillow target (approx. 6.5" motif gives ~26" pillow). Block motifs to precise size.
Round 2 :
Join motifs into a 4 x 4 square using the join-as-you-go technique described: join rows first, then join rows together. Reinforce intersections with extra sc through four loops at grid crosses.
Round 3 :
Work 1 round of sc around the assembled square, working evenly and filling corner shaping with (sc, ch3, sc) to keep square corners soft. This rounds creates the back attachment edge.
Round 4 :
Create a back panel either from matching motifs or from single-piece fabric: for a zip-back, create a panel of dc rows approx. the width and attach by whip stitch along three sides, leaving top open for inserting a zipper or envelope flap.
Round 5 :
Attach pillow back: place front and back right sides together and whip stitch or single crochet around leaving an opening for turning if required. Add a zipper or buttons for a professional finish.
Round 6 :
Fasten off and weave in all ends; insert pillow form and lightly stuff to desired fullness.
Info :
Alternatively, make two identical motif-faced panels and sew three sides, then insert pillow and whip stitch the final side. For a cleaner look, consider lining the pillow inside with a lightweight cotton fabric before final closure.
— Tassels and Finishing Touches :
Round 1 :
To make large tassels as pictured: wind yarn around a 4.5" cardboard template approximately 60-80 times for a full tassel. For each tassel, remove from template and tie a short piece of yarn tightly around the top loop to form the tassel head. Trim lower edge evenly.
Round 2 :
Wrap the tied head with a 6" length of yarn tightly to form the neck, securing with a knot and weaving ends into the head. Make four large tassels for the corners; add 8-12 smaller tassel clusters across edges if desired.
Round 3 :
Attach tassels by threading the head loop with a yarn tail and pulling through the corner scallop and sl st into the back loops for anchors. Sew the top of the tassel firmly with several passes of the yarn needle and knot on the underside.
Info :
For extra durability, secure tassel heads to a small inner knot on the underside of the border with a dab of fabric glue, then weave ends to conceal glue. Avoid glue if yarn is delicate or if you intend to wash the bedspread frequently.
Round 4 :
Weave in all remaining ends using tapestry needle. Re-block the completed bedspread lightly if needed to settle stitches and scallops.
Info :
When adding tassels, ensure they are evenly placed by measuring from each corner and along edges so the visual weight is balanced. Mark placement with pins before attaching permanently.
— Troubleshooting & Tips (Info Heavy) :
Info :
If your wrapped center ring looks loose, tighten the wraps and re-anchor with an extra round of sc through the wraps and base stitches. If petals flatten, steam-block carefully to coax three-dimensional shape back into place. For consistent motif size, always use the same hook and yarn tension and block each motif identically.
Info :
To change overall bedspread size, adjust the grid count. For example: twin = 9 x 10 motifs, full = 11 x 12 motifs, queen = 12 x 14 motifs (sample pictured), king = 14 x 16 motifs — these are approximate and assume the sample motif size of ~6.5" after blocking.
Info :
Care instructions: hand wash or gentle machine wash in cool water and dry flat. Cotton-blend yarns may relax after first washing – re-block after washing to preserve motif definition.
Info :
Alternative color suggestions: A single saturated color like the photographed crimson emphasizes texture. For a vintage look try an ombre of three close reds or a two-tone contrast for center rings vs. petals for more visual complexity.
Completing this bedspread is a truly rewarding experience — every motif you make is a little piece of handcrafted luxury that joins together into an elegant heirloom. The sculpted centers, lacy joins and sculptural tassels make a bold statement in any bedroom. Enjoy the meditative rhythm of repeating motifs and the satisfying moment when the first sewn seam pulls the project into a single breathtaking surface. 🧶✨ Wrap up, block carefully, and enjoy the lasting warmth and texture you've created. 😍