🧢 Beautiful ✨ Detailed πŸ’ Adorable

Crochet bag with leaves Pattern

Crochet bag with leaves Pattern
4.4β˜… Rating
8-10 Hours Time Needed
1.4K Made This
βœ‚οΈ

Intermediate Level

Ideal for those with basic crochet experience, featuring slightly more advanced stitches and techniques to expand your skills.

⏱️

All-Day Adventure

Requires 8-10 hours, ideal for a full day of immersive crocheting.

✨

Stylish Touch

An elegant detail to elevate any look, combining traditional techniques with contemporary design sensibilities.

About This Crochet bag with leaves Pattern

This pattern teaches you how to crochet a textured bag with sculpted leaves using cord or bulky yarn. It includes full round-by-round instructions for the base, leaf sections, trim, and handles. You will learn post stitch shaping (FPDC and BPDC) to create dramatic raised leaves and a sturdy bag structure. The finished bag is roomy and stylish, perfect for everyday use.

Crochet bag with leaves Pattern crochet pattern - detailed view of completed project

Instructions include materials, abbreviations, video links, and clear step-by-step photos to guide you. The final section explains folding, sewing handles, and finishing touches for a polished result.

Why You'll Love This Crochet bag with leaves Pattern

I absolutely love this pattern because the raised leaf motifs give a simple bag an elegant, sculptural look. I enjoy working with cord and post stitches, and this design highlights those techniques beautifully. The project is satisfying to make β€” you can see the shape form as you add each leaf. I also love that the bag is practical and durable, making it perfect for daily use or gifting.

Crochet bag with leaves Pattern step 1 - construction progress Crochet bag with leaves Pattern step 2 - assembly progress Crochet bag with leaves Pattern step 3 - details and accessories Crochet bag with leaves Pattern step 4 - final assembly and finishing

Switch Things Up

I love how easily you can change the look of this bag by swapping cord colors β€” try a two-tone scheme with a neutral base and contrasting leaf color for dramatic effect.

If you want a smaller or larger bag, change the cord weight and hook size; bulky cord with a larger hook will make a chunkier bag, while thinner cord will create a more delicate version.

I often add a fabric lining to my bags for structure and to keep small items from slipping through; choose a lightweight cotton and sew a simple lined pouch to insert.

To make the bag more secure, install a magnetic snap or zipper at the top before sewing the lining β€” this adds function without changing the exterior look.

Try substituting different stitches for the trim β€” a crab stitch or reverse single crochet gives a neat, rope-like finish for a polished edge.

If you prefer a softer handle, crochet a padded handle by wrapping a length of cord with yarn or add a soft fabric cover over the handle for comfort on the shoulder.

I sometimes experiment by adding beads or wooden toggles to the leaf tips for a boho-inspired vibe β€” these small touches personalize the bag beautifully.

Make a mini version as a phone pouch or key fob by reducing the rounds and simplifying the leaf motif; this is a great gift idea and uses less material.

For a beach-ready bag, use polypropylene cord and skip the lining; this creates a washable, water-resistant tote perfect for summer essentials.

I also enjoy varying the leaf placement β€” try a single large leaf or scattered small leaves for a different visual focal point while keeping the same shaping techniques.

Common Mistakes & How to Fix Them

βœ— Not using stitch markers during the repeated quarter-round sections leads to misaligned leaves; place markers to mark each quarter and ensure consistent placement. βœ— Pulling your tension too tight when working front or back post double crochet can distort the leaf shapes; keep a relaxed, even tension and practice on a swatch first. βœ— Skipping the instruction to hide the starting tail makes the base look messy; weave and hide the end along the stitches immediately after the first round. βœ— Forgetting to fold and count loops before attaching handles may cause uneven placement; fold the bag and count three loops toward the middle as instructed to mark exact handle positions. βœ— Using the wrong hook size for your cord will change the bag dimensions drastically; match the recommended hook to your chosen cord and check gauge by making the base rounds.

Crochet bag with leaves Pattern

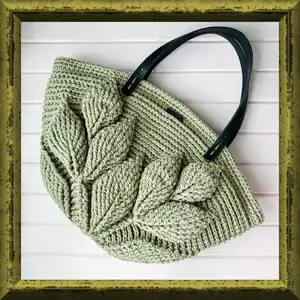
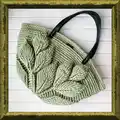
Make a stylish crochet bag decorated with sculpted leaves using cord and post stitches. This pattern walks you through the base, leaf panels, trimming, and handles so you can create a durable, fashionable tote. Perfect for gifting or everyday use, the textured leaves give a designer look to a handmade piece. Follow the step-by-step instructions and photos to achieve a professional finish.

Intermediate 8-10 Hours

Materials Needed for Crochet bag with leaves Pattern

β€” Main Fabric

  • 01
    Any cord (cotton, polyester, raffia, jute) 2-3 mm, approximately 800m (875 yards) β€” example: Maccaroni PP Tie Dye 3MM
  • 02
    Bulky/cord alternative yarns in similar thickness (adjust hook size accordingly)
  • 03
    Small amounts of contrasting yarn for details (optional)

β€” Tools Required

  • 01
    Crochet hook size 4-5 mm (suitable for 2-3 mm cord in this example)
  • 02
    Any sewing handles (pre-made leather or fabric handles) or materials to crochet handles
  • 03
    Scissors
  • 04
    Thick needle (for sewing handles to bag)
  • 05
    4 stitch markers
  • 06
    Yarn needle for weaving ends
  • 07
    Iron (for pressing bag if using raffia, jute or cotton cord)

Progress Tracker

0% Complete

β€” Materials and tools :

Info :

Any cord (cotton, polyester, raffia, jute) 2-3 mm, 800m (875 yards). In this example, Maccaroni PP Tie Dye 3MM. Suitable yarn hook (In this example, 4 - 5 mm). Any sewing handles (You may also crochet them too). Scissors. Thick needle. 4 stitch markers. Size of the bag: 21-22inches x 13-14inches (55cmx35cm). Depending on the yarn and hook size you are using, the bag size can increase or decrease.

Infos :

CH - chain stitch. SlSt - slip stitch. SC - single crochet. DC - double crochet. BPDC - back post double crochet. FPDC - front post double crochet. FPDC2tog - 2 FPDC crochet together.

Info :

Link to the video: Part 1: https://youtu.be/5XoOMBhzreY Part 2: https://youtu.be/x_2a47mYL7M Part 3: https://youtu.be/tJAhPNQZNc4

β€” Crochet the bag base :

Info :

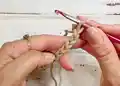
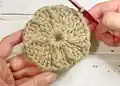
Crochet chain of the 6CH, SlSt in 1st CH.

Round 1 :

1. 2CH, 16 DC, SlSt.

Info :

Hide the end along the stitches.

Info :

Next, crochet the rounds with a pattern that repeats 4 times. Here presented the description of how to crochet 1/4 round. The remaining 3 parts are crocheted similarly. The each row ends with SlSt.

Round 2 :

2. 2CH, 3 DC in 1, 1 FPDC, 1CH, 1 FPDC, 3 DC in 1, 1 FPDC.

Round 3 :

3. 2CH, 3 BPDC, 2 FPDC in 1, 1CH, 2 FPDC in 1, 3 BPDC, 1 FPDC.

Round 4 :

4. 2CH, 2 BPDC in 1, 2 BPDC, 1 FPDC, 2 FPDC in 1, 1CH, 2 FPDC in 1, 1 FPDC, 2 BPDC, 2 BPDC in 1, 1 FPDC.

Round 5 :

5. 2CH, 2 BPDC in 1, 3 BPDC, 2 FPDC, 2 FPDC in 1, 1CH, 2 FPDC B 1, 2 FPDC, 3 BPDC, 2 BPDC B 1, 1 FPDC.

Round 6 :

6. 2CH, 5 BPDC, 3 FPDC, 2 FPDC in 1, 1CH, 2 FPDC in 1, 3 FPDC, 5 BPDC, 1 FPDC.

Round 7 :

7. 2CH, 2 BPDC in 1, 4 BPDC, 4 FPDC, 2 FPDC in 1, 1CH, 2 FPDC in 1, 4 FPDC, 4 BPDC, 2 BPDC B 1, 1 FPDC.

Round 8 :

8. 2CH, 2 BPDC in 1, 5 BPDC, 5 FPDC, 2 FPDC in 1, 1CH, 2 FPDC in 1, 5 FPDC, 5 BPDC, 2 BPDC in 1, 1 FPDC.

Round 9 :

9. 1CH, (1DC, 1CH, 1DC) in 1, 7 BPDC, 6 FPDC, 2 FPDC in 1, 1CH, 2 FPDC in 1, 6 FPDC, 7 BPDC, (1DC, 1CH, 1DC) in 1, 1 FPDC.

Round 10 :

10. 1CH, 1DC, 2 FPDC in 1, 1CH, 2 FPDC in 1, 7 BPDC, FPDC2tog, 12 FPDC, FPDC2tog, 7 BPDC, 2 FPDC in 1, 1CH, 2 FPDC in 1, 1DC, 1 FPDC.

Round 11 :

11. 1CH, 2 BPDC in 1, 1 FPDC, 2 FPDC in 1, 1CH, 2 FPDC in 1, 1 FPDC, 7 BPDC, FPDC2tog, 10 FPDC, FPDC2tog, 7 BPDC, 1 FPDC, 2 FPDC in 1, 1CH, 2 FPDC in 1, 1 FPDC, 2 BPDC in 1, 1 FPDC.

Round 12 :

12. 1CH, 2 BPDC B 1, 1 BPDC, 2 FPDC, 2 FPDC in 1, 1CH, 2 FPDC in 1, 2 FPDC, 7 BPDC, FPDC2tog, 8 FPDC, FPDC2tog, 7 BPDC, 2 FPDC, 2 FPDC in 1, 1CH, 2 FPDC in 1, 2 FPDC, 1 BPDC, 2 BPDC in 1, 1 FPDC.

Round 13 :

13. 1CH, 2 BPDC in 1, 2 BPDC, 3 FPDC, 2 FPDC in 1, 1CH, 2 FPDC in 1, 3 FPDC, 7 BPDC, FPDC2tog, 6 FPDC, FPDC2tog, 7 BPDC, 3 FPDC, 2 FPDC in 1, 1CH, 2 FPDC in 1, 3 FPDC, 2 BPDC, 2 BPDC in 1, 1 FPDC.

Round 14 :

14. 1CH, 2 BPDC in 1, 3 BPDC, 4 FPDC, 2 FPDC in 1, 1CH, 2 FPDC in 1, 4 FPDC, 7 BPDC, FPDC2tog, 4 FPDC, FPDC2tog, 7 BPDC, 4 FPDC, 2 FPDC in 1, 1CH, 2 FPDC in 1, 4 FPDC, 3 BPDC, 2 BPDC in 1, 1 FPDC.

Round 15 :

15. 1CH, 2 BPDC in 1, 4 BPDC, 5 FPDC, 2 FPDC in 1, 1CH, 2 FPDC in 1, 5 FPDC, 7 BPDC, FPDC2tog, 2 FPDC, FPDC2tog, 7 BPDC, 5 FPDC, 2 FPDC in 1, 1CH, 2 FPDC in 1, 5 FPDC, 4 BPDC, 2 BPDC in 1, 1 FPDC.

Round 16 :

16. 1CH, 2 BPDC in 1, 5 BPDC, FPDC2tog, 10 FPDC, FPDC2tog, 7 BPDC, FPDC2tog, FPDC2tog, 7 BPDC, FPDC2tog, 10 FPDC, FPDC2tog, 5 BPDC, 2 BPDC in 1, 1 FPDC.

Round 17 :

17. 1CH, 7 BPDC, FPDC2tog, 8 FPDC, FPDC2tog, 7 BPDC, FPDC2tog, 7 BPDC, FPDC2tog, 8 FPDC, FPDC2tog, 7 BPDC, 2 FPDC in 1, 1, 1 FPDC.

Round 18 :

18. 1CH, 7 BPDC, FPDC2tog, 6 FPDC, FPDC2tog, 7 BPDC, 1DC, 7 BPDC, FPDC2tog, 6 FPDC, FPDC2tog, 7 BPDC, 2 FPDC in 1, 1CH, 2 FPDC in 1.

Round 19 :

19. 1CH, 7 BPDC, FPDC2tog, 4 FPDC, FPDC2tog, 15 BPDC, FPDC2tog, 4 FPDC, FPDC2tog, 7 BPDC, 1 FPDC, 2 FPDC in 1, 1CH, 2 FPDC in 1, 1 FPDC.

Round 20 :

20. 1CH, 7 BPDC, FPDC2tog, 2 FPDC, FPDC2tog, 15 BPDC, FPDC2tog, 2 FPDC, FPDC2tog, 7 BPDC, 2 FPDC, 2 FPDC in 1, 1CH, 2 FPDC in 1, 2 FPDC.

Round 21 :

21. 1CH, 7 BPDC, FPDC2tog, FPDC2tog, 15 BPDC, FPDC2tog, FPDC2tog, 7 BPDC, 3 FPDC, 2 FPDC in 1, 1CH, 2 FPDC in 1, 3 FPDC.

Round 22 :

22. 1CH, 7 BPDC, FPDC2tog, 15 BPDC, FPDC2tog, 7 BPDC, 4 FPDC, 2 FPDC in 1, 1CH, 2 FPDC in 1, 4 FPDC.

Round 23 :

23. 1CH, 7 BPDC, 1DC, 15 BPDC, 1DC, 7 BPDC, FPDC2tog, 8 FPDC, FPDC2tog.

Round 24 :

24. 1CH, 31 BPDC, FPDC2tog, 6 FPDC, FPDC2tog.

Round 25 :

25. 1CH, 31 BPDC, FPDC2tog, 4 FPDC, FPDC2tog.

Round 26 :

26. 1CH, 31 BPDC, FPDC2tog, 2 FPDC, FPDC2tog.

Round 27 :

27. 1CH, 31 BPDC, FPDC2tog, FPDC2tog.

Round 28 :

28. 1CH, 31 BPDC, FPDC2tog.

Round 29 :

29. 1CH, 32 BPDC.

β€” Crochet the base trim :

Round 30 :

30. 1CH, 128 SC, SlSt.

Info :

If the handles are crocheted, then go to the next section. But, if the handles are sewn, then crochet further.

Round 31 :

31. 1CH, 128 SC, SlSt.

β€” Finish :

Round 32 :

32. 1CH, 128 SC. Cut the thread and hide its end along the stitches.

Info :

If you crochet from raffia, jute or cotton cord - be sure to iron the bag through a damp cloth. Fold the bag in half, combining the tops of the last leaves. Count three loops towards the middle. In these places (red arrow) sew the handles with the thick needle and pieces of yarn.

β€” Crochet handles :

Infos :

Fold the bag in half, combining the tops of the last leaves. Count three loops towards the middle. Place 4 markers. Crochet in the round of SC. When reaching the 1st marker, begin to crochet the chain stitches. The number of CH depends on the desired length of the handle: elbow or shoulder. Connect the chain to the base in the place where the 2nd marker located. Next, crochet SC to 3d markers, again repeat crochet the same amount of SC. Connect the chain in the place where there is 4th marker. The next row crochet SC. Crochet SC in each loop of CH, also. Crochet another 2-3 rows of SC. If desired, the last row of SC in places where the handles, it can be crochet with loops by lowering the hook in the CH (red arrow).

Info :

Iron the handle through a damp cloth.

Info :

Congratulations! Your bag is ready!

Assembly Instructions

  • Fold the bag in half, combining the tops of the last leaves; count three loops towards the middle to mark the handle attachment points and place markers.
  • Sew handles in the marked places (red arrow points in photos) using a thick needle and pieces of yarn, stitching through the top loops for a secure attachment.
  • If crocheting the handles: work in rounds of SC, when reaching the 1st marker begin chains for desired length, connect to the 2nd marker and continue SC to the 3rd marker; repeat symmetrically.
  • After attaching handles, weave all ends and, if using raffia, jute or cotton cord, iron the bag through a damp cloth to even the shape.
  • When the handle chain is attached, crochet 2-3 additional rounds of SC over the chain loops, then finish and hide the ends along the stitches for a neat edge.
  • Place 4 markers before beginning handles to ensure precise placement and symmetry; check both sides before sewing or crocheting handles.

Important Notes

  • πŸ’‘Use stitch markers to keep track of quarter repeats, especially during the leaf pattern, to maintain symmetry across the bag.
  • πŸ’‘Hide and weave in starting tails along the stitches early to avoid bulky seams and an untidy base.
  • πŸ’‘If using natural fibers like raffia, jute or cotton cord, iron the finished bag through a damp cloth to neaten and set the shape.
  • πŸ’‘Work with consistent tension when making FPDC and BPDC stitches to ensure leaves form correctly and maintain even shaping.

This crochet bag with leaves pattern combines rustic cord and sculpted post stitches to create a statement tote with texture and style. The design is practical and roomy, finished with sturdy handles and professional shaping. Make one as a gift or a personal accessory β€” it will become a go-to favorite in your handmade collection. 🧢✨

You ask,

we answer.

FAQs

What size will the finished piece be?

The finished bag measures approximately 21-22 inches wide by 13-14 inches tall (55cm x 35cm) when made with the recommended cord and hook size.

Can I use different yarn weights for this pattern?

Yes, you can use different cord or yarn weights, but the final size and stitch definition will change; adjust your hook size accordingly and make a small gauge swatch before proceeding.

Do I need prior crochet experience for this pattern?

This pattern is rated intermediate and uses front and back post double crochet techniques; basic experience with post stitches and reading round-by-round instructions is recommended.

How long does this project typically take to complete?

Most crocheters complete this project in 8-10 hours, though time may vary based on experience level and working pace.

Can I sew on pre-made handles instead of crocheting them?

Yes, you can sew on pre-made handles; fold the bag and mark the attachment points (count three loops towards the middle) then sew through the top loops with a thick needle and yarn.