๐Ÿงถ Beautiful โœจ Detailed ๐Ÿ’ Adorable

Crochet Donut Pillow Pattern

Crochet Donut Pillow Pattern
4.4โ˜… Rating
5-7 Hours Time Needed
3.9K Made This
โœ‚๏ธ

Intermediate Level

Ideal for those with basic crochet experience, featuring slightly more advanced stitches and techniques to expand your skills.

โฑ๏ธ

Weekend Treat

Takes 5-7 hours, making it an enjoyable project to finish over a couple of days.

๐Ÿก

Cozy Accent

A warm touch for your space that transforms ordinary corners into inviting nooks filled with handmade charm.

About This Crochet Donut Pillow Pattern

Create a plush, round donut pillow using soft Himalaya Dolphin Baby yarn with clear step-by-step rounds and photo guidance. This pattern includes shaping, a back-loop color change row for the 'frosting', and simple sprinkle decoration instructions. The finished pillow measures about 12.20 inches (29 cm) and is perfect for home decor or as a whimsical gift.

Crochet Donut Pillow Pattern crochet pattern - detailed view of completed project

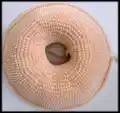
You will work mostly in single crochet rounds with increases and decreases for shaping, then finish with hand-sewn sprinkles using colorful yarn. The pattern supplies materials, stitch abbreviations, and detailed finishing steps to make assembly straightforward.

Why You'll Love This Crochet Donut Pillow Pattern

I absolutely love this pattern because it turns simple single crochet rounds into a charming, decorative pillow that brightens any room. I enjoy how the back-loop frosting row creates a subtle edge that separates the donut base from the 'frosting' color. I also love adding colorful yarn sprinkles by hand โ€” it is a quick, creative step that makes each pillow unique. This design is rewarding because it is both tactile and visually delightful, and I get excited to gift them to friends and family.

Crochet Donut Pillow Pattern step 1 - construction progress Crochet Donut Pillow Pattern step 2 - assembly progress Crochet Donut Pillow Pattern step 3 - details and accessories Crochet Donut Pillow Pattern step 4 - final assembly and finishing

Switch Things Up

I love customizing this donut pillow by changing the frosting color to match my room decor โ€” try pastel shades for a softer look or bold colors for a playful accent.

I sometimes make mini versions by switching to a thinner yarn and smaller hook to create keychain or small cushion versions.

To make a firmer pillow, I use a little more stuffing and crochet one or two extra rounds before closing to increase thickness.

I like to vary sprinkle styles: use long sprinkled stitches for a whimsical look or tiny embroidered knots for neat, subtle sprinkles.

You can add a fabric backing circle inside before stuffing for added stability and to keep stuffing from shifting over time.

If you want a themed donut, I add tiny felt hearts, stars, or a small crocheted tag for personalization before final sewing.

I sometimes sew an invisible zipper inside the seam so the pillow can be washed โ€” it takes more time but is worth it for easy care.

Try combining two frosting colors by doing two back-loop rounds in different colors for an ombre effect that looks charming on display.

I recommend experimenting with embroidery thread for delicate sprinkles if you prefer a low-profile decoration that doesnt puff out much.

For a playful set, I make several donuts in coordinating colors and display them together on a sofa or bed โ€” they make a cheerful collection and great handmade gifts.

Common Mistakes & How to Fix Them
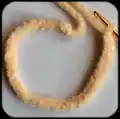
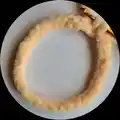
โœ— Skipping the correct chain count at the start will change the whole circumference; always make 36 CH and join carefully to form the correct ring. โœ— Crocheting too loosely can make the donut collapse and lose shape; maintain a tight, consistent tension for a firm pillow. โœ— Forgetting to stuff gradually causes lumps or uneven shaping; stuff little by little and shape as you go to keep an even form. โœ— Not sewing the opening securely can let stuffing escape over time; fold the donut as shown, sew small stitches, stuff again, then finish sewing for a secure closure. โœ— Changing color without using the back loops for the frosting row will hide the edge definition; be sure to crochet that CC row in back loops only as instructed.

Crochet Donut Pillow Pattern

This cozy crochet donut pillow pattern guides you through every round to create a soft, sprinkle-decorated round pillow you will love. You will work in continuous rounds and add colorful yarn 'sprinkles' for a playful finish. The pattern is clear and photo-supported so you can follow along and make your own donut in beautiful plush yarn.

Intermediate 5-7 Hours

Materials Needed for Crochet Donut Pillow Pattern

โ€” Main Fabric

  • 01
    Himalaya Dolphin Baby yarn - Peach color (80333) 100% Polyester (main color) - approx 2 skeins (I used two yarns; you may need a little more if you crochet tightly)
  • 02
    Himalaya Dolphin Baby yarn - Pink color (80303) 100% Polyester (frosting color) - approx 1-2 skeins depending on size
  • 03
    You can substitute with other plush polyester, cotton, or acrylic yarns; final pillow size depends on yarn choice
  • 04
    Fiberfill stuffing - approximately 150 grams per donut pillow

โ€” Tools Required

  • 01
    Crochet hook No: 3.5 mm
  • 02
    Fiberfill (about 150 grams for one donut pillow)
  • 03
    Long needle for sewing and decoration
  • 04
    Scissors
  • 05
    Polyester or cotton yarns in small amounts for donut decoration (sprinkles) and stitching

Progress Tracker

0% Complete

โ€” Donut Pillow :

Round 1 :

Start crochet the bottom of donut pillow with peach color 36 CH then connect in a ring (36)

Round 2 :

36 SC (36)

Round 3 :

(2 SC,1 INC) *12 (48)

Round 4 :

48 SC (48)

Round 5 :

(3 SC,1 INC) *12 (60)

Round 6 :

(4 SC,1 INC) *12 (72)

Round 7 :

72 SC (72)

Round 8 :

(5 SC,1 INC) *12 (84)

Round 9 :

(6 SC,1 INC) *12 (96)

Round 10 :

96 SC (96)

Round 11 :

(7 SC,1 INC) *12 (108)

Round 12 :

108 SC (108)

Round 13 :

(8 SC,1 INC) *12 (120)

Round 14 :

120 SC (120)

Round 15 :

(9 SC,1 INC) *12 (132)

Round 16 :

132 SC (132)

Round 17 :

(10 SC,1 INC) *12 (144)

Round 18 :

144 SC (144)

Round 19 :

(11 SC,1 INC) *12 (156)

Round 20-23 :

4 Rows 15 SC (156)

Round 24 :

CC and crochet this row with a hook only for the back loops.

Round 25-30 :

6 Rows 156 SC (156)

Round 31 :

(11 SC,1 DEC) *12 (144)

Round 32 :

144 SC (144)

Round 33 :

(10 SC,1 DEC) *12 (132)

Round 34 :

132 SC (132)

Round 35 :

(9 SC,1 DEC) (120)

Round 36 :

120 SC (120)

Round 37 :

(8CS,1 DEC) *12 (108)

Round 38 :

108 SC (108)

Round 39 :

(7 SC,1 DES) *12 (96)

Round 40 :

96 SC (96)

Round 41 :

(6 SC,1 DEC) *12 (84)

Round 42 :

(5 SC,1 DEC) *12 (72)

Round 43 :

72 SC (72)

Round 44 :

(4 SC,1 DEC) *12 (60)

Round 45 :

(3 SC,1 DEC) *12 (48)

Round 46 :

48 SC (48)

Round 47 :

(2 SC,1 DEC) *12 (36)

Round 48 :

36 SC (36)

Info :

Pass the long end of the yarn through the last loop of the stitch. Fold the donut as in the picture and start sewing up the hole.

Info :

Here I used dark cotton yarn to show how I sew up the hole. Sew a little and be sure to stuff the donut with fiberfill and again sew a little and stuff the donut...

Info :

This is result without the donut decoration.

Info :

Lets start decoration the pillow. 1.Insert a needle with yarn from the bottom of donut.

Info :

2.After pulling out the needle, insert it nearby, stepping back two centimeters.

Info :

3.Repeat this with different colors of yarn until you decorate the donut.

Info :

4.At the end, stick the yarn back from where you started to insert the needle.

Info :

5.Tie 2 ends of the yarn and hide inside.

Info :

Congratulation! Your Donut is finished!

Assembly Instructions

  • Pass the long end of the yarn through the last loop of the stitch, fold the donut as shown in the pictures and start sewing up the hole using small stitches for a neat finish.
  • Sew a little, then stuff the donut with fiberfill and continue sewing; repeat stuffing and sewing in small steps until the opening is fully closed for even shaping.
  • Use a contrasting yarn to practice the sewing method first if desired, then switch to matching yarn to finish and hide the stitches.
  • For the sprinkle decoration, insert a needle with colored yarn from the bottom of the donut, pull out, and reinsert nearby about two centimeters back to create short sprinkled stitches across the frosting.
  • When all sprinkles are added tie the two ends of the yarn and hide the knot inside the donut to secure the decoration and create a clean finish.

Important Notes

  • ๐Ÿ’กUse a 3.5 mm hook and maintain consistent, firm tension to achieve the intended 12.20 inch (29 cm) size and firm structure.
  • ๐Ÿ’กCrochet the color-change frosting row in back loops only to create a clear edge between base and frosting.
  • ๐Ÿ’กStuff gradually and evenly while sewing the final opening to avoid lumps and ensure an even round shape.
  • ๐Ÿ’กApproximately 150 grams of fiberfill is enough for one donut pillow; adjust stuffing if you prefer a firmer or softer pillow.

This plush donut pillow pattern brings whimsical charm to your home with soft, fluffy yarn and colorful sprinkles. Perfect for snuggling, gifting, or brightening a couch or kids room. Make one in peach, pink, blue, or chocolate-inspired shades to suit your style. ๐Ÿงถ ๐Ÿฉ

You ask,

we answer.

FAQs

What size will the finished piece be?

The finished pillow measures approximately 12.20 inches (29 centimeters) when using the recommended Himalaya Dolphin Baby yarn and 3.5 mm hook.

Can I use different yarn weights for this pattern?

Yes, you can use different yarn weights, but the final size will change; choose an appropriate hook for your yarn and be prepared to adjust stuffing amounts.

Do I need prior crochet experience for this pattern?

This pattern is rated intermediate, so basic knowledge of single crochet, increases, decreases, and working in rounds is recommended.

How long does this project typically take to complete?

Most crocheters finish this donut pillow in about 5-7 hours, depending on experience, yarn choice, and how much time you spend on decoration and finishing.