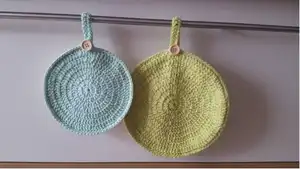
Make charming double-sided round potholders to protect your hands and decorate your kitchen. This pattern includes two sizes (regular and large), clear step-by-step instructions, and optional hanging loop variations with or without a button. Perfect for gifting or brightening your own kitchen, the design is versatile and easy to customize with color choices.
Progress Tracker
0% Complete
— Regular Potholder :
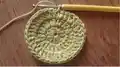
Round 1 :
Start with the color you want to have in the back of your potholder. On a magic ring Ch 2 (counts as a double crochet) and then add 11 Dc into the ring (12 stitches in total). Pull the thread to close the ring and join with a Sst.
Round 2 :
Ch 2 (counts as a double crochet) and then add 1 Dc in the same stitch from Round 1. Continue adding two Dc over each of the stitches from Round 1 (24 stitches in total). Join with a Sst.
Round 3 :
Ch 2 (counts as a double crochet), then add two Dc over the next stitch from previous row. *One Dc, two Dc in the following stitch*. Repeat between * until the end of the row. Join with a Sst (36 stitches in total).
Round 4 :
Ch 2 (counts as a double crochet), one Dc in the next stitch from previous row, two Dc in the following one. *One Dc, one Dc, two Dc in the following stitch*. Repeat between * until the end of the row. Join with a Sst (48 stitches in total).
Round 5 :
Ch 2 (counts as a double crochet), one Dc in each of the next two stitches from previous row, two Dc in the next one. *One Dc, one Dc, one Dc, two Dc in the following stitch*. Repeat between * until the end of the row. Join with a Sst (60 stitches in total).
Round 6 :
Ch 2 (counts as a double crochet), one Dc in each of the next three stitches from previous row, two Dc in the next one. *One Dc, one Dc, one Dc, one Dc, two Dc in the following stitch*. Repeat between * until the end of the row. Join with a Sst (72 stitches in total).
Round 7 :
Ch 2 (counts as a double crochet), one Dc in each of the next four stitches from previous row, two Dc in the next one. *One Dc, one Dc, one Dc, one Dc, one Dc, two Dc in the following stitch*. Repeat between * until the end of the row. Join with a Sst (84 stitches in total).
Info :
Now repeat the same process (rows 1 to 7) to make a second circle using the yarn color you chose for the front of the potholder, but don't cut the yarn or weave in the end when you've completed row 7.
Info :
Instead, place the circle you've just finished on top of the first one you made (front of the potholder on top of the back of the potholder), wrong sides together (so that the right sides of each circle are turned outwards). Add one row of Sc all around joining both circles (you will be inserting your hook in a stitch from each of the circles and stitching them together). When you complete this Sc row, both sides of the potholder will be joined.
Info :
If you're making the potholder without a hanging loop, cut the yarn and weave in ends, and your potholder is finished. If you want to add the hanging loop, don't cut the yarn and continue to the Hanging Loop Instructions.
— Large Potholder :
Info :
Rows 1 to 7: Start with the color you want to have in the back of your potholder and follow the pattern of the regular sized potholder (Rounds 1 to 7 above).
Round 8 :
Ch 2 (counts as a double crochet), one Dc in each of the next five stitches from previous row, two Dc in the next one. *One Dc, one Dc, one Dc, one Dc, one Dc, one Dc, two Dc in the following stitch*. Repeat between * until the end of the row. Join with a Sst (96 stitches in total).
Round 9 :
Ch 2 (counts as a double crochet), one Dc in each of the next six stitches from previous row, two Dc in the next one. *One Dc repeated seven times, two Dc in the following stitch*. Repeat between * until the end of the row. Join with a Sst (108 stitches in total).
Info :
Now repeat the same process to make a second circle using the yarn color you chose for the front of the potholder, but don't cut the yarn or weave in the end when you've completed row 9.
Info :
Instead, place the circle you've just finished on top of the first one you made (front on top of back), wrong sides together. Add one row of Sc all around joining both circles (insert your hook in a stitch from each circle and stitch them together). When you complete this Sc row, both sides of the potholder will be joined.
Info :
If you're making the potholder without a hanging loop, cut the yarn and weave in ends, and your potholder is ready to be used. If you want to add the hanging loop, continue to the Hanging Loop Instructions.
— Hanging Loop Instructions :
Hanging loop (P1) :
Ch 21 and then add one Dc in each of the chains starting on the second chain from hook (20 stitches). Sst to the body of the potholder two stitches down from where you started the chain.
Info :
Now decide if you want a fixed hanging loop (where the tip of the row of Dc you just finished is sewn to the body of the potholder, creating a closed loop) or a hanging loop that can open and close with a button.
Closed hanging loop :
If you want a sew in closed loop, leave a bit of excess yarn when you cut it, and with your blunt tip sewing needle close the gap between the beginning of the hanging loop and the Sst you used to secure it, and at the same time fold and sew the tip of the strip of crochet to the body of the potholder. Weave in ends and your potholder is ready to be used.
Hanging loop with button :
If you want a hanging loop that can be opened and closed with a button follow these steps: leave a bit of excess yarn when you cut it, and with your blunt tip sewing needle close the gap between the beginning of the hanging loop and the Sst you used to secure it. Weave in end. With the regular sewing thread and needle, sew the button at the edge of the potholder body, just where the crochet strip for the hanging loop begins. To open and close the hanging loop pass the button through the first space at the tip of the crochet strip.
These double-sided round potholders combine practicality with handmade charm to brighten any kitchen. The pattern is quick to work up, easy to customize with colors, and includes a neat hanging loop option with or without a button. Make a matching set or mix-and-match colors for delightful gifts and everyday use. 🧶✨