Make adorable animal hats with personality using this detailed Crochet Hatimals pattern. You will create cozy, feature-packed hats with eyes, snouts, ears, and scales that add fun character to every piece. Clear step-by-step rounds and sizing options let you crochet hats for babies through adults. Grab your hook and favorite worsted yarn and bring these playful Hatimals to life!
Progress Tracker
0% Complete
— Special Notes :
Info :
These hats are all made in Single Crochet. I do this for two reasons. The first reason is that it makes the hats easier to make for beginners. The second reason is that it makes all my hats functional as well as a fun fashion statement! Since these hats are all done in Single Crochet, they do take longer to make especially in the adult sizes. Using larger stitches like Double and Triple Crochet in patterns can complete projects faster and may look great but they aren't very functional in cold weather. Here in Colorado where the wind gets to whippin' about 50 mph and the temperature is in the 20's and below, a hat made with Double Crochet does not keep the noggin very warm as the wind will cut right through those larger stitches. With Single Crochet stitches, the hats are tight, secure, and the smaller stitches cut out much of the wind so your head stays nice and warm as well as keeping you looking cute! My hats are also great for the ski slopes and have been field tested by my family in remote Alaska!
— Head Measurements :
Info :
For the best fit it is very important to measure the recipient's head prior to beginning your project. Hat sizes do not go by one's age but by how big one's head is. Some people have BIG heads, some people have SMALL heads, and some have average heads. This includes babies and children. To measure the head, a sewing tape measure is always best. Wrap the tape measure around the head going OVER the top half of the ear not above, coming across the front of the head at the eyebrows. Once you have an accurate head measurement, make that size hat and not the hat size by age. If you do not have a sewing tape measure, you can do this same measurement with a piece of string or yarn. Mark the spot on the string where the measurement is complete then measure the sting with a ruler or measuring tape.
— General Instructions :
Infos :
Abbreviations: CH Chain. Rnd(s) Round(s). SC Single Crochet. SP Space. ST(s) Stitch(s). SC DEC Single Crochet Decrease. SLST Slip Stitch. YO Yarn Over. Exact gauge is essential for proper size. Before beginning, make a sample swatch with hook specified to ensure you don't need to go up or down a hook. If gauge is too small, go up a hook. If too big go down a hook. Continue until you find the hook that works best for you. With 'H' hook (5.0mm) 4 SC rows of 4 SC = 1" square. Markers are used to help distinguish the beginning of each round being worked. Place a 2" scrap piece of yarn before the first stitch of each round, moving after each round is complete. Remove marker when no longer needed. You can also purchase stitch markers at your local yarn store that are a bit more secure and don't fall out so easily.
— Materials :
Info :
Each hat in this book is made using Red Heart Super Saver Yarn in 7oz skeins for ease of yarn shopping. You can use any worsted weight 4 ply yarn but ensure you pay attention to gauge as each yarn manufacturer is different with the thicknesses of their yarns. For your convenience, the colors used for the photography models are listed below. F, G, and H hooks (or size needed to obtain gauge) Yarn Needle, Fiber Fill, Stitch Markers
Dinosaur :
Tea Leaf – Main Color (1 7oz Skein) Warm Brown – Trim Color (1 7oz Skein) Red, White, Black (Less than 1 oz)
Bear :
Coffee – Main Color (1 7oz Skein) Warm Brown – Trim Color (1 7oz Skein) Red, White, Black (Less than 1 oz)
Puppy :
Warm Brown – Main Color (1 7oz Skein) Coffee – Trim Color (1 7oz Skein) Red, White, Black (Less than 1 oz)
Panda :
White – Main Color (1 7oz Skein) Black – Trim Color (1 7oz Skein) Red (Less than 1 oz)
Wolf :
Light Grey – Main Color (1 7oz Skein) Heather Grey – Trim Color (1 7oz Skein) Red, White, Black (Less than 1 oz)
Giraffe :
Cornmeal – Main Color (1 7oz Skein) Coffee – Trim Color (1 7oz Skein) White, Black, Warm Brown (Less than 1 oz)
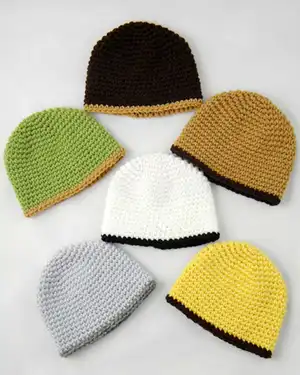
— Basic Beanie :
Info :
Hat is made in continuous rounds so do not join at the end of rounds. Use a stitch marker. All Sizes Perform the Following Rounds
Rnd 1 :
With Main Color (from table on page 3) and "H" hook, CH 2, 6 SC in 2nd CH from hook. (6 SC)
Rnd 2 :
2 SC in each SC around. (12 SC)
Rnd 3 :
*1 SC in next SC, 2 SC in next SC*, repeat from * to * around. (18 SC)
Rnd 4 :
*1 SC in each of the next 2 SC, 2 SC in next SC*, repeat from * to * around. (24 SC)
Rnd 5 :
*1 SC in each of the next 3 SC, 2 SC in next SC*, repeat from * to * around. (30 SC)
Rnd 6 :
*1 SC in each of the next 4 SC, 2 SC in next SC*, repeat from * to * around. (36 SC)
Rnd 7 :
*1 SC in each of the next 5 SC, 2 SC in next SC*, repeat from * to * around. (42 SC)
Rnd 8 :
*1 SC in each of the next 6 SC, 2 SC in next SC*, repeat from * to * around. (48 SC)
Info :
Proceed to the section of choice for the size hat you wish to make
— Basic Beanie - 14" – 16" (0-3 month) :
Rnd 9 :
1 SC in each SC around. (48 SC)
Info :
Repeat Rnd 9 until hat measures approximately 5" from top to bottom, SLST to join, fasten off.
Info :
Option 1: If you do not want earflaps, continue with the trim round below.
Info :
Option 2: If you want earflaps, continue on to the earflaps section.
Trim :
With Trim Color (from table on page 3), join with SC in back of hat, 1 SC in each SC around, SLST to join, fasten off. (48 SC)
— Basic Beanie - 16" – 18" (3 – 6 month) :
Rnd 9 :
*1 SC in each of the next 7 SC, 2 SC in next SC*, repeat from * to * around. (54 SC)
Rnd 10 :
1 SC in each SC around. (54 SC)
Info :
Repeat Rnd 10 until hat measures approximately 6" from top to bottom, SLST to join, fasten off.
Info :
Option 1: If you do not want earflaps, continue with the trim round below.
Info :
Option 2: If you want earflaps, continue on to the earflaps section.
Trim :
With Trim Color (from table on page 3), join with SC in back of hat, 1 SC in each SC around, SLST to join, fasten off. (54 SC)
— Basic Beanie - 18" – 20" (Toddler, Child) :
Rnd 9 :
*1 SC in each of the next 7 SC, 2 SC in next SC*, repeat from * to * around. (54 SC)
Rnd 10 :
*1 SC in each of the next 8 SC, 2 SC in next SC*, repeat from * to * around. (60 SC)
Rnd 11 :
1 SC in each SC around. (60 SC)
Info :
Repeat Rnd 11 until hat measures approximately 7" from top to bottom, SLST to join, fasten off.
Info :
Option 1: If you do not want earflaps, continue with the trim round below.
Info :
Option 2: If you want earflaps, continue on to the earflaps section.
Trim :
With Trim Color (from table on page 3), join SC in back of hat, 1 SC in each SC around, SLST to join, fasten off. (60 SC)
— Basic Beanie - 20" – 22" (Child, Pre-Teen, Adult) :
Rnd 9 :
*1 SC in each of the next 7 SC, 2 SC in next SC*, repeat from * to * around. (54 SC)
Rnd 10 :
*1 SC in each of the next 8 SC, 2 SC in next SC*, repeat from * to * around. (60 SC)
Rnd 11 :
*1 SC in each of the next 9 SC, 2 SC in next SC*, repeat from * to * around. (66 SC)
Rnd 12 :
1 SC in each SC around. (66 SC)
Info :
Repeat Rnd 12 until hat measures approximately 8" from top to bottom, SLST to join, fasten off.
Info :
Option 1: If you do not want earflaps, continue with the trim round below.
Info :
Option 2: If you want earflaps, continue on to the earflaps section.
Trim :
With Trim Color (from table on page 3), join SC in back of hat, 1 SC in each SC around, SLST to join, fasten off. (66 SC)
— Basic Beanie - 22" – 24" (Large Teen / Adult) :
Rnd 9 :
*1 SC in each of the next 7 SC, 2 SC in next SC*, repeat from * to * around. (54 SC)
Rnd 10 :
*1 SC in each of the next 8 SC, 2 SC in next SC*, repeat from * to * around. (60 SC)
Rnd 11 :
*1 SC in each of the next 9 SC, 2 SC in next SC*, repeat from * to * around. (66 SC)
Rnd 12 :
*1 SC in each of the next 10 SC, 2 SC in next SC*, repeat from * to * around. (72 SC)
Rnd 13 :
1 SC in each SC around. (72 SC)
Info :
Repeat Rnd 13 until hat measures approximately 9" from top to bottom, SLST to join, fasten off.
Info :
Option 1: If you do not want earflaps, continue with the trim round below.
Info :
Option 2: If you want earflaps, continue on to the earflaps section.
Trim :
With Trim Color (from table on page 3), join SC in back of hat, 1 SC in each SC around, SLST to join, fasten off. (72 SC)
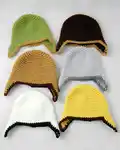
— Earflaps :
Info :
Lay hat flat on hard surface with the tie off in the center of the back of the hat. Count 3 stitches in from the left side and place a marker. Count 3 stitches in from the right side and place a marker. If you don't have stitch markers, you can use a piece of yarn.
Left earflap :
With right side facing, opening at the top, attach main color (from table on page 3) with a SC in the same SC the stitch marker is in.
Row 1 :
14" – 16" SC in next 7 SC, CH 1, turn. (8 SC) 16" – 18" SC in next 7 SC, CH 1, turn. (8 SC) 18" – 20" SC in next 9 SC, CH 1, turn. (10 SC) 20" – 22" SC in next 11 SC, CH 1, turn. (12 SC) 22" – 24" SC in next 11 SC, CH 1, turn. (12 SC)
Row 2 :
Row 2 is the same for all sizes. Skip first SC, SC in each SC across, CH 1, turn. Repeat Row 2 until only 1 SC remains. Fasten off. Remove marker.
Right earflap :
With right side facing, opening at the top, count to the right of the remaining stitch marker the number of stitches that will be needed to work the earflap for desired size and attach yarn with a SC. The space the stitch marker occupies is counted as the first stitch.
Row 1 :
14" – 16" SC in next 7 SC, CH 1, turn. (8 SC) 16" – 18" SC in next 7 SC, CH 1, turn. (8 SC) 18" – 20" SC in next 9 SC, CH 1, turn. (10 SC) 20" – 22" SC in next 11 SC, CH 1, turn. (12 SC) 22" – 24" SC in next 11 SC, CH 1, turn. (12 SC)
Row 2 :
Row 2 is the same for all sizes. Skip first SC, SC in each SC across, CH 1, turn. Repeat Row 2 until only 1 SC remains. Fasten off. Remove marker.
Trim :
Attach Trim Color (from table on page 3) to the back of the hat in the same stitch where hat was fastened off. CH 1, SC in each stitch and row end around the hat. Do 3 SC in the tip of each earflap. SLST to join, fasten off. Continue on to the animal hat of choice for the facial features.
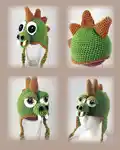
— Dinosaur :
Large Scale (make 1) :
Rnd 1: With Trim Color (from table on page 3) and an "H" hook, CH 2, 4 SC in 2nd CH from hook. Use a stitch marker as needed. (4 SC)
Rnd 2 :
2 SC in each SC around. (8 SC)
Rnd 3 - 4 :
SC in each SC around. (8 SC)
Rnd 5 :
*2 SC in next SC, SC in next SC*, repeat from * to * around. (12 SC)
Rnd 6 - 7 :
SC in each SC around. (12 SC)
Rnd 8 :
*2 SC in next SC, SC in next 2 SC*, repeat from * to * around. (16 SC)
Rnd 9 - 11 :
SC in each SC around. (16 SC)
Rnd 12 :
SC in each SC around, SLST in next SC, fasten off leaving an 8" tail for sewing. (16 SC)
Medium Scale (make 1 or more) :
Rnd 1: With Trim Color (from table on page 3) and an "H" hook, CH 2, 4 SC in 2nd CH from hook. Use a stitch marker as needed. (4 SC)
Rnd 2 :
2 SC in each SC around. (8 SC)
Rnd 3 - 4 :
SC in each SC around. (8 SC)
Rnd 5 :
*2 SC in next SC, SC in next SC*, repeat from * to * around. (12 SC)
Rnd 6 - 7 :
SC in each SC around. (12 SC)
Rnd 8 :
*2 SC in next SC, SC in next 2 SC*, repeat from * to * around. (16 SC)
Rnd 9 :
SC in each SC around, SLST in next SC, fasten off leaving an 8" tail for sewing. (16 SC)
Small Scales (make 2 or more) :
Rnd 1: With Trim Color (from table on page 3) and an "H" hook, CH 2, 4 SC in 2nd CH from hook. Use a stitch marker as needed. (4 SC)
Rnd 2 :
2 SC in each SC around. (8 SC)
Rnd 3 :
SC in each SC around. (8 SC)
Rnd 4 :
*2 SC in next SC, SC in next SC*, repeat from * to * around. (12 SC)
Rnd 5 :
SC in each SC around. (12 SC)
Rnd 6 :
*2 SC in next SC, SC in next 2 SC*, repeat from * to * around. (16 SC)
Rnd 7 :
SC in each SC around, SLST in next SC, fasten off leaving an 8" tail for sewing. (16 SC)
Teeth (Make 2 or more) :
Rnd 1: With White and "F" hook, CH 2, 3 SC in 2nd CH from hook. Do not join. (3 SC)
Rnd 2 :
2 SC in first SC, 1 SC in next 2 SC. (4 SC)
Rnd 3 :
1 SC in each SC around, SLST to join. fasten off leaving small tail to sew. (4 SC)
Nostrils (Make 2) :
Rnd 1: With Black and "F" hook, CH 2, 3 SC in 2nd CH from hook, SLST to join, fasten off leaving a small tail to sew with.
Info :
Proceed to the Facial Features section to determine what type of eyes you want your hat to have! It can have cartoon eyes, serious eyes, or mix and match the eyelids from the serious eyes with the cartoon eyes or give it the serious eyes without the eyelids! This is your chance to make your hat unique!
— Bear :
Inside Ears - Make 2 :
Rnd 1: With Trim Color (from table on page 3) and an "H" hook, CH 2, 6 SC in 2nd CH from hook, SLST to join, CH 1. (6 SC)
Rnd 2 :
2 SC in each SC around, SLST to join, CH 1. (12 SC)
Rnd 3 :
2 SC in each SC around, SLST to join, fasten off and set aside. (24 SC)
Outside Ears - Make 2 :
Rnd 1: With Main Color (from table on page 3) and an "H" hook, CH 2, 6 SC in 2nd CH from hook, SLST to join, CH 1. (6 SC)
Rnd 2 :
2 SC in each SC around, SLST to join, CH 1. (12 SC)
Rnd 3 :
2 SC in each SC around, SLST to join, CH 1, turn. (24 SC)
Rnd 4 :
Pick up inside ear and with wrong sides facing each other, working through both thicknesses, 1 SC in each SC around, SLST to join, fasten off leaving a tail to sew with. (24 SC)
Info :
Proceed to the Facial Features section to determine what type of eyes you want your hat to have! It can have cartoon eyes, serious eyes, or mix and match the eyelids from the serious eyes with the cartoon eyes or give it the serious eyes without the eyelids! This is your chance to make your hat unique!
This Crochet Hatimals collection brings playful animal characters to life as wearable hats with personality and charm. Each hat is constructed in single crochet for warmth and durability, with thoughtful details like earflaps, trims, and sewn-on facial features. Perfect for gift-making, costume play, or cozy everyday wear—make a set for siblings or a custom piece to match an outfit. 🧶🧵