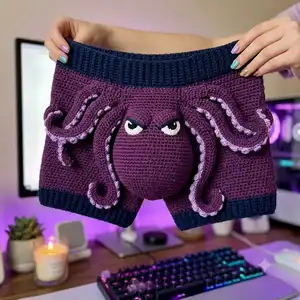
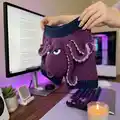
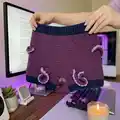
A playful crochet boxer-short pattern featuring a bold 3D kraken bulb and eight curled tentacles that double as cheeky decoration. Deep plum body with contrasting navy ribbed waistband and cuffs, and light-lilac suction cup details brings the design to life. Perfect for a gag gift or a fun handmade statement piece, this pattern includes step-by-step instructions for the shorts, octopus bulb, tentacles, eyes, and trims.
Progress Tracker
0% Complete
— Octopus Head (Bulb) :
Round 1 :
6 sc in magic ring (6)
Round 3 :
(1 sc, 1 inc) x 6 (18)
Round 4 :
(2 sc, 1 inc) x 6 (24)
Round 5 :
(3 sc, 1 inc) x 6 (30)
Round 6 :
(4 sc, 1 inc) x 6 (36)
Round 7 :
(5 sc, 1 inc) x 6 (42)
Round 8 :
(6 sc, 1 inc) x 6 (48)
Info :
Work the bulb in continuous rounds (spiral) to avoid visible seams. Place a stitch marker at the first stitch of each round and move it as you progress. Use main color (deep plum).
Round 9 :
1 sc in each st (48)
Round 10 :
1 sc in each st (48)
Round 11 :
1 sc in each st (48)
Round 12 :
1 sc in each st (48)
Info :
At rounds 12-14 decide eye placement. Eyes in pictured piece sit slightly above bulb midpoint. Mark positions approximately 8-10 stitches apart, centered on the front face.
Round 13 :
1 sc in each st (48)
Round 14 :
1 sc in each st (48)
Round 15 :
(6 sc, 1 inc) x 6 (54)
Round 16 :
1 sc in each st (54)
Round 17 :
1 sc in each st (54)
Round 18 :
(7 sc, 1 inc) x 6 (60)
Round 19 :
1 sc in each st (60)
Info :
Begin stuffing bulb lightly at round 19. Add small amounts of fiberfill and shape as you go; aim for a firm but slightly yielding bulb so sewing to shorts is stable.
Round 20 :
1 sc in each st (60)
Round 21 :
(7 sc, 1 dec) x 6 (54)
Round 22 :
(6 sc, 1 dec) x 6 (48)
Round 23 :
1 sc in each st (48)
Info :
Continue stuffing firmly but evenly between rounds 22-26. Use small tufts to avoid lumps. Leave opening large enough to continue stuffing and for later insertion of yarn tail to sew the bulb closed and attach to shorts.
Round 24 :
(5 sc, 1 dec) x 6 (42)
Round 25 :
(4 sc, 1 dec) x 6 (36)
Round 26 :
(3 sc, 1 dec) x 6 (30)
Round 27 :
(2 sc, 1 dec) x 6 (24)
Info :
If you prefer a slightly longer bulb like in the photo, stop decreasing at round 24 and work two additional even rounds before continuing decreases. The counts above match a compact, rounded bulb.
Round 28 :
(1 sc, 1 dec) x 6 (18)
Round 30 :
Fasten off leaving long tail for sewing. Close hole with tapestry needle and invisible stitch, finish stuffing if needed (bulb should remain slightly firm) (0)
Info :
Do not overstuff; the bulb will be sewn to the shorts pocket which adds support. Keep tail long (approx. 40-50cm) for sewing through multiple layers.
— Eyes (Make 2) :
Info :
These are flat appliques worked in white then accented. We will make a small white base and embroider dark pupil and a navy eyebrow above each eye using surface stitch.
Round 1 :
6 sc in magic ring with white (6)
Round 3 :
1 sc in each st (12)
Round 4 :
Fasten off leaving long tail for sewing. Use dark yarn to embroider pupil at inner edge (use small horizontal oval) and attach to marked positions on bulb at rounds 13-14. Secure with small stitches around edge.
Info :
If using safety eyes, place them at the bulb while partially stuffed at rounds 13-14, about 8 stitches apart. Add a small embroidered eyelid line with navy yarn to get that scowling expression.
— Eyebrows / Expression Details (Make 2) :
Round 1 :
Ch 6, turn, sc in 2nd ch from hook and across (5)
Round 2 :
Sl st across to taper ends and shape point by decreasing 1 st at each end to create a slight triangular brow (3)
Round 3 :
Fasten off leaving long tail for stitching to bulb above eyes. Use navy or dark accent color to create the dramatic scowl seen in the photo. Stiffen slightly with a drop of fabric glue if needed.
Info :
Position eyebrows just above the white eye discs and angle inward slightly to mimic the expression. Sew securely with small stitches.
— Tentacle (Make 8) :
Info :
Each tentacle is worked as a flat, slightly tapered tube that will curl naturally with increases and frequent short rows. We will crochet a tube and then add suction cup trim along the underside using small discs or bobbles. Work in main deep plum for outer tentacle and use light-lilac for suction cups. Repeat this set for each tentacle, making 8 total.
Round 1 :
6 sc in magic ring with deep plum (6)
Round 3 :
(1 sc, 1 inc) x 6 (18)
Round 4 :
1 sc in each st (18)
Round 5 :
(2 sc, 1 dec) x 6 (12)
Round 6 :
1 sc in each st (12)
Info :
We will now lengthen the tentacle in even rounds to achieve desired length. The shaping below introduces slight increases on the underside to encourage natural curling when relaxed. Work continuous rounds and do not fasten off between rounds.
Round 7 :
(3 sc, 1 inc) x 3 (15)
Round 8 :
1 sc in each st (15)
Round 9 :
(4 sc, 1 inc) x 3 (18)
Round 10 :
1 sc in each st (18)
Round 11 :
(5 sc, 1 inc) x 3 (21)
Round 12 :
1 sc in each st (21)
Info :
Now work even rounds for length. The tentacles in the photo are long and tapered; you can work between 6-12 even rounds here depending on desired curl and length. The following rounds provide a 12-round length and taper at the end.
Round 13 :
1 sc in each st (21)
Round 14 :
1 sc in each st (21)
Round 15 :
1 sc in each st (21)
Round 16 :
1 sc in each st (21)
Round 17 :
(4 sc, 1 dec) x 3 (18)
Round 18 :
1 sc in each st (18)
Round 19 :
(3 sc, 1 dec) x 3 (15)
Round 20 :
(2 sc, 1 dec) x 3 (12)
Round 21 :
(1 sc, 1 dec) x 3 (9)
Round 23 :
Fasten off leaving long tail for sewing. Do not stuff tentacles; they are left flat to curl. Shape the tentacle by wrapping around a finger and securing with pins if you want a permanent curl, or sew the underside edge to hold shape.
Info :
For the photo's curled look, lightly block tentacles around a dowel or your finger and sew a running stitch along the underside to hold the curl. Alternatively, insert a thin strand of craft wire before finishing to make them poseable.
— Suction Cups (Make many for tentacles) :
Info :
Each suction cup is a small disc made in light-lilac. Make between 6 and 12 cups per tentacle depending on desired spacing. Make smaller cups toward the tip and larger cups toward the base for a natural taper.
Round 1 :
6 sc in magic ring with light-lilac (6)
Round 3 :
1 sc in each st (12)
Round 4 :
Fasten off leaving tail for sewing. Flatten disc and sew along underside of tentacle, aligning discs to run along one edge of the tentacle to mimic picture. For small cups at tip, skip round 2 and use just the 6-st disc.
Info :
Attach suction cups with a few small, invisible stitches through the tentacle body. Space them evenly for consistent appearance - e.g., every 3-4 stitches along the tentacle edge for the body of each cup placement.
— Shorts Main Body (Front + Back as one tube) :
Info :
These shorts are worked in the round from a small central gusset (magic ring) to a waist band. We will form the short tube, create two leg openings by dividing the work, and then work each leg in the round before adding ribbed cuffs and waistband. Use deep plum for main panels and navy for cuff/waistband trims. Work joined rounds with sl st when indicated for a clean edge.
Round 1 :
8 sc in magic ring (8)
Round 3 :
(1 sc, 1 inc) x 8 (24)
Round 4 :
(2 sc, 1 inc) x 8 (32)
Round 5 :
(3 sc, 1 inc) x 8 (40)
Round 6 :
(4 sc, 1 inc) x 8 (48)
Round 7 :
(5 sc, 1 inc) x 8 (56)
Round 8 :
(6 sc, 1 inc) x 8 (64)
Round 9-12 :
1 sc in each st (64)
Info :
At round 12 you will have formed a generous gusset. We will now increase selectively to shape the shorts front panel so the octopus bulb can be attached and visually centered. If your desired shorts size is larger, add increases evenly across rounds 9-12 to reach the required hip measurement.
Round 13 :
(7 sc, 1 inc) x 8 (72)
Round 14-18 :
1 sc in each st (72)
Round 19 :
Change to navy yarn. 1 sc in each st BLO (72)
Round 20-22 :
1 sc in each st BLO (72)
Info :
These rounds create a subtle ridge that helps seat the waistband later. If you prefer a softer ridge, work regular sc in rounds 20-22 instead of BLO. Return to main color after this rib ridge if desired for continued main panel shaping.
Round 23 :
Change to deep plum. 1 sc in each st (72)
Round 24-28 :
1 sc in each st (72)
Info :
Next we will divide the tube to create two leg openings. Count 36 stitches for the front half and 36 for the back half. Place removable markers at the sides to mark leg openings (these markers indicate where to separate into legs).
Round 29 :
Work across first 36 sts only (front half) in sc (36); leave remaining 36 sts on holder for back leg later
Round 30-38 :
Work in rounds around front half (36) for 9 rounds to form leg top flange (36)
Info :
After working the front half for 9 rounds, return to remaining stitches (held for back half). Join yarn and work the same 9 rounds on back half to form both leg openings' upper edges. These form the inner seam of the shorts leg area.
Round 39 :
Rejoin both halves at center front stitch to work full tube again. Join across both halves to re-form shorts body (72)
Round 40-46 :
1 sc in each st (72)
Info :
Measure the panel now; adjust rounds 40-46 to make the desired rise (distance from crotch to waistband). The pictured pair sits mid-rise with approximately 6-8 rounds here depending on gauge.
Round 47 :
Change to navy yarn for leg cuff prep. 1 sc in each st BLO (72)
Round 48-50 :
1 sc in each st BLO (72)
Info :
We will split for legs and create ribbed cuffs. Work each leg after splitting the previous stitches evenly: 36 sts per leg. The navy rounds will form a ridged cuff before switching to ribbing in hdc BLO for a stretchier finish.
Round 51 :
Split into 2 legs; work first leg (36 sts) in rounds in the round for cuff (36)
Round 52-55 :
Change to navy. 1 hdc in each st BLO (36)
Round 56 :
1 hdc BLO around (36)
Round 57 :
Sl st in next 36 sts to close cuff and fasten off first leg. Repeat rounds 51-56 for second leg and fasten off. Join both legs again with main color at waistband area and crochet a round to join legs back into one tube (72)
Info :
Leg length in photo is short; adjust number of rounds on each leg before adding cuff to change overall shorts length. Make sure both legs are equal in rounds before joining them to avoid uneven hips.
Round 58-60 :
1 sc in each st (72)
Round 61 :
Change to navy for waistband. 1 sc in each st BLO (72)
Round 62-70 :
Work 9 rounds of navy in BLO using sc or hdc for ribbed effect (72)
Info :
For a deeper ribbed waistband as pictured, work front-post and back-post hdc in alternating sts for 6-9 rounds instead of BLO sc. Fold the band over and seam blocking to create an elastic-looking, snug waistband.
Round 71 :
Fasten off leaving long tails for weaving in. Block shorts lightly and weave in all ends. Reinforce the panel on front center (where bulb will be attached) with an extra round of matching yarn on the wrong side to create a neat pocket base for the bulb.
— Short Reinforced Pocket / Bulb Base :
Info :
Create a double-layer patch for the octopus bulb to sit in. This distributes the bulb weight and prevents sagging. You will crochet a circular patch and sew it to the inside front panel across rounds that correspond to the bulb width.
Round 1 :
6 sc in magic ring with deep plum (6)
Round 3 :
(1 sc, 1 inc) x 6 (18)
Round 4 :
(2 sc, 1 inc) x 6 (24)
Round 5 :
1 sc in each st (24)
Round 6 :
Fasten off leaving long tail for sewing. Make a second identical patch and sew both patches together around outer edge leaving a small opening. Insert small rectangle of interfacing or felt between layers for reinforcement, then sew closed. Attach the patch to the inside of the shorts centered on front panel at the rounds corresponding to bulb width (approx. rounds 24-28 of shorts). Use mattress stitch to sew patch securely.
Info :
Place patch so that the large bulb covers the seam line between the two patches; this hides the seam and provides stable anchoring points to sew the bulb through multiple layers of the shorts material.
— Assembly and Attachment of Octopus :
Info :
Position the stuffed bulb on the front center of the shorts over the reinforced pocket. Pin through pocket and bulb base so the bulb can be sewn through both patch layers and the shorts body for strength. Use long yarn tail from bulb and whip stitch through both patch layers and shorts body several times for stability.
Step 1 :
Center the bulb horizontally across the front panel and vertically so the bulb extends outward approximately 6-8 cm from the garment. Pin through bulb base and patch to hold position.
Step 2 :
Sew bulb using long tail and yarn needle. Go through bulb base, through both reinforcement patch layers, and through the front panel in several passes. Make at least 8-10 evenly spaced stitches around bulb base, pulling taut to seat bulb in pocket without distorting shorts' fabric.
Step 3 :
Arrange tentacles evenly around base of bulb. Use pinned layout to ensure symmetry: two tentacles on each side of the bulb, two angled downwards and two curled upward for playful composition as seen in photo.
Step 4 :
Sew tentacles to shorts by stitching along the first 6-8 rounds of each tentacle to the front panel around the bulb base, catching fabric of pocket and back panel to keep attachment sturdy. Use extra stitches where tentacles join bulb for integrated look.
Info :
Attach suction cups after tentacles are sewn. Sew cups along the underside of each tentacle with small, neat stitches; for a more three-dimensional look, sew cups only at center and let edges lift slightly.
— Final Finishing Touches :
Step :
Sew eyes onto bulb where previously marked. Embroider pupils and eyelid lines. Attach eyebrows above eyes using small whip stitches at two or three points to hold shape. Tidy up all yarn ends by weaving them into the nearest rows for at least 3-4 cm before cutting.
Info :
Check all attachment points by gently tugging; add extra reinforcement stitches if the bulb shifts. Optionally, add a few inside stitches from the pocket to the waistband underside to share weight if bulb feels heavy.
— Optional Poseable Wire Insertion for Tentacles :
Info :
If you want tentacles to hold posed curls permanently, use thin floral wire. Insert wire through the center of the tentacle before final decrease rounds, fold wire end back on itself and tape to avoid piercing crochet fabric. Complete finishing rounds and sew opening closed around wire. Bend as desired to form curls.
Step :
Secure wire ends by wrapping in a small bit of yarn or tape and then embedding the wrapped ends inside the finished seam to avoid scratchy points against skin. If making for a child or wearable use, consider skipping wire or covering wire ends with protective caps and additional stitches.
Info :
Test fit the shorts before final trimming of yarn tails. Try a mannequin or folded towel to see how the bulb sits and how tentacles drape. Make any small sewing adjustments for symmetry and comfort.
This playful Kraken underwear project blends garment construction and amigurumi sculpting into a single, delightfully cheeky piece! The combination of deep plum, navy and light-lilac creates a fun contrast, and the 3D bulb plus curled tentacles bring so much personality. Sewing the bulb into a reinforced pocket makes the piece wearable while keeping the whimsical sculptural look intact. 🧶 Make one for a friend, a dear gag-gift, or just as a unique creative challenge—happy hooking! 🎁