🧢 Beautiful ✨ Detailed πŸ’ Adorable

Crochet Nativity Book Amigurumi Pattern

Crochet Nativity Book Amigurumi Pattern
4.4β˜… Rating
8-10 Hours Time Needed
4.1K Made This
βœ‚οΈ

Intermediate Level

Ideal for those with basic crochet experience, featuring slightly more advanced stitches and techniques to expand your skills.

⏱️

All-Day Adventure

Requires 8-10 hours, ideal for a full day of immersive crocheting.

🧸

Cute Companion

An adorable friend to cherish, handcrafted with love to bring comfort and joy for years to come.

About This Crochet Nativity Book Amigurumi Pattern

This pattern teaches you how to crochet a miniature nativity book with three tiny amigurumi dolls: baby, mother and father. It combines small amigurumi techniques, color changes, jacquard (intarsia) rows for the book pages, and decorative embroidery. The instructions include wigs, headdresses, tiny curls and a looped rooftop effect for a textured finish.

Crochet Nativity Book Amigurumi Pattern crochet pattern - detailed view of completed project

Photographs accompany each construction step and the pattern lists all materials and yarn colors used. Detailed rounds are provided so you can follow stitch counts exactly and assemble the finished set with confidence.

Why You'll Love This Crochet Nativity Book Amigurumi Pattern

I absolutely love this pattern because it turns a classic nativity scene into a tiny, tactile storybook you can display or gift. I enjoyed designing the little wigs and curly roof texture β€” they add such personality to the characters and house. The jacquard pages let you add tiny window and door details to tell the story in miniature. Working on so many small details kept the project engaging and rewarding from start to finish.

Crochet Nativity Book Amigurumi Pattern step 1 - construction progress Crochet Nativity Book Amigurumi Pattern step 2 - assembly progress Crochet Nativity Book Amigurumi Pattern step 3 - details and accessories Crochet Nativity Book Amigurumi Pattern step 4 - final assembly and finishing

Switch Things Up

I love experimenting with color palettes for this set; try soft pastels for a vintage look or bold jewel tones for a modern take.

You can change the yarn weight and hook size to make larger or smaller versions; using bulkier yarn makes a chunky, faster version while thinner yarn creates tiny keychain-sized dolls.

I often swap the headdress color for metallic or sparkly yarn to give a festive accent to the dolls and add a small bead or sequin for a subtle shimmer.

If you want more stability, I add a slightly larger cardboard base or even a small coin inside the bottom before inserting the cardboard for extra weight.

I sometimes replace the embroidered eyes with tiny safety eyes if the piece is for adult display, but for a baby-safe toy I recommend embroidered eyes only.

You can personalize the book pages by changing the jacquard color blocks to create different window or door designs, or stitch initials on a page for a keepsake touch.

For posable arms, I use slightly thicker wire and wrap it carefully; alternatively, skip the wire for a softer, fully crocheted arm.

Try adding tiny props like a crocheted blanket for the baby or a miniature star hanging from the book spine to enrich the scene.

If you prefer less embroidery work, use felt cutouts for the door and windows and glue them in place, then add a few stitched details to finish.

I recommend blocking the book pages lightly to help the jacquard rows lay flat and to make sewing the book cover easier when assembling the finished set.

Common Mistakes & How to Fix Them

βœ— Skipping stitch markers when beginning rounds causes confusion on where the round begins; place a row marker at the first stitch of every round to keep track of your rounds. βœ— Forgetting to stuff as you go leads to lumps and uneven shaping; stuff gradually and evenly during rounds to maintain a smooth silhouette and proper fill level. βœ— Missing the BLO or FLO instructions changes the look of the headdress and decorative bands; always switch to back or front loop work exactly where indicated to achieve the intended texture. βœ— Not inserting and securing the wire in arms will make them floppy and unposed; insert wire before final stuffing, bend to desired shape and wrap with adhesive plaster before finishing the arm. βœ— Neglecting to cut and glue the cardboard base inside the body will make the doll unstable; cut the thick cardboard circle as instructed and place it at the bottom before final stuffing for structure. βœ— Rushing the jacquard color changes in the book will tangle yarn and create messy floats; carry unused colors neatly and secure or weave them in as you go to maintain clean colorwork.

Crochet Nativity Book Amigurumi Pattern

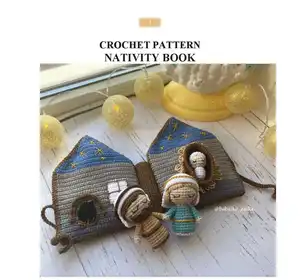
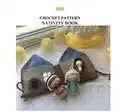
Create a charming crochet nativity book with tiny amigurumi family members using this detailed pattern. You'll make a foldable storybook-style house and three little dolls (baby, mother, father) with clear step-by-step instructions. Perfect for gifting, holiday decor, or a special keepsake to display. Follow the photos and rounds to bring this tiny nativity scene to life.

Intermediate 8-10 Hours

Materials Needed for Crochet Nativity Book Amigurumi Pattern

β€” Main Fabric

  • 01
    Sport weight 4ply Yarn Art Jeans (50g /160m) - N01 white (used for faces, trims)
  • 02
    Sport weight 4ply Yarn Art Jeans (50g /160m) - N03 milky
  • 03
    Sport weight 4ply Yarn Art Jeans (50g /160m) - N07 beige
  • 04
    Sport weight 4ply Yarn Art Jeans (50g /160m) - N40 brown
  • 05
    Sport weight 4ply Yarn Art Jeans (50g /160m) - N46 gray
  • 06
    Sport weight 4ply Yarn Art Jeans (50g /160m) - N49 dark gray
  • 07
    Sport weight 4ply Yarn Art Jeans (50g /160m) - N52 green
  • 08
    Sport weight 4ply Yarn Art Jeans (50g /160m) - N53 black
  • 09
    Sport weight 4ply Yarn Art Jeans (50g /160m) - N68 blue
  • 10
    Sport weight 4ply Yarn Art Jeans (50g /160m) - N81 light blue
  • 11
    Lace Weight 1ply Alize Forever Sim (50g/300m) - N488 yellow (for headdress trim and small decorative details)
  • 12
    Misc: thick cardboard for base, fiberfill stuffing for dolls, small button for baby-bed

β€” Tools Required

  • 01
    Crochet hook size 2.0 mm
  • 02
    Yarn needle for sewing and weaving ends
  • 03
    Scissors
  • 04
    Stitch markers
  • 05
    Pink pastel (or fabric paint) for toning cheeks
  • 06
    Wire 2-2.5 mm (about 20 cm / 7.8 inches) for posable arms
  • 07
    Adhesive plaster or tape to wrap around wire
  • 08
    Thick cardboard to cut a small circular base for each body
  • 09
    Embroidery thread black for eyes and brown/beige threads for door/window embroidery
  • 10
    Small button for baby-bed (optional)

Progress Tracker

0% Complete

β€” Terms and abbreviations (US) :

Info :

MR - magic ring. ch- chain. sc - single crochet. dc - double crochet. dcinc - double crochet increase (2 dc in one stitch). inc - increase - two single crochet in one loop. dec - decrease - two single crochet together. sl st - slip stitch. BLO - back loops only. FLO - front loops only. reverse sc- reverse single crochet.

β€” BABY DOLL Body-Head :

Info :

With white yarn.

Round 1 :

6sc in MR

Info :

Place row marker here.

Round 2 :

6inc (12)

Round 3-6 :

12sc (4 rounds)

Info :

Stuff the body with fiberfill.

Round 7 :

6dec (6)

Round 8 :

Change color to milky. 6inc (12)

Round 9 :

(1sc, inc) *6 (18)

Round 10-12 :

18sc (3 rounds)

Info :

Stuff the head with fiberfill.

Round 13 :

(1sc, dec) *6 (12)

Round 14 :

6dec

Info :

Fasten off, cut the yarn, weave in the yarn ends.

β€” Hood :

Info :

With white yarn.

Round 1 :

6sc in MR

Info :

Place row marker here.

Round 2 :

6inc (12)

Round 3 :

(1sc, inc) *6 (18)

Round 4-5 :

18sc (2 rounds)

Round 6 :

18sc, turn (18)

Round 7 :

ch1, 10sc

Info :

Leave long tail for sewing. Put the hood on your head and sew it on.

Info :

Embroider eyes with black yarn. Use pink pastel to tint the cheeks.

Info :

Congrats your baby doll is ready!!!
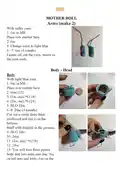
β€” MOTHER DOLL Arms (make 2) :

Info :

With milky yarn.

Round 1 :

6sc in MR

Info :

Place row marker here.

Round 2 :

6sc

Round 3 :

Change color to light blue.

Round 4-7 :

6sc (4 rounds)

Info :

Fasten off, cut the yarn, weave in the yarn ends.

β€” MOTHER DOLL Body - Head :

Info :

Body: With light blue yarn.

Round 1 :

6sc in MR

Info :

Place row marker here.

Round 2 :

6inc (12)

Round 3 :

(1sc, inc) *6 (18)

Round 4 :

(2sc, inc) *6 (24)

Round 5 :

BLO 24sc

Round 6-8 :

24sc (3 rounds)

Info :

Cut out a circle from thick cardboard and put it on the bottom. Stuff with fiberfill in the process.

Round 9 :

BLO 24sc

Round 10 :

24sc

Round 11 :

(2sc, dec) *6 (18)

Round 12 :

18sc

Round 13 :

You will turn three pieces: body and two arms into one: 3sc on left arm and body, 6sc on the body,

Round 14 :

3sc on right arm and body, 6sc on the body (18)

Round 15 :

3sc on left arm, 6sc on the body, 3sc on right arm, 6sc on the body (18)

Info :

When you crochet your arms, insert the wire, bend it, and wrap with adhesive plaster. Stuff the body and arms with fiberfill.

Round 16 :

Change color to milky. (1sc, dec) *6 (12)

Info :

Head:

Round 17 :

12inc (24)

Round 18 :

(3sc, inc) *6 (30)

Round 18-23 :

30sc (6 rounds)

Round 24 :

(3sc, dec) *6 (24)

Info :

Stuff the head with fiberfill.

Round 25 :

(2sc, dec) *6 (18)

Round 26 :

(1sc, dec) *6 (12)

Round 27 :

6dec

Info :

Fasten off, cut the yarn, weave in the yarn ends.

β€” Mother Doll Hair Wig :

Info :

With beige yarn.

Round 1 :

6sc in MR

Info :

Place row marker here.

Round 2 :

6inc (12)

Round 3 :

(1sc, inc) *6 (18)

Round 4 :

(2sc, inc) *6 (24)

Round 5 :

(3sc, inc) *6 (30)

Round 6-8 :

30sc (3 rounds)

Round 9 :

30sc, turn

Round 10 :

ch1, 1sl st, 6sc, Crochet the curls: (sl st, 5ch, from the second chain on the hook 4sc, sl st into the base) *8, 6sc, sl st.

Info :

Leave long tail for sewing.

β€” Mother Doll Headdress :

Info :

With white yarn.

Round 1 :

6sc in MR

Info :

Place row marker here.

Round 2 :

6inc (12)

Round 3 :

(1sc, inc) *6 (18)

Round 4 :

(2sc, inc) *6 (24)

Round 5 :

(3sc, inc) *6 (30)

Round 6 :

(4sc, inc) *6 (36)

Round 7-8 :

36sc (2 rounds)

Round 9 :

BLO 36sc

Round 10 :

36sc, turn (36)

Round 11-14 :

ch1, 18sc, turn (4 rounds)

Info :

Fasten off, cut the yarn, weave in the yarn ends.

Info :

Return to round 9 of the headdress and work with yellow yarn (Alize Forever Sim) through front loops: FLO ch1, 36sc, sl st, Cut the yarn and fasten off.

Info :

Return to round 5 of the body and work with white yarn through front loops: FLO ch1, 24 reverse sc. Cut the yarn and fasten off.

Info :

Return to round 9 of the body and work with yellow yarn (Alize Forever Sim) through front loops: FLO ch1, 24sc, sl st, Cut the yarn and fasten off.

Info :

Sew the hair wig to the head. Embroider eyes with black yarn. Use pink pastel to tint the cheeks.

Info :

Put a headdress on the doll's head. Congrats your mother doll is ready!!!

β€” FATHER DOLL Arms (make 2) :

Info :

With milky yarn.

Round 1 :

6sc in MR

Info :

Place row marker here.

Round 2 :

6sc

Round 3 :

Change color to beige.

Round 4-7 :

6sc (4 rounds)

Info :

Fasten off, cut the yarn, weave in the yarn ends.

β€” FATHER DOLL Body - Head :

Info :

Body: With beige yarn.

Round 1 :

6sc in MR

Info :

Place row marker here.

Round 2 :

6inc (12)

Round 3 :

(1sc, inc) *6 (18)

Round 4 :

(2sc, inc) *6 (24)

Round 5 :

BLO 24sc

Round 6-9 :

24sc (4 rounds)

Info :

Cut out a circle from thick cardboard and put it on the bottom. Stuff with fiberfill in the process.

Round 10 :

BLO 24sc

Round 11 :

24sc

Round 12 :

(2sc, dec) *6 (18)

Round 13 :

18sc

Round 14 :

You will turn three pieces: body and two arms into one: 3sc on left arm and body, 6sc on the body, 3sc on right arm and body, 6sc on the body (18)

Round 15 :

3sc on left arm, 6sc on the body, 3sc on right arm, 6sc on the body (18)

Info :

When you crochet your arms, insert the wire, bend it, and wrap with adhesive plaster. Stuff the body and arms with fiberfill.

Round 16 :

Change color to milky. (1sc, dec) *6 (12)

Info :

Head:

Round 17 :

12inc (24)

Round 18 :

(3sc, inc) *6 (30)

Round 19-24 :

30sc (6 rounds)

Round 25 :

(3sc, dec) *6 (24)

Info :

Stuff the head with fiberfill.

Round 26 :

(2sc, dec) *6 (18)

Round 27 :

(1sc, dec) *6 (12)

Round 28 :

6dec

Info :

Fasten off, cut the yarn, weave in the yarn ends.

β€” Father Doll Hair Wig :

Info :

With brown yarn.

Round 1 :

6sc in MR

Info :

Place row marker here.

Round 2 :

6inc (12)

Round 3 :

(1sc, inc) *6 (18)

Round 4 :

(2sc, inc) *6 (24)

Round 5 :

(3sc, inc) *6 (30)

Round 6-9 :

30sc (4 rounds)

Round 10 :

1sl st, 26sc, 2dc, sl st.

Info :

Leave long tail for sewing.

β€” Beard :

Info :

With brown yarn.

Round 1 :

Chain 15. From the second chain on the hook: dec, 10sc, dec, turn (12)

Round 2 :

ch1, dec, 8sc, dec (10)

Info :

Leave long tail for sewing.

β€” Father Doll Headdress :

Info :

With white yarn.

Round 1 :

6sc in MR

Info :

Place row marker here.

Round 2 :

6inc (12)

Round 3 :

(1sc, inc) *6 (18)

Round 4 :

(2sc, inc) *6 (24)

Round 5 :

(3sc, inc) *6 (30)

Round 6 :

(4sc, inc) *6 (36)

Round 7-8 :

36sc (2 rounds)

Round 9 :

BLO 36sc

Round 10 :

36sc, turn (36)

Round 11-13 :

ch1, 18sc, turn (3 rounds)

Info :

Fasten off, cut the yarn, weave in the yarn ends.

Info :

Return to round 9 of the headdress and work with brown yarn through front loops: FLO ch1, 36sc, sl st, Cut the yarn and fasten off.

Info :

Return to round 5 of the body and work with brown yarn through front loops: FLO ch1, 24 reverse sc. Cut the yarn and fasten off.

Info :

Return to round 10 of the body and work with brown yarn through front loops: FLO ch1, 24sc, sl st, Cut the yarn and fasten off.

Info :

Sew the hair wig to the head. Sew the beard to the head. Embroider a mustache with brown yarn. Embroider eyes with black yarn. Put a headdress on the doll's head.

Info :

Congrats your father doll is ready!!!

β€” BOOK Page 1 :

Info :

With green yarn. Work in rows.

Row 1 :

Chain 35. From the second chain on the hook: 34sc, turn (34)

Row 2 :

Ch1, 34sc, turn (34)

Row 3 :

Change color to gray BLO ch1, 34sc, turn

Row 4 :

Attention! Crochet in jacquard technique from Row 4 to 20. Add white yarn (these stitches are highlighted in red). Add brown yarn (these stitches are highlighted in blue) ch1, 20sc, 10sc, 4sc, turn (34)

Row 5 :

ch1, 4sc, 10sc, 20sc, turn (34)

Row 6 :

ch1, 20sc, 10sc, 4sc, turn (34)

Row 7 :

ch1, 4sc, 10sc, 20sc, turn (34)

Row 8 :

ch1, 20sc, 10sc, 4sc, turn (34)

Row 9 :

ch1, 4sc, 10sc, 20sc, turn (34)

Row 10 :

ch1, 20sc, 10sc, 4sc, turn (34)

Row 11 :

ch1, 4sc, 10sc, 6sc, 8sc, 6sc, turn (34)

Row 12 :

ch1, 6sc, 8sc, 6sc, 10sc, 4sc, turn (34)

Row 13 :

ch1, 4sc, 10sc, 6sc, 8sc, 6sc, turn (34)

Row 14 :

ch1, 6sc, 8sc, 6sc, 10sc, 4sc, turn (34)

Row 15 :

ch1, 4sc, 10sc, 6sc, 8sc, 6sc, turn (34)

Row 16 :

ch1, 6sc, 8sc, 6sc, 10sc, 4sc, turn (34)

Row 17 :

ch1, 4sc, 10sc, 6sc, 8sc, 6sc, turn (34)

Row 18 :

ch1, 6sc, 8sc, 6sc, 10sc, 4sc, turn (34)

Row 19 :

ch1, 4sc, 10sc, 6sc, 8sc, 6sc, turn (34)

Row 20 :

ch1, 6sc, 8sc, 6sc, 10sc, 4sc, turn (34)

Row 21-29 :

With gray yarn ch1, 34sc, turn (9 rows)

Row 30 :

Change color to beige FLO ch1, 34sc, turn

Row 31 :

ch1, dec, 30 loop stitches, dec, turn (32)

Row 32 :

ch1, dec, 28sc, dec, turn (30)

Row 33 :

ch1, dec, 26 loop stitches , dec, turn (28)

Row 34 :

ch1, dec, 24sc, dec, turn (26)

Row 35 :

ch1, dec, 22 loop stitches , dec, turn (24)

Row 36 :

ch1, dec, 20sc, dec, turn (22)

Row 37 :

ch1, dec, 18 loop stitches , dec, turn (20)

Row 38 :

ch1, dec, 16sc, dec, turn (18)

Row 39 :

ch1, dec, 14 loop stitches , dec, turn (16)

Row 40 :

ch1, dec, 12sc, dec, turn (14)

Row 41 :

ch1, dec, 10 loop stitches , dec, turn (12)

Row 42 :

ch1, dec, 8sc, dec, turn (10)

Row 43 :

ch1, dec, 6 loop stitches , dec, turn (8)

Row 44 :

ch1, dec, 4sc, dec, turn (6)

Row 45 :

ch1, dec, 2 loop stitches, dec, turn (4)

Row 46 :

ch1, 2dec, turn (2)

Row 47 :

ch1, dec (1)

Info :

Fasten off, cut the yarn, weave in the yarn ends.

Info :

Embroider window frames with brown thread. Embroider doorjamb with beige thread. Embroider a handle on the door.

β€” BOOK Page 2 :

Info :

With dark gray yarn. Work in rows.

Row 1 :

Chain 35. From the second chain on the hook: 34sc, turn (34)

Row 2-7 :

ch1, 34sc, turn (6 rows) (34)

Row 8 :

Change color to gray ch1, 34sc, turn (34)

Row 9-10 :

ch1, 34sc, turn (2 rows)

Row 11 :

Attention! Crochet in jacquard technique from Row 11 to 20. Add white yarn (these stitches are highlighted in blue). ch1, 6sc, 6sc, 22sc, turn (34)

Row 12 :

ch1, 22sc, 6sc, 6sc, turn (34)

Row 13 :

ch1, 6sc, 6sc, 22sc, turn (34)

Row 14 :

ch1, 22sc, 6sc, 6sc, turn (34)

Row 15 :

ch1, 6sc, 6sc, 22sc, turn (34)

Row 16 :

ch1, 22sc, 6sc, 6sc, turn (34)

Row 17 :

ch1, 6sc, 6sc, 22sc, turn (34)

Row 18 :

ch1, 22sc, 6sc, 6sc, turn (34)

Row 19 :

ch1, 6sc, 6sc, 22sc, turn (34)

Row 20 :

ch1, 22sc, 6sc, 6sc, turn (34)

Row 21-29 :

With gray yarn ch1, 34sc, turn (9 rows)

Row 30 :

Change color to blue FLO ch1, 34sc, turn (34)

Row 31 :

ch1, dec, 30sc, dec, turn (32)

Row 32 :

ch1, dec, 28sc, dec, turn (30)

Row 33 :

ch1, dec, 26sc, dec, turn (28)

Row 34 :

ch1, dec, 24sc, dec, turn (26)

Row 35 :

ch1, dec, 22sc, dec, turn (24)

Row 36 :

ch1, dec, 20sc, dec, turn (22)

Row 37 :

ch1, dec, 18sc, dec, turn (20)

Row 38 :

ch1, dec, 16sc, dec, turn (18)

Row 39 :

ch1, dec, 14sc, dec, turn (16)

Row 40 :

ch1, dec, 12sc, dec, turn (14)

Row 41 :

ch1, dec, 10sc, dec, turn (12)

Assembly Instructions

  • Sew the hood to the baby doll's head using the long tail left from the hood; position the hood then whipstitch along the edge to secure it neatly.
  • Attach each doll's hair wig to the head by matching the wig opening to the head and sewing with the long tails; embroider the eyes and cheeks after the wig is secured.
  • Insert the thick cardboard circle into the bottom of each body before finishing stuffing to create a stable base, then continue stuffing and close the opening.
  • When joining body and arms, crochet the three pieces together as instructed (3sc on left arm+body, 6sc body, 3sc right arm+body, 6sc body) and stuff, inserting the wire into arms before finishing and wrapping with plaster to secure.
  • Embroider windows, doorjamb and door handle onto the book after completing jacquard rows, then add looped rooftop curls and fasten all loose ends.
  • Sew beard and mustache to the father doll using the long tail, then embroider eyes and add the headdress; secure all trims and weave in ends.

Important Notes

  • πŸ’‘Use a stitch marker to indicate the beginning of each round, especially for small amigurumi pieces and rounds with increases and decreases.
  • πŸ’‘Stuff pieces gradually and evenly as you crochet to avoid lumps and to ensure correct shaping of head, body and arms.
  • πŸ’‘Follow BLO and FLO instructions exactly to create the front/back loop trims and headdress detail; these change the surface texture intentionally.
  • πŸ’‘Cut and insert a cardboard circle into the body base to give stability and a flat bottom for the dolls to stand.
  • πŸ’‘Wrap and secure the internal wire for arms with adhesive plaster to prevent yarn wear and to maintain poseability.

This sweet Nativity Book set brings a tiny, handmade story to your home and makes a thoughtful holiday gift. The set includes a foldable jacquard-stitched book and three tiny dolls with wigs, headdresses, and embroidered faces. Enjoy the detailed textures, looped rooftop, and hand-stitched accents that make this piece truly special. πŸ§Άβœ¨πŸ™

You ask,

we answer.

FAQs

What size will the finished piece be?

The book measures approximately 18 cm (7 inches) high by 14 cm (5.5 inches) wide; the baby is about 4.5 cm (1.7 inches), the mother about 9.0 cm (3.5 inches), and the father about 10 cm (3.9 inches) when using the recommended yarn and hook size.

Can I use different yarn weights for this pattern?

Yes, you can use different yarn weights, but this will change the scale of the dolls and book; choose an appropriate hook size to maintain stitch definition and note that jacquard details may need resizing.

Do I need special experience to make this set?

This pattern is rated intermediate because it uses small amigurumi shaping, colorwork (jacquard) on the book, and front/back loop techniques; familiarity with increases, decreases, BLO/FLO and working in rows is recommended.

How long does the project typically take to complete?

Most crafters will finish the full set in about 8-10 hours depending on experience and how much time is spent on embroidery and assembly.

How do I make the book roof texture?

The roof curls are made by crocheting loop stitches (or repeated short chain curl units) described in the pattern rows and by working loop stitches on the designated rows; follow the instructions for the loop/curly rounds and use the thicker yarn specified for the effect.