🧢 Beautiful ✨ Detailed πŸ’ Adorable

Low Sew Spider Amigurumi Pattern

Low Sew Spider Amigurumi Pattern
4.5β˜… Rating
5-7 Hours Time Needed
3.3K Made This
βœ‚οΈ

Intermediate Level

Ideal for those with basic crochet experience, featuring slightly more advanced stitches and techniques to expand your skills.

⏱️

Weekend Treat

Takes 5-7 hours, making it an enjoyable project to finish over a couple of days.

🧸

Cute Companion

An adorable friend to cherish, handcrafted with love to bring comfort and joy for years to come.

About This Low Sew Spider Amigurumi Pattern

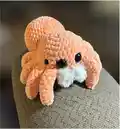
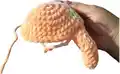
This pattern creates a plush, low-sew spider amigurumi worked in continuous rounds with soft plush yarn for a cuddly finish. Youll make eight stuffed legs, a fuzzy fang accent, a shaped head, and a rounded body that attaches securely. The instructions include specific stitch counts and placement notes so your spider will look like the photos.

Low Sew Spider Amigurumi Pattern crochet pattern - detailed view of completed project

Recommended yarns include Parfait chunky or Sweet Snuggles Lite, with small fuzzy yarn for the fangs. Finished size is approximately 8" using the suggested materials.

Why You'll Love This Low Sew Spider Amigurumi Pattern

I absolutely love this pattern because it turns plush yarn into a charming, squishy spider that is impossible not to hug. I enjoy how quickly the legs work up β€” theyre repetitive and meditative, but still fun to assemble. The low-sew join method keeps the front clean while making attachment simple and secure. Every time I make one, I tweak the eye placement and fuzzy fangs to give each spider a unique personality, which keeps the project fresh and creative.

Low Sew Spider Amigurumi Pattern step 1 - construction progress Low Sew Spider Amigurumi Pattern step 2 - assembly progress Low Sew Spider Amigurumi Pattern step 3 - details and accessories Low Sew Spider Amigurumi Pattern step 4 - final assembly and finishing

Switch Things Up

I love customizing this pattern by swapping colors to create different personalities β€” try pastel peach for a sweet look or deep navy for a night-time critter.

You can change yarn weight and hook size to alter the final size; bulky yarn with a larger hook makes a chunky cuddly spider while thin yarn makes a tiny keychain friend.

I often swap the fuzzy yarn for brighter accent colors to make the fangs pop against the body color.

Adjust eye sizes and spacing to change expression β€” closer eyes make a cuter, more innocent face while wider eyes give a quirky look.

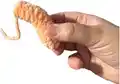
For poseable legs, close the leg tips with 3 sc as noted and insert a thin wire inside the legs before stuffing for bendable positioning.

Try embroidering small details like cheek highlights or a tiny smile with contrasting yarn for added character.

Experiment with stuffing density to change firmness β€” firmer stuffing keeps legs more structured while softer stuffing makes the spider squishier.

Add felt pads or small magnets in the feet if you want them to sit or attach to metal surfaces for display options.

I sometimes make matching mini versions by using a smaller plush yarn and a smaller hook to build a family set of spiders.

Make seasonal versions by using holiday colors, or add tiny crocheted accessories like a hat or scarf to personalize each spider.

If youre making this for a child, consider embroidering eyes instead of using safety eyes for extra safety.

Mix and match textures β€” pair plush body yarn with silkier fangs or fluffy yarn to create tactile contrast and visual interest.

Common Mistakes & How to Fix Them

βœ— Not stuffing the legs as you go results in limp or lumpy legs; stuff the leg gradually while crocheting to maintain consistent shape and firmness. βœ— Skipping stitch counting during increases and decreases can change your stitch totals; count stitches at the end of each round to keep the correct shaping. βœ— Attaching legs in the wrong orientation makes them point the wrong way when flipped; refer to the photos and attach legs so they point down when you flip the head. βœ— Placing safety eyes too close or too far apart affects the facial expression; follow the placement note and place center eyes 3 sts apart with outer eyes 2-3 sts back for balanced features. βœ— Not securing leg tails properly can cause legs to come loose; knot and weave in leg tails securely inside the head before finishing.

Low Sew Spider Amigurumi Pattern

Make a cuddly, low-sew spider amigurumi perfect for gifts or cozy decor. This pattern uses plush yarn and fuzzy accents to create a soft, squeezable spider with easy-to-follow shaping. Youll work simple rounds for legs, head, and body, then attach features for a finished, charming creature. Ideal for makers who enjoy quick, tactile projects with adorable results.

Intermediate 5-7 Hours

Materials Needed for Low Sew Spider Amigurumi Pattern

β€” Main Fabric

  • 01
    Parfait chunky plush yarn - approximately 75 grams (main color)
  • 02
    Sweet Snuggles Lite plush yarn - alternative option (equivalent amount)
  • 03
    Small amount of fuzzy/eyelash yarn for fangs and accent details (a few yards)
  • 04
    Accent yarn for small details if desired (small amount)

β€” Tools Required

  • 01
    5 mm crochet hook (for Parfait chunky)
  • 02
    6 mm crochet hook (for Sweet Snuggles Lite)
  • 03
    Polyester stuffing (polyfil)
  • 04
    Darning needle / yarn needle for sewing and weaving ends
  • 05
    Safety eyes: 20 mm (pair) and 12 mm (pair) as listed
  • 06
    Scissors
  • 07
    Stitch markers (recommended to mark rounds)

Progress Tracker

0% Complete

β€” Legs :

Info :

Legs: Make 8. Be sure to stuff the leg as you go.

Round 1 :

4 sc in mc (4)

Round 2 :

sc, (inc x3) (7)

Round 3-7 :

sc around (7)

Info :

Start Stuffing and continue as you go.

Round 8 :

2 sc, inc, 2 sc, dec (7)

Round 9-10 :

repeat round 8 (7)

Round 11 :

sc around (7)

Round 12 :

2 sc. (5 sts left unworked)

Info :

sl st, FO

Info :

*Note: if you would like floppy legs that can be easily posed. You can close the legs with 3 sc. This is an option and will make them move more. I like stiffer legs so I leave mine open.

β€” Fangs :

Info :

Fangs: Make 2 using fuzzy yarn. Leave a yarn tail on both ends because we tie them on later.

Item Name (P1) :

Chain 5, starting in second chain from hook sc 4.

β€” Head :

Info :

Head: we will be working from the top of the head down.

Round 1 :

9 sc in mc (9)

Round 2 :

inc x 9 (18)

Round 3 :

(2 sc, inc) x 6 (24)

Round 4 :

(3 sc, inc) x 6 (30)

Round 5 :

(4 sc, inc) x 6 (36)

Round 6 :

(5 sc, inc) x 6 (42)

Round 7-8 :

sc around (42)

Info :

The next round we will attach the legs. Refer to the photos to make sure they are attached correctly so when you flip it over they point down.

Round 9 :

3 sc with first leg, go through the front and back sts of the leg then through the body as shown (3 sts per leg). Repeat till you have attached 4 legs, 7 sc (this is the front where the eyes will be placed), 3 sc with leg x4, sc 11. (42)

Round 10 :

sc around (42)

Info :

Stop and secure the leg tails with knots. Attach eyes between row 7-8 above legs in the 7 st space. 3 sts between the center eyes. Smaller outer eyes are placed 2-3 sts back. Some testers liked to place the smaller eyes between rows 6-7.

Round 11 :

(5 sc, dec) x 6. (36)

Info :

Attach the fangs on row 8 below the eyes, 1-2 sts apart. Note they have a natural curve. Place them so they curve into the head. I just slip my yarn tail through and tie a knot on the inside.

Round 12 :

(4 sc, dec) x 6 (30)

Round 13 :

(3 sc, dec) x 6 (24)

Round 14 :

(2 sc, dec) x 6 (18)

Info :

STUFF

Round 15 :

dec x 9 (9)

Info :

sl st, FO

Info :

close.

β€” Body :

Round 1 :

6 sc in mc (6)

Round 2 :

inc x 6 (12)

Round 3 :

sc around (12)

Round 4 :

(sc, inc) x 6 (18)

Round 5 :

(2 sc, inc) x 6 (24)

Round 6 :

sc around (24)

Round 7 :

(3 sc, inc) x 6 (30)

Round 8 :

(4 sc, inc) x 6 (36)

Round 9 :

(5 sc, inc) x 6 (42)

Round 10-13 :

sc around (42)

Round 14 :

(5 sc, dec) x 6 (36)

Round 15 :

sc around (36)

Round 16 :

(4 sc, dec) x 6 (30)

Round 17 :

sc around (30)

Round 18 :

(3 sc dec) x 6 (24)

Info :

sl st & FO. Leave a long yarn tail for attaching.

Info :

STUFF

Info :

Attach the body 4 rounds from the center of head and 4 rounds from the bottom of the head. I attach my body right up against the legs.

Assembly Instructions

  • Attach each leg into the head on round 9 by 3 sc through the front and back sts of the leg and then through the body; attach four legs, work 7 sc for the front (where eyes go), then attach the remaining four legs as instructed.
  • Secure leg tails with knots inside the head after attaching them to ensure they dont come loose and to tidy the interior.
  • Place and attach safety eyes between rounds 7-8 above the legs in the 7 st space with 3 sts between the center eyes; place smaller outer eyes 2-3 sts back or between rows 6-7 as preferred.
  • Attach the fuzzy fangs to row 8 below the eyes, spacing 1-2 sts apart and tying yarn tails on the inside so they curve naturally into the head.
  • Sew the body to the head by aligning the body so it meets 4 rounds from the center of the head and 4 rounds from the bottom of the head; attach firmly with the long yarn tail left from the body.

Important Notes

  • πŸ’‘Use a stitch marker to keep track of the start of each round since the pattern is written in continuous rounds.
  • πŸ’‘Stuff legs and body gradually and evenly; start stuffing legs as you go to maintain shape and avoid lumps.
  • πŸ’‘Secure and knot all leg tails inside the head after attachment to prevent loosening during play or handling.
  • πŸ’‘Pin and check placement of eyes and fangs before permanently tying or knotting to ensure desired expression and symmetry.

You have finished a delightful Low Sew Spider thats soft, squishy, and full of personality. Its perfect as a handmade gift or a playful decor piece for any room. Enjoy the tiny details you added and the cozy texture of the plush yarn. πŸ§ΆπŸ•·οΈ

You ask,

we answer.

FAQs

What size will the finished piece be?

The finished amigurumi measures approximately 8" tall when using the recommended Parfait chunky yarn and the suggested hook size.

Can I use different yarn weights for this pattern?

Yes, but changing yarn weight will affect the final size and look; use an appropriate hook for your chosen yarn and expect differences in proportions.

Do I need prior crochet experience for this pattern?

This pattern is rated intermediate, so basic knowledge of single crochet, increases, and decreases is recommended for best results.

How long does this project typically take to complete?

Most crocheters complete this project in 5-7 hours, though time may vary depending on experience level and how quickly you assemble and stuff pieces.

Where should I place the eyes and fangs?

Place main (larger) eyes between rows 7-8 above the legs in the 7-st space with 3 sts between center eyes; place fangs on row 8 below the eyes about 1-2 sts apart.