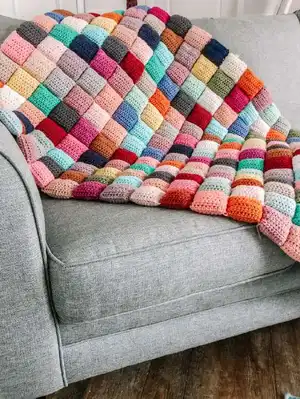
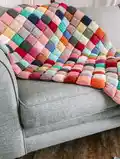
Create a cozy, quilt-like Crochet Puff Quilt using simple half double crochet stitches and easy seaming techniques. This pattern is perfect if you love using yarn scraps to build colorful, textured blankets. Follow step-by-step tutorials for whip stitch and mattress stitch seaming so your finished piece looks neat and professional.
Progress Tracker
0% Complete
— Materials :
Info :
Yarn: Worsted/Medium (4-weight), roughly 15-20yds per square, plus yarn for seaming. Hook: 5.0mm, or hook to meet gauge. Other: yarn needle, scissors, stuffing, stitch marker, flexible tape measure.
— Abbreviations :
Infos :
ch: chain. rnd: round. slst: slip stitch. hdc: half double crochet. Pattern written in US Terms.
— Gauge :
Info :
Each square measures 3" x 3" before stuffing. Follow along in the pattern and measure your square as you go to check gauge. Meeting precise gauge is not extremely important, because of the flexible sizing of this blanket. You may attach as many squares together as you would like to achieve your desired size.
Info :
My Finished Measurements: 54" x 54" (18 squares by 18 squares)
— Notes :
Info :
Create this heavy-weight, quilt-like crochet blanket with just one simple stitch and simple seaming techniques!
Info :
Written in US Terms
Info :
Beginning ch 1 does NOT count as a stitch.
Info :
Each square will be worked in a flat round. You will gently stuff it, close the top, seam your square to form a row, and attach the row onto your blanket.
Info :
I worked this blanket completely out of yarn scraps, but I chose to use all 100% cotton yarn. My preference was to use yarn all from the same fiber, but you can use your discretion.
— Pattern :
Round 1 :
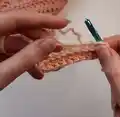
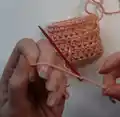
Starting in the second ch from the hook, hdc in each ch across. Rotate your work to the other side of the ch (see figure 1) and hdc in each ch across. Slst to the starting stitch. (20 stitches)
Info :
*tip: when working along the second side of your ch, lay your starting tail down across the row and crochet over top of it to secure this tail without having to weave it in (see figure 2)
Info :
*tip: if needed, use a stitch marker at the beginning of each round to help keep track of your stitch count.
Round 2-8 :
Ch 1 and turn. Hdc in each of the next 20 stitches. Slst to the starting stitch. (20 stitches)
Info :
Fasten off, leaving a long tail (roughly 20"-24").
Info :
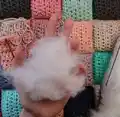
Begin lightly stuffing your square (see figure 3 for the recommended stuffing amount). Attach a yarn needle to the end of your tail and use the whip stitch (Tutorial #1) to begin seaming across the top. Finish filling in stuffing if needed, and whip stitch to the end, completely closing off your square. If this is your first square of a new row, you may go ahead and weave in this end.
Info :
Repeat this entire process for your next square, but don't weave in your final end yet.
Info :
As you seam all of your squares together, you will be looking at the back side of the work. Keep this in mind as you seam, if you would like your colors to be in a specific arrangement.
Info :
With your yarn needle still attached, seam this square to your previous square (Tutorial #2)
Info :
Decide how wide you would like your blanket to be, in increments of 3" (or increments of how wide each square is for you). Continue repeating this pattern until you have attached enough squares side by side to achieve your desired width. This will be one "row" of squares.
Info :
Complete a second full row of squares. Now, you will seam the two rows together using the mattress stitch (Tutorial #3). You will be using a completely separate strand of yarn for this, any color of your choosing.
Info :
Repeat this entire process for your entire project.
Info :
Once you achieve your desired width and length, weave in all ends and enjoy!
— Tutorial #1 :
Item Name (P1) :
Whip stitch across the top: Attach your yarn needle to the end of your tail. Align the stitches from one side to the other. Insert your yarn needle through the first set of stitches and pull your yarn through. Come back around and insert your yarn needle through the next set of stitches, going the same direction as last time. Continue repeating this until you get to the end of the square, but don't fasten off the tail.
— Tutorial #2 :
Item Name (P1) :
Whip stitch 2 squares together: You will NOT be seaming along the very sides of the squares. You want to begin picking up strands on the flat side of the square, *just off* from the very side. Insert your yarn needle into your first square (peach), picking up at least 2 strands. Pull the yarn through. Come back over to your second square (white), pick up at least 2 strands, and pick up at least 2 strands in your first square. Pull the yarn through. Continue this method all the way down. Do your last strand grab in the corners of each square. Flip your squares to work along the bottom edge. Go through the very bottom/corners one more time, ending on your second square (the color of the tail you are currently working with). Run your tail through your square and stuffing to "hide" the tail inside. Snip off the remainder of the tail.
— Tutorial #3 :
Item Name (P1) :
Mattress stitch the rows together: Measure out a strand of yarn that is roughly 3x the length of work you need to seam. Attach one side to your yarn needle, and use the other side to tie a knot through both corners of the first set of squares. You will NOT be inserting the yarn needle from front to back, like pictured here. Similar to Tutorial #2, you will pick up stitches on the top and bottom of your squares, so that your seam lines don't show on the front of the work. Pick up a set of loops close to the top of your bottom square. Insert your yarn needle from the very bottom of your top square, up through a hole in the first row. Pull the yarn through. Move to the next space to seam through, but go in the opposite direction. Insert down through the top square and down through the bottom square. Continue this method across the first set of squares, switching directions with each stitch. When you get to the corners, you want to make a nice and secure connection between all 4 corners. It does not matter which square you end on. Insert through that square again (orange) up to the diagonal corner (yellow). Pull tightly. Ensure that all corner connections are nice and snug. Come back to the corner next door (tan) and down into the diagonal opposing corner (white). Pull tightly. Ensure that all corner connections are nice and snug. Continue on to the very end of your row. When you get to the end, go through the corners one more time and fasten off. Secure with a knot and weave in the end.
This Crochet Puff Quilt Pattern transforms tiny squares and yarn scraps into a cozy, quilt-like blanket full of color and texture. Whether you make a small lap throw or a full-size blanket, the puff squares create a plush, tactile surface that feels luxurious. Gather your scraps, pick colors you love, and enjoy the soothing rhythm of repeating simple stitches to build something beautiful. 🧶🧵