🧢 Beautiful ✨ Detailed πŸ’ Adorable

My Teddy Bear Amigurumi Pattern

My Teddy Bear Amigurumi Pattern
4.4β˜… Rating
5-7 Hours Time Needed
4.0K Made This
βœ‚οΈ

Intermediate Level

Ideal for those with basic crochet experience, featuring slightly more advanced stitches and techniques to expand your skills.

⏱️

Weekend Treat

Takes 5-7 hours, making it an enjoyable project to finish over a couple of days.

🧸

Cute Companion

An adorable friend to cherish, handcrafted with love to bring comfort and joy for years to come.

About This My Teddy Bear Amigurumi Pattern

This pattern creates a soft, plush teddy bear with a removable-looking collar and embroidered facial details. It is written with clear, step-by-step rounds and helpful photos to guide shaping and assembly. The design supports three yarn options for different finished sizes so you can personalize the final toy.

My Teddy Bear Amigurumi Pattern crochet pattern - detailed view of completed project

You will work in continuous rounds to shape the head and body, then add ears, muzzle, nose, and paws. The pattern includes tips for eye tightening, thread mounting, and finishing touches for a professional look.

Why You'll Love This My Teddy Bear Amigurumi Pattern

I absolutely love this pattern because it balances simple amigurumi techniques with charming character details that make each bear unique. I enjoy the shaping sequence for the head-to-body transitionβ€”it gives the bear a sweet, rounded look. The collar and shirt edge add personality and a pop of color that I find irresistible. Sewing the muzzle and embroidering the smile always feels rewarding and brings the face to life.

My Teddy Bear Amigurumi Pattern step 1 - construction progress My Teddy Bear Amigurumi Pattern step 2 - assembly progress My Teddy Bear Amigurumi Pattern step 3 - details and accessories My Teddy Bear Amigurumi Pattern step 4 - final assembly and finishing

Switch Things Up

I love how this pattern adapts to different yarns and sizes; swapping yarn gives a whole new character to the bear.

For a softer, fluffier bear try plush yarn like YarnArt Velour or Dolce and use a slightly larger hook for a cuddly finish.

If you want a smaller keychain version, pick a thinner cotton yarn and a 1-2 mm hook to scale down the pattern.

I often change colors for the collar and shirt edge to give the bear a sweater in seasonal hues like pastel spring or warm autumn tones.

You can embroidery different expressions by altering eyebrow placement and mouth curves to create sleepy, surprised, or smiling faces.

Try felting a small felt accessory like a bow or tiny scarf and sew it onto the collar for extra charm and personalization.

To make the bear posable, insert thin wire into the arms and secure it with extra stuffing and reinforced thread mounting.

I sometimes add tiny crocheted props like a honey pot or a tiny hat to create a themed set for gifting or display.

Mix yarn texturesβ€”use semi-cotton for the muzzle and nose to keep detail crisp while keeping the body plush and tactile.

Play with eye size and placement to create different ages and personalities; smaller eyes and a larger muzzle create a baby-like look.

Common Mistakes & How to Fix Them

βœ— Forgetting to use stitch markers when working continuous rounds leads to lost row starts; place and move a stitch marker at the beginning of every round to keep track. βœ— Understuffing or overstuffing the head creates a misshapen result and difficult assembly; stuff cheeks and back of the head gradually and firmly while shaping to maintain the intended silhouette. βœ— Changing colors without securing the ends properly can cause loose joins and unraveling; fasten off and weave in ends or hide tails between rounds to secure color changes. βœ— Placing safety eyes too early or too close together results in incorrect facial proportions; insert eyes between rounds 14 and 15 with 10 SC between them and pin placement before permanently attaching.

My Teddy Bear Amigurumi Pattern

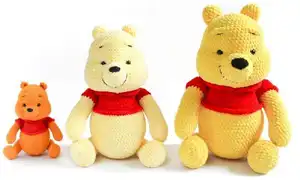
Make a cuddly, handmade teddy bear using this complete crochet pattern. You'll learn head-to-body shaping, paws, muzzle, and facial detailing step-by-step. Suitable for making three size variations depending on yarn choice, this pattern includes full stitch-by-stitch rounds and helpful assembly notes to guide your project.

Intermediate 5-7 Hours

Materials Needed for My Teddy Bear Amigurumi Pattern

β€” Main Fabric

  • 01
    YarnArt Velour (plush yarn) 170 m/100 g - Yellow: ~1 and a half balls for main body (approximate)
  • 02
    YarnArt Velour (plush yarn) 170 m/100 g - Red: less than half of a ball for collar and shirt edge
  • 03
    YarnArt Dolce (plush alternative) 131 yds/3.5 Oz. - color options: 761, 748 (use per look-up table)
  • 04
    Alize Cotton Gold (semi-cotton) 360 yds/3.5 Oz. - thinner alternative for smaller version and nose details
  • 05
    Black semi-cotton yarn (for nose and facial embroidery) - small amount
  • 06
    Additional small amounts of main yarn shade for tightening and attaching details

β€” Tools Required

  • 01
    Crochet hook size 3 mm (recommended for YarnArt Velour)
  • 02
    Crochet hook size 3.5 mm (for YarnArt Dolce if used)
  • 03
    Crochet hook size 2 mm (for semi-cotton nose and finer details)
  • 04
    Very small hook (1-1.5 mm) if dividing semi-cotton for tiniest nose
  • 05
    Safety eyes 10 mm (pair) - recommended size; adjust according to yarn choice (12 mm for Dolce, 5 mm for Alize Cotton Gold)
  • 06
    Scissors
  • 07
    Yarn sewing needles (long needles for thread mounting)
  • 08
    Stitch markers
  • 09
    Pins with large head for placement
  • 10
    Polyester stuffing / fiber filling
  • 11
    Synthetic/tooth thread for tightening and thread mount of paws (optional but stronger)

Progress Tracker

0% Complete

β€” Head - Body :

Round 0 :

CH 6

Round 1 :

start in the 2nd chain from the hook 4 SC, 3 SC into the last chain from the hook, on the other side: 3 SC, INC (12)

Round 2 :

INC, 3 SC, 3 INC, 3 SC, 2 INC (18)

Round 3 :

SC, INC, 3 SC, (SC, INC)*3, 3 SC, (SC, INC)*2 (24)

Round 4 :

2 SC, INC, 3 SC, (2 SC, INC)*3, 3 SC, (2 SC, INC)*2 (30)

Round 5 :

3 SC, INC, 3 SC, (3 SC, INC)*3, 3 SC, (3 SC, INC)*2 (36)

Round 6 :

4 SC, INC, 3 SC, (4 SC, INC)*3, 3 SC, (4 SC, INC)*2 (42)

Round 7 :

5 SC, INC, 3 SC, (5 SC, INC)*3, 3 SC, (5 SC, INC)*2 (48)

Round 8 :

6 SC, INC, 3 SC, (6 SC, INC)*3, 3 SC, (6 SC, INC)*2 (54)

Round 9-15 :

7 rounds 54 SC

Round 16 :

8 INC, 10 SC, 8 INC, 28 SC (70)

Round 17-25 :

9 rounds 70 SC

Info :

insert eyes between 14th and 15th rounds at a distance of 10 SC between them (between cheeks)

Info :

work 3 SC more, shift stitch marker forward

Round 26 :

8 DEC, 10 SC, 8 DEC, 28 SC (54)

Round 27 :

(7 SC, DEC)*6 (48)

Round 28 :

(6 SC, DEC)*6 (42)

Round 29 :

42 SC

Info :

don't work in the last 2 stitches in the 29th round; place stitch marker 2 stitches backward; change color to red

Round 30 :

(13 SC, INC)*3 (45)

Round 31 :

BLO: (14 SC, INC)*3 (48)

Info :

stuff the head : it's important to stuff the head correct: stuff cheeks and back of the head properly, avoid stretching the top of the head by holding it with your palm

Round 32 :

(15 SC, INC)*3 (51)

Round 33 :

(16 SC, INC)*3 (54)

Round 34 :

(17 SC, INC)*3 (57)

Round 35 :

(18 SC, INC)*3 (60)

Info :

mark the place of 6 INCs in the middle of the belly at a distance of 2 SC between each INC

Round 36 :

10 SC, (INC, 2 SC)*5, INC, 34 SC (66)

Round 37 :

66 SC

Info :

change color to yellow

Round 38 :

BLO: 66 SC

Round 39 :

(10 SC, INC)*6 (72)

Round 40-51 :

12 rounds 72 SC

Info :

before you stuff the body, crochet additional rounds of collar and shirt edge, work in front loops only in 31st and 38th rounds

β€” Collar (31st round) :

Infos :

turn the body upside down. attach a red thread in front in the middle of the collar. work the 1st round in front loops only. make a turn and work a CH at the end of each round.

Round 1 :

7 SC, INC, 14 SC, INC, 14 SC, INC, 7 SC, CH, turn (48)

Round 2 :

skip SC, 45 SC, DEC, CH, turn (46)

Round 3 :

skip SC, 43 SC, DEC (44)

Info :

fix the thread, put the thread through the side of the collar to the body and fix on the inside

β€” Shirt edge (38th round) :

Info :

attach a red thread, work CH and 66 SC in front loops only; join the beginning and the end of the round with SS; put the thread to the body and fix it on the inside.

Info :

continue crocheting the body: stuff while crocheting

Round 52 :

(10 SC, DEC)*6 (66)

Round 53 :

(9 SC, DEC)*6 (60)

Round 54 :

(8 SC, DEC)*6 (54)

Round 55 :

(7 SC, DEC)*6 (48)

Round 56 :

(6 SC, DEC)*6 (42)

Round 57 :

(5 SC, DEC)*6 (36)

Round 58 :

(4 SC, DEC)*6 (30)

Round 59 :

(3 SC, DEC)*6 (24)

Round 60 :

(2 SC, DEC)*6 (18)

Round 61 :

(SC, DEC)*6 (12)

Round 62 :

6 DEC (6)

Info :

pull the hole down, fix the thread and hide the ending

β€” Eye Tightening :

Info :

mark 8 points where you will withdraw the needle: two points by sides of each eye and 4 points on the line of changing the color under the eyes; take a strong thread of main yarn color and a long needle, insert it in the 1st point on the collar line and withdraw it near the eye side; insert the needle in the point from the other side of the eye; withdraw the needle at the bottom near the 1st point; tighten the thread; tie the endings and hide them in the head; repeat the steps with the 2nd eye; then do a horizontal eye tighten as shown in the photos.

β€” Ears (2 details) :

Round 1 :

6 SC in MR

Round 2 :

6 INC (12)

Round 3-5 :

3 rounds 12 SC

Info :

CH, fold in half and crochet it together 6 SC; sew the ears on the head in the area of 6-7-8 rounds forming an arc (round a bit the line of attaching) at a distance of 6-7 SC

β€” Muzzle :

Round 1 :

6 SC IN MR

Round 2 :

6 INC (12)

Round 3 :

6 SC, (SC, INC)*3 (15)

Round 4 :

6 SC, (2 SC, INC)*3 (18)

Round 5 :

6 SC, (3 SC, INC)*3 (21)

Round 6 :

6 SC, (4 SC, INC)*3 (24)

Info :

SS, fix the thread, cut it and leave a long ending to sew

Optional Round 7 :

6 SC, (5 SC, INC)*3 (27) (you can increase the diameter of muzzle by working one more round)

β€” Nose :

Info :

black semi-cotton yarn, 2 mm hook. if you crochet the bear with semi-cotton yarn, use thinner cotton yarn or divide the main semi-cotton yarn in half; 1-1,5 mm hook

Round 0 :

CH 6

Round 1 :

start in the 2nd chain from the hook 4 SC, 3 SC into the last chain from the hook, on the other side: SC, 3 SC in the same loop, SC, INC (14)

Info :

SS, fix the thread, cut it and leave a long ending to sew

Optional Round 2 :

INC, 3 SC, 3 INC, 2 SC, 3 SC in the same loop, 2 SC, 2 INC (22) (you can increase the diameter of nose by working one more round)

β€” Head design and finishing :

Info :

mark the place of attaching the muzzle (between the 15th and 24th rounds); stuff a bit the muzzle and fix well on the head (INCs should be right by sides and at the bottom); sew the muzzle (stuff it well while attaching); sew the nose on the muzzle; embroider the smile: mark 4 points as it is shown in the photo; insert needle under the muzzle and withdraw it on back side of the muzzle; stretch the thread under the pins; fix two bottom points with thread; make stitches with the thinner thread so the stitches are less visible; tighten the thread; tie the endings and hide them in the head; mark the place for the future eyebrows (4-6 rounds higher than the eye at a distance of 6-8 SC); embroider eyebrows with the black semi-cotton thread; tighten the area above the eyebrows with the strong thread of the main yarn color.

β€” Upper paws (2 details) :

Infos :

start working with yellow yarn. stuff tight while working.

Round 1 :

6 SC in MR

Round 2 :

6 INC (12)

Round 3 :

(3 SC, INC)*3 (15)

Round 4 :

(2 SC, INC)*5 (20)

Round 5-6 :

2 rounds 20 SC

Round 7 :

11 SC, (SC, DEC)*3 (17)

Round 8-17 :

10 rounds 17 SC

Info :

change color to red

Round 18 :

(3 SC, INC)*4, SC (21)

Round 19 :

BLO: 21 SC

Round 20-21 :

2 rounds 21 SC

Round 22 :

(SC, DEC)*7 (14)

Round 23 :

7 DEC (7)

Info :

pull the hole down, fix the thread and hide it; turn the paw upside down, attach red thread and work in front loops only in the 19th round: CH, crochet 21 SC, SS to join in the end, fix the thread, tie the endings and hide them inside.

β€” Bottom paws (2 details) :

Info :

stuff tight while working

Round 0 :

CH 7

Round 1 :

start in the 2nd chain from the hook 5 SC, 3 SC into the last chain from the hook, on the other side: 4 SC, INC (14)

Round 2 :

INC, 4 SC, 3 INC, 4 SC, 2 INC (20)

Round 3 :

SC, INC, 4 SC, (SC, INC)*3, 4 SC, (SC, INC)*2 (26)

Round 4 :

26 BPSC

Round 5-7 :

3 rounds 26 SC

Round 8 :

5 SC, 7 DEC, 7 SC (19)

Round 9 :

4 SC, 5 DEC, 5 SC (14)

Round 10 :

14 SC

Round 11 :

6 SC, INC, 7 SC (15)

Round 12 :

7 SC, INC, 7 SC (16)

Round 13 :

8 SC, INC, 7 SC (17)

Round 14 :

9 SC, INC, 7 SC (18)

Round 15 :

10 SC, INC, 7 SC (19)

Round 16 :

11 SC, INC, 7 SC (20)

Round 17-21 :

5 rounds 20 SC

Round 22 :

(SC, DEC)*6, DEC (13)

Round 23 :

6 DEC +1 DEC from the next round (7)

Info :

pull the hole down, hide the ending

β€” Thread mount of paws and final assembly :

Info :

I use both semi-cotton and synthetic thread for the thread mount to make it stronger; to make the mounting easier I use long needles. Try on the paws, choose the appropriate position. Insert a long needle through the body in the place of mounting the 1st paw and withdraw it in the place of mounting the 2nd paw. Put the paw on the needle taking only the front part of the fabric (not through the whole paw), 2-3 SC and the fiber filling. Secure firmly and hide thread endings inside.

Assembly Instructions

  • Insert safety eyes between rounds 14 and 15 at a distance of 10 SC between them (position between the cheeks) and secure according to eye maker instructions.
  • Sew the muzzle to the head between rounds 15 and 24, stuffing the muzzle slightly and aligning INCs so they are at the sides and bottom; sew firmly using the long needle and hide ends inside.
  • Sew ears onto the top of the head in the area of rounds 6-7-8 forming a small arc, spacing the ears about 6-7 SC apart for symmetry.
  • Mount upper and bottom paws using long needles and synthetic/semi-cotton thread for strength; insert the needle through the body from one mounting point to the opposing point, thread the paw taking only the front fabric, add 2-3 SC and fiber filling, then secure and hide thread ends.

Important Notes

  • πŸ’‘Use stitch markers to track the beginning of rounds, especially when shaping increases and decreases.
  • πŸ’‘Stuff the head carefully: stuff cheeks and back of the head first and avoid over-stretching the top by supporting it with your palm.
  • πŸ’‘When changing to the collar or shirt edge, work the first round in front loops only to get the correct edge and join with a slip stitch to finish.

This adorable My Teddy Bear pattern is perfect for making a heartfelt gift or a cozy friend to keep. The pattern supports three yarn options for different sizes and textures, allowing lots of creativity and personalization. Enjoy the stitching process and make a little companion that will be treasured. 🧢🧡

You ask,

we answer.

FAQs

What size will the finished piece be?

The finished teddy bear size varies with yarn: approximately 37 cm with YarnArt Dolce, 31 cm with YarnArt Velour, and 18 cm with Alize Cotton Gold, based on the pattern look-up table.

Can I use different yarn weights for this pattern?

Yes, you can use different yarn weights but the final size and texture will change; adjust hook size accordingly and refer to the look-up table for recommended hooks.

Do I need prior crochet experience for this pattern?

This pattern is rated intermediate; familiarity with single crochet, increases, decreases, working in rounds, and basic assembly is recommended for best results.

How long does this project typically take to complete?

Most crocheters complete this project in 5-7 hours, though time may vary depending on experience level, yarn choice, and how much time you spend on finishing details.