🧢 Beautiful ✨ Detailed πŸ’ Adorable

Crochet Wine Tote Bag Pattern

Crochet Wine Tote Bag Pattern
4.5β˜… Rating
2-4 Hours Time Needed
4.2K Made This
βœ‚οΈ

Intermediate Level

Ideal for those with basic crochet experience, featuring slightly more advanced stitches and techniques to expand your skills.

⏱️

Bite-Sized Project

Finishes in 2-4 hoursβ€”perfect for an afternoon of creative relaxation.

✨

Stylish Touch

An elegant detail to elevate any look, combining traditional techniques with contemporary design sensibilities.

About This Crochet Wine Tote Bag Pattern

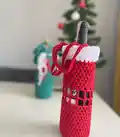
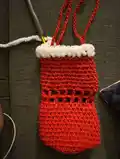
This pattern creates a slim crochet wine tote that holds a standard bottle and features perforated square details and a soft velvet trim. The body is worked in rounds from a small circular base, then transitioned into straight rounds and a decorative perforated band. Straps are crocheted and attached to form a secure handle; a velvet edge gives a finished, festive look.

Crochet Wine Tote Bag Pattern crochet pattern - detailed view of completed project

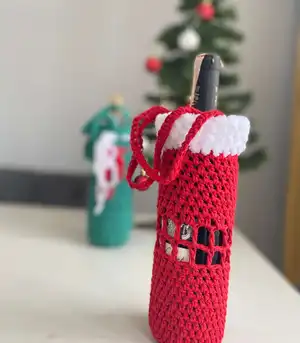
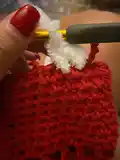
Photo steps accompany each round so you can follow stitch placement and shaping easily. The pattern uses macrame yarn for body structure and a small amount of velvet yarn for the top trim.

Why You'll Love This Crochet Wine Tote Bag Pattern

I absolutely love this pattern because it turns a simple bottle into a lovely handmade gift that feels special and personal. I enjoy the way the circular base transitions into the tall, narrow body and how the perforated band adds character without complex shaping. I also love the combination of sturdy macrame yarn with the fluffy velvet trim β€” it creates contrast and a professional finish. Making the straps and finishing knots is satisfyingly straightforward, so you see progress quickly and end up with a useful, beautiful piece.

Crochet Wine Tote Bag Pattern step 1 - construction progress Crochet Wine Tote Bag Pattern step 2 - assembly progress Crochet Wine Tote Bag Pattern step 3 - details and accessories Crochet Wine Tote Bag Pattern step 4 - final assembly and finishing

Switch Things Up

I love how easily this pattern adapts to new looks; you can change the entire mood by switching yarn colors and textures.

I often use bulky yarn and a larger hook to make a chunky, cozy tote that becomes a statement piece.

I also like to use thinner cotton yarn and a smaller hook to create a delicate, smaller wine bag perfect for mini bottles or favors.

I sometimes replace the perforated band with a decorative slip-stitch pattern to make a solid panel for a different aesthetic.

I recommend trying braided straps instead of single-chain straps for extra strength and a different visual effect.

I like to add beads or a small tassel on the perforated row for a little sparkle when giving as a gift.

I sometimes line the inside with fabric to make the tote more rigid and to hide the knot ends neatly.

I encourage you to experiment with two-tone bodies: work the bottom in one color and switch for the perforated band to highlight the design.

I often shorten or lengthen the strap chain to make a shoulder bag or a quick carry handle depending on how the bottle will be carried.

I enjoy personalizing the tote by adding an embroidered initial or a small crocheted motif that reflects the recipient's personality.

Common Mistakes & How to Fix Them

βœ— Skipping the stitch count after increase rounds can make the base uneven; count stitches at the end of each increase round to ensure correct total and symmetry. βœ— Working the perforated (mesh) row too tightly will close the holes and ruin the design; keep a slightly loose tension for these chains so the squares form properly. βœ— Not checking the curl at rows 4 and 5 may prevent the base from turning up into a bottle shape; follow the instruction to work edge hdc only for a crisp inward curl. βœ— Pulling the velvet yarn too tight when adding the trim will distort the top edge; work gently and feel the stitches to keep the velvet fluffy and even. βœ— Failing to knot and secure strap ends tightly can lead to slipping; tie knots firmly and weave in ends securely to prevent straps from loosening. βœ— Rushing the strap length without measuring against the bottle can result in straps that are too short; measure on a bottle and adjust chain length before finishing.

Crochet Wine Tote Bag Pattern

Make a charming crochet wine tote that fits a standard bottle and doubles as a thoughtful handmade gift. This pattern uses macrame and a velvet trim to give a sturdy, festive finish. Follow the clear, photo-backed rounds to build the base, body, perforated detail, and straps step by step. Perfect for gifting or crafting a unique bottle carrier for special occasions.

Intermediate 2-4 Hours

Materials Needed for Crochet Wine Tote Bag Pattern

β€” Main Fabric

  • 01
    100 g macrame yarn (main color, approximately 100 grams - red in sample photos)
  • 02
    20 g white velvet yarn (for the top trim and decorative finish)

β€” Tools Required

  • 01
    Crochet hook 4.5 mm
  • 02
    Scissors
  • 03
    Yarn needle for weaving and finishing
  • 04
    Stitch markers (optional for counting rounds)

Progress Tracker

0% Complete

Infos :

CROCHET TERMS: Chain (ch) - yarn over, pull yarn through stitch on hook. Slip Stitch (Slip St) - insert hook into stitch or space indicated, yarn over, pull yarn through both loops on hook. Single crochet (Sc) - insert hook into stitch or space indicated, yarn over, pull up a loop (2 loops in hook), yarn over, pull yarn through loops on hook. half-double crochet (hdc) - yarn over, insert hook into stitch or space indicated, pull up a loop (3 loops in hook), yarn over, pull yarn through loops on hook. double crochet (dc) - yarn over, insert hook into stitch or space indicated, pull up a loop (3 loops in hook) * yarn over, pull yarn through 2 loops on hook; repeat from * once more. treble crochet (tr) - yarn over twice, insert hook into stitch or space indicated, pull up a loop (4 loops in hook) * yarn over, pull yarn through 2 loops on hook; repeat from * 2 times.

Infos :

MATERIALS: 4,5 MM HOOK. 100 G MACRAME YARN. 20G WHITE VELVET YARN.

β€” Body :

Round1 :

Make 6 ch, and connect to the first ch to form a ring. Make 10 hdc into the ring. Close the row by sinking into the top of the first hdc. With 2 ch go to the top row (we have reached the 2nd row). here we will make 2 hdc into each stitch. at the end of the row we will have a total of 20 hdc. it is important to proceed by counting. When we come to the end, connect to the top of the first hdc.

Round2 :

Make 3 ch to go up to the 3rd row. make 1 more hdc into the same ch. (In the 2nd row we made 2 hdc into each ch. In the 3rd row we will advance the row by making 1 double 1 single.) 1 hdc on the next ch, 2 hdc on the next ch...When we come to the end, connect to the top of the first hdc.

Round3 :

Let's move on to row 4 with 2 ch. in this row our work on all chains will be as follows; 1 hdc on 1ch, 1 hdc on the next 1 ch, 2 hdc single on the next 1 ch, ie 2 hdc single, 1 hdc double so when we complete the row, connect to the first hdc and close row 4. To move to row 5, make 2 ch. we will no longer increase, make 1 hdc on each ch. the trick here is to make the hdc ch sin only on the edge line. we do this for a complete curl. (picture a-b) When we complete the row, conect to the first hdc and close the 5th row. In rows 4 and 5, it will start to curl inwards and take the bottle form.

Round4 :

In all the next 10 rows, when we close the row, we go to the top row with 1 ch. and we make 1 hdc on each ch.

Round5 :

in this order, we go to the top row with 4 ch. (The reason why it is 4 is that we have moved to the perforated row) Skip 1 ch and make 1 dc on the 2nd ch. Make 1 ch, make 2 ch, skip 1 ch and make 1 dc on the next ch. complete the whole row like this. When closing the row, connect to the 3rd of the first 4 ch groups and close. When the row is completed, go up to the top row with 4 ch. make 1 dc on top of the dc in the next row. make 2 ch, make 1 dc on top of the next dc. so we will form squares. When closing the row, connect to the 3rd of the first group of 4 ch and close.

Round6 :

in this order, we switch from perforated rows to straight rows again. in this order, we switch from perforated rows to straight rows again. In the bottom row, we made 2 ch between the squares. in this row, we will only work on 2 chs. we will complete the whole row by making 2 hdc in every 2 ch spaces. do not knit tightly in this row, knit more freely so that it does not tighten. When you reach the end of the row, connect to the first ch. Go to the top row with 1 ch. In this and the next 7 rows, we will make 1 ch on each ch. (total 8 row)

Round7 :

we're moving on to making stalks. Let's make 40 ch. (you can extend the length here as much as you want. you can also do it by measuring here. Skip 8 ch and connect on the 9th ch. Here we must make it tight while connecting. we will call it a belt. we will complete the belt by making 1 hdc on each ch kin on the belt. connect to the beginning and cut the rope. knot tightly. Count 4 ch from the end of the arch and tie into ch 5. Make 40 ch. (this will be the 2nd arch.) skip 8 ch and tie tightly to the 9th ch. go back and make 1 hdc in all ch. tie at the beginning and cut the rope. knot tightly.

Round8 :

and in this order we switch to velvet thread. the trick here. after knitting the straps, I continue with velvet because I want the straps to stay inside. follow this way for a more beautiful look. Since the velvet rope is fluffy, it may be difficult for you to see the chains. try to understand with your hand. we will continue in this way for a total of 2 rows by making 1 ch on each ch.

Infos :

general view: for the perforated areas here; if you want, you can decorate it with velvet threads. If you want, you can write a cute note on the note paper and tie it. Or you can keep it simple.

Assembly Instructions

  • After completing the body and perforated rows, measure and crochet straps (40 ch or desired length), skip 8 ch and attach to the 9th ch as described, then secure by working 1 hdc across the strap and knotting the ends tightly.
  • Change to white velvet yarn for the top edge and work 2 rows of 1 ch on each ch to create a fluffy trim; weave in and secure ends so the velvet stays inside the strap channel.
  • When making the perforated square band, connect the squares by working 1 dc on top of the previous row's dc and 2 ch between to form even squares as described, making sure to connect to the 3rd ch of the first 4-ch group when closing.
  • Tie strap knots tightly at both ends and weave tails into the inside of the tote to hide and secure them, preventing slippage when carrying a bottle.
  • Use photos as reference to check placement and tension; place the finished bottle inside to confirm strap length and trim position before final weaving and trimming of ends.

Important Notes

  • πŸ’‘Count stitches carefully after each increase round to maintain a circular, even base and correct stitch totals.
  • πŸ’‘Keep a slightly loose tension on perforated (chain) rows so the decorative holes form properly and do not tighten closed.
  • πŸ’‘Knot and secure strap ends firmly and weave in tails to prevent straps from slipping or coming undone when carrying weight.
  • πŸ’‘Work velvet trim gently because fluffy yarn can hide chain spaces; feel with your hand to find chains if they are hard to see.

This festive crochet wine tote makes a charming gift that is both useful and handmade with love. The macrame body gives sturdy support while the velvet trim adds a soft, cozy finish. Make one in your favorite colors and add a little note for a personal touch. 🎁🧢

You ask,

we answer.

FAQs

What size will the finished piece be?

The finished tote fits a standard wine bottle and measures approximately 33-36 cm tall including the trim when using the recommended macrame yarn and 4.5 mm hook.

Can I use different yarn weights for this pattern?

Yes, you can substitute different yarn weights, but this will change the final size and drape; adjust hook size accordingly and test with a sample before starting the full piece.

Do I need prior crochet experience for this pattern?

This pattern is rated intermediate; you should be comfortable working in rounds, making hdc, dc, and chain-spaces (mesh) and following increases and row counts.

How long does this project typically take to complete?

Most crocheters complete this project in 2-4 hours, though time may vary based on experience and whether you customize strap length or add decorations.