🧶 Beautiful ✨ Detailed 💝 Adorable

Crocheted Bumblebee Amigurumi Pattern

Crocheted Bumblebee Amigurumi Pattern
4.4★ Rating
2-3 Hours Time Needed
3.6K Made This
✂️

Beginner Friendly Level

Perfect for those just starting their crochet journey, with clear instructions and simple techniques

⏱️

Bite-Sized Project

Finishes in 2-4 hours—perfect for an afternoon of creative relaxation.

🧸

Cute Companion

An adorable friend to cherish, handcrafted with love to bring comfort and joy for years to come.

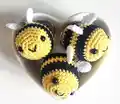
About This Crocheted Bumblebee Amigurumi Pattern

This pattern creates a small crocheted bumblebee amigurumi ideal for keychains or tiny gifts. It features clear round-by-round instructions for the body and wings and simple color changes for the stripes. You will sew on cute facial details and a hanging loop to finish your bee.

Crocheted Bumblebee Amigurumi Pattern crochet pattern - detailed view of completed project

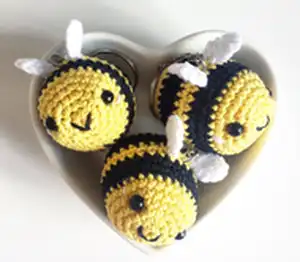
Perfect for using small amounts of leftover yarn and practicing increases and decreases. The finished bee is compact and portable, making a lovely handmade accessory.

Why You'll Love This Crocheted Bumblebee Amigurumi Pattern

I absolutely love this pattern because it transforms a few simple stitches into a tiny character full of charm. I enjoy the quick satisfaction of finishing a small amigurumi in an afternoon. The color changes make each bee pop and allow for playful combinations. Sewing the wings and embroidered face is the part I find most rewarding, as it brings the bee to life.

Crocheted Bumblebee Amigurumi Pattern step 1 - construction progress Crocheted Bumblebee Amigurumi Pattern step 2 - assembly progress Crocheted Bumblebee Amigurumi Pattern step 3 - details and accessories Crocheted Bumblebee Amigurumi Pattern step 4 - final assembly and finishing

Switch Things Up

I love customizing the colors for each bee, so I often swap the yellow and black for pastel shades to make soft, decorative bees.

If you want a larger bee, I change to a thicker yarn and a larger hook to create a chunkier, cuddlier version that still follows the same rounds.

I sometimes make miniature sets using thin yarn and a smaller hook to create tiny keychain charms perfect for gift sets or party favors.

Try adding a small bell or bead to the hanging loop for a playful sound when the bee moves—just sew it securely into the chain before attaching.

For more personality, embroider different mouth shapes or eyebrows using contrasting thread to alter the bee's expression.

I also like to vary the wing shape: make larger oval wings or tiny rounded wings by adding or skipping an increase round on the wing piece.

Make a magnet version by stitching a small pouch into the back and inserting a flat magnet before closing, ideal for fridges and lockers.

Use safety eyes or embroider eyes for toy-safe versions—embroidered eyes are great when the bee might be handled by small children.

Add a tiny crocheted scarf or bow by working a few extra rounds in a contrast color and sewing it around the bee's neck for seasonal flair.

I often gift a trio of bees in coordinating colors—mix and match colour A and B for stripe variations and present them on a small card for a handmade gift.

Common Mistakes & How to Fix Them

✗ Skipping placement of the safety eyes can ruin the facial symmetry; place the eyes between rounds 5 and 6 with eight stitches between them before stuffing. ✗ Forgetting to stop crocheting to stuff the body will make shaping difficult; stop and stuff firmly at the instructed point, adding stuffing gradually for an even shape. ✗ Not leaving long tails when fastening off prevents secure assembly later; always leave long tails for sewing the last stitches and attaching the hanging loop. ✗ Crocheting too tightly during color changes can distort stripes and make sewing harder; maintain consistent, moderate tension and change color cleanly between rounds.

Crocheted Bumblebee Amigurumi Pattern

Create a tiny, adorable crocheted bumblebee that makes a perfect keychain or sweet gift. This pattern uses simple amigurumi techniques and clear round-by-round instructions so you can stitch along easily. With three small pieces to assemble and playful color changes, you will have a charming handmade bumblebee in no time. Ideal for gifting, craft markets, or brightening up your own bag.

Beginner Friendly 2-3 Hours

Materials Needed for Crocheted Bumblebee Amigurumi Pattern

— Main Fabric

  • 01
    Crochet yarn Natura Just Cotton Colour A: Tournesol (yellow)
  • 02
    Crochet yarn Natura Just Cotton Colour B: Noir (black)
  • 03
    Crochet yarn Natura Just Cotton Colour C: Ibiza (white) for wings
  • 04
    Crochet yarn Natura Just Cotton Colour D: Rose Layette (pink) for cheeks
  • 05
    Stuffing material (small amount)
  • 06
    Small parcel of dried lavender (optional)

— Tools Required

  • 01
    Hook 2.5 (mm)
  • 02
    Yarn needle
  • 03
    Scissors
  • 04
    6 mm black safety eyes (2)
  • 05
    Stuffing material
  • 06
    Optional: small parcel of dried lavender for scent

Progress Tracker

0% Complete

— Materials :

Info :

Hook 2.5. Yarn needle. Scissors. Crochet yarn Natura Just Cotton Colour A: Tournesol Colour B: Noir Colour C: Ibiza Colour D: Rose Layette. Stuffing material. 6 mm black safety eyes.

— Body :

Round 1 :

Using colour A work 6 sc in magic ring (6)

Round 2 :

2 inc (12)

Round 3 :

*1 sc, 1 inc**, repeat from *to ** 6 times (18)

Round 4 :

*2 sc, 1 inc**, repeat from *to ** 6 times (24)

Round 5 :

*3 sc, 1 inc**, repeat from *to ** 6 times (30)

Round 6 :

Sc in each st

Round 7-10 :

Change to colour B and continue in sc

Info :

Stop crocheting and place safety eyes between round 5 and 6, considering 8 stitches between the eyes.

Round 11-13 :

Change to colour A and continue in sc

Round 14-17 :

Change to colour B and continue in sc

Round 18 :

Change to colour A and continue in sc

Round 19 :

*3 sc, 1 dec**, repeat from *to ** 6 times (24)

Round 20 :

*2 sc, 1 dec**, repeat from *to ** 6 times (18)

Info :

Stop crocheting and start stuffing the bee firmly, I filled my bee with a small parcel of dried lavander as well but this is optional.

Round 21 :

*1 sc, 1 dec**, repeat from *to ** 6 times (12)

Round 22 :

6 dec (6)

Info :

Fasten off leaving a long tail for sewing the last stitches together.

— WINGS (make 2) :

Round 1 :

Using colour C work 6sc in magic ring (6)

Round 2 :

2 inc (12)

Info :

Work a slip stitch and fasten off leaving a long tile for sewing the wings to the bee.

— Assembling :

Info :

Sew the wings to top of the body, between the 2 black stripes with 2 rows in between to allow space for the chain.

Info :

Chain 40, leaving a tail long enough to pass through the bee. Finish the chain by joining the first st with a slip stitch. Using the 2 long tails, sew the hanging loop to the body.

Info :

Using 3 strands of thread from colour D sew 2 pink dots 2 rows down from the eyes on each side.

Info :

Using 3 strands of thread from colour B make the mouth by making a V at the front of the face.

Assembly Instructions

  • Place and secure safety eyes between rounds 5 and 6, spacing them about 8 stitches apart before stuffing the head area.
  • Sew the two wings to the top of the body between the two black stripes, leaving two rows of space between them to allow room for the hanging chain.
  • Make a chain of 40 stitches to form the hanging loop, join with a slip stitch, and use the two long tails to sew the hanging loop securely to the top of the bee.
  • Using three strands of colour D, embroider two small pink cheek dots two rows down from the eyes on each side.
  • Using three strands of colour B, embroider a small V-shaped mouth at the front of the face for a sweet expression.

Important Notes

  • 💡Place safety eyes before stuffing to ensure correct placement and symmetry between rounds 5 and 6.
  • 💡Stuff the bee firmly but evenly to keep the shape smooth; overstuffing can distort the stripes and shape.
  • 💡Fasten off with long tails when indicated so you have enough yarn to sew seams and attach the hanging loop securely.
  • 💡Sew wings and facial details with small, neat stitches and pin parts in place before sewing to ensure correct positioning.

This little bee is a quick and delightful make that brightens any bag or keyring. 🐝 Its tiny size makes it perfect for using up yarn scraps and creating multiple color combinations. Handcrafted charm meets a sweet, portable design—perfect for gifting or keeping! 🧶✨

You ask,

we answer.

FAQs

What size will the finished piece be?

The finished amigurumi measures approximately 3-5 cm in diameter depending on your tension and yarn, ideal as a keychain or small ornament.

Can I use different yarn weights for this pattern?

Yes, you can use different yarn weights, but the final size will change; adjust your hook accordingly and expect a larger or smaller bee.

Do I need prior crochet experience for this pattern?

This pattern is beginner friendly; basic knowledge of single crochet, increases, and decreases is helpful for the best results.

How long does this project typically take to complete?

Most crocheters complete this project in about 2-3 hours, though time may vary based on experience and the number of bees you make.