🧶 Beautiful ✨ Detailed 💝 Adorable

Cuddle me cow Amigurumi Pattern

Cuddle me cow Amigurumi Pattern
4.7★ Rating
5-7 Hours Time Needed
2.9K Made This
✂️

Intermediate Level

Ideal for those with basic crochet experience, featuring slightly more advanced stitches and techniques to expand your skills.

⏱️

Weekend Treat

Takes 5-7 hours, making it an enjoyable project to finish over a couple of days.

🧸

Cute Companion

An adorable friend to cherish, handcrafted with love to bring comfort and joy for years to come.

About This Cuddle me cow Amigurumi Pattern

This pattern creates a charming cuddle-me cow lovey with a combined head-and-body piece, removable features, and small decorative hearts and a flower. The design uses double knit/light worsted yarn and works in continuous rounds for neat shaping. Youll find clear round-by-round instructions for each part plus tips for assembly and facial embroidery.

Cuddle me cow Amigurumi Pattern crochet pattern - detailed view of completed project

Includes full stitch abbreviations, yarn suggestions, and helpful notes for stuffing and finishing. Perfect for gifting or making a comforting baby lovey with sweet details.

Why You'll Love This Cuddle me cow Amigurumi Pattern

I absolutely love this pattern because it combines a soft lovey body with a sweet amigurumi head for immediate cuddles. I enjoy the simple shaping that produces a professional, neat look without complicated seams. The little details — hearts, a flower, embroidered eyes and brows — let me add personality and charm to every piece I make. Working in continuous rounds and using DC for the body gives a lovely textured finish that I find very satisfying to crochet and finish.

Cuddle me cow Amigurumi Pattern step 1 - construction progress Cuddle me cow Amigurumi Pattern step 2 - assembly progress Cuddle me cow Amigurumi Pattern step 3 - details and accessories Cuddle me cow Amigurumi Pattern step 4 - final assembly and finishing

Switch Things Up

I love changing up the colors to create different personalities — try soft pastels for a sleepy nursery friend or high contrast spots for a playful look.

If you want a bigger or smaller lovey, change the yarn weight and hook size; bulky yarn and a larger hook gives a chunky cuddly friend, while thinner yarn creates a small keychain-sized pal.

I often swap safety eyes for embroidered eyes for safer toys for babies and a gentler aesthetic.

Try making the hearts in contrasting colors or multi-color variegated yarn for a whimsical patchwork effect.

You can add a tiny ribbon bow or crocheted scarf to give your cow a signature accessory that matches nursery decor.

For a different texture, use boucle or chenille yarn for the body while keeping smooth yarn for the face and details.

I sometimes embroider freckles or change the eyebrow shape to give different expressions — a small change in stitch placement can create a whole new personality.

Consider adding a small bell or jingle inside the tail or flower (securely sewed and padded) for a sensory version for older babies.

If youre selling your finished pieces, offer color customizations like gender-neutral palettes or themed sets with matching hearts and flowers.

I also like to make a matching tiny blanket by expanding the body pattern into a rectangular panel to create a coordinated lovey set.

Common Mistakes & How to Fix Them

✗ Skipping stitch markers during continuous rounds causes you to lose the start of round; place a marker at the first stitch of each round and move it as you work to stay on track. ✗ Overstuffing the head can distort shaping and make sewing difficult; stuff gradually and firmly but stop before the last few stitches so you can close neatly. ✗ Not checking stitch counts after increases or decreases leads to shape errors; count your stitches at the end of each round and correct immediately if the count is off. ✗ Changing color without securing ends causes loose tails and messy joins; weave in ends or carry color neatly and leave a tail when changing to sew parts together securely. ✗ Forgetting that CH2 at the beginning of body rounds does not count as a stitch will change your counts; always follow the pattern note and count only the stitches specified. ✗ Attaching features without pinning can make the placement uneven; pin or baste pieces in place and check alignment before stitching permanently.

Cuddle me cow Amigurumi Pattern

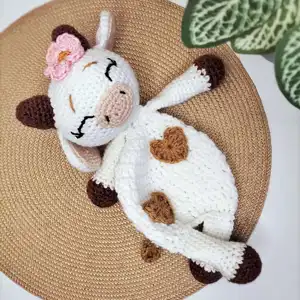
Make a sweet cuddly cow lovey with this friendly amigurumi pattern. You will create a soft head-and-body lovey, arms, legs, ears, horns, tail, hearts and a cute flower detail. The pattern uses double knit/light worsted yarn and clear step-by-step rounds so you can follow along with confidence. Perfect as a handmade gift or a comforting toy for little ones.

Intermediate 5-7 Hours

Materials Needed for Cuddle me cow Amigurumi Pattern

— Main Fabric

  • 01
    Double knit / Light worsted yarn (main supply)
  • 02
    Color A: White - approx 50g for head/legs plus 10g for flower centre
  • 03
    Color B: Brown - approx 20g for hoofs/horns/tail plus 10g for flower petals
  • 04
    Color C: Pink - approx 15g for nose and inner ears
  • 05
    Color D: Hearts - approx 15g (black/brown for spots or hearts)
  • 06
    Additional small amounts of yellow and red for flower (10g each optional)
  • 07
    A little bit of brown and black embroidery floss for facial details

— Tools Required

  • 01
    Crochet hook size 3.50 mm (recommended)
  • 02
    Optional: Crochet hook size 4.00 mm (if you have tight tension for body section)
  • 03
    Scissors
  • 04
    Polyester stuffing
  • 05
    10/12 mm safety eyes (optional)
  • 06
    Stitch marker
  • 07
    Tapestry/yarn needle
  • 08
    Embroidery floss (brown and black) for facial details
  • 09
    Pins for assembly (optional)

Progress Tracker

0% Complete

— Head :

Info :

Head and body are one piece

Round 1 :

MC, 6 SC [6]

Round 2 :

INC x6 [12]

Round 3 :

(SC, INC ) x6 [18]

Round 4 :

(2 SC, INC ) x6 [24]

Round 5 :

(3 SC, INC ) x6 [30]

Round 6 :

(4 SC, INC ) x6 [36]

Round 7 :

(5 SC, INC ) x6 [42]

Round 8 :

(6 SC, INC ) x6 [48]

Round 9 :

(7 SC, INC )x 6 [54]

Round 10-16 :

SC in each stitch around [54] *7 Rounds*

Info :

If using safety eyes: Place eyes between round 10/11, 6 stitches apart. Use white cotton thread to embroider a white stitch under each eye. Embroidery eyes are on page 3.

Round 17 :

(7 SC, DEC ) x6 [48]

Round 18 :

(6 SC, DEC )x6 [42]

Round 19 :

(5 SC, DEC )x6 [36]

Round 20 :

(4 SC, DEC )x6 [30]

Round 21 :

(3 SC, DEC )x6 [24]

Round 22 :

SC in each stitch around [24] stuff head

Round 23 :

(2 SC, DEC ) x6 [18]

Round 24 :

(1 SC, DEC ) x6 [12]
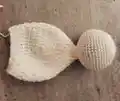
Round 25 :

(DEC ) x6 [6]

— Body :

Info :

The body requires no stuffing, working in DC stitches.CH2 at the beginning of each round doesn't count as a stitch.

Round 26 :

CH 2,(INC x 6 ) SLP st at the top of CH2 [12]

Round 27 :

CH2, (1 DC, INC )x6, SLP st at the top of CH2 [18]

Round 28 :

CH2, (2 DC, INC )x6, SLP st at the top of CH2 [24]

Round 29 :

CH2, (3 DC, INC )x6, SLP st at the top of CH2 [30]

Round 30 :

CH2, (4 DC, INC )x6, SLP st at the top of CH2 [36]

Round 31 :

CH2, (5 DC, INC )x6, SLP st at the top of CH2 [42]

Round 32-34 :

CH2, DC in each stitch around, SLP st at the top of CH2 [42] *3 Rounds*

Round 35 :

CH2, (5 DC, DEC )x6, SLP st at the top of ch2 [36]

Round 36 :

CH2, DC in each stitch around, SLP st at the top of ch2 [36]

Round 37 :

CH2, (4 DC, DEC )x6, SLP st at the top of ch2 [30]

Round 38 :

CH2, DC in each stitch around, SLP st at the top of ch2 [30]

Info :

Fold the bottom of the body in half and sc 15 stitches across the edge to close the body

— Nose :

Round 1 :

CH5, (2 SC in 2nd chain from hook ) SC in next 2 stitches, 4 SC in the last stitch. Now working on the opposite side of the chain5, SC in the next 2 stitches,2SC in the last stitch. [12]

Round 2 :

(1SC, INC ) x6 [18]

Round 3 :

(2SC, INC ) x6 [24]

Info :

End off with a slip stitch, leaving a strand of yarn to sew the nose onto the face. Attach the nose between rounds 14-21 counting from the top of the head down.

— Horns :

Info :

Make two

Round 1 :

MC, 6 SC [6]

Round 2 :

INC x6 [12]

Round 3-4 :

SC in each stitch around [12] *2 Rounds*

Round 5 :

(SC, INC )x6 [18]

Round 6-8 :

SC in each stitch around [18] *3 Rounds*

Info :

Stuff the horns. End off with a slip stitch, leaving a strand of yarn to sew the horns onto the head. Attach the horns between rounds 5-10 counting from the top of the head.

— Ears :

Info :

Make two of each colour (4 pieces in total). Note: Make the inner ear first

Inner ears Round 1 :

MC, 6 SC [6]

Inner ears Round 2 :

INC x6 [12]

Inner ears Round 3 :

(SC, INC )x6 [18]

Inner ears Round 4 :

(2 SC, INC )x6 [24]

Info :

End off with a slip stitch and weave in the ends.

Outer ears Round 1 :

MC, 6 SC [6]

Outer ears Round 2 :

INC x6 [12]

Outer ears Round 3 :

(SC, INC )x6 [18]

Outer ears Round 4 :

(2 SC, INC )x6 [24]

Info :

Don't cut the yarn, place Colour C (inner ear) on top of Colour A (Outer ear ) SC 24 stitches around the ear attaching the inner ear to the outer ear by inserting the hook through all four loops.

Outer ears Row 5 :

CH1, SC in next 6 stitches [6]

Outer ears Row 6 :

TYW, CH1, SC in next 6 stitches [6]

Info :

End off with a slip stitch, Leaving a strand of yarn to sew the ear to the head.

Item Name (Assembling the ears) :

Sew the little ear flap (rounds 5-6 )onto the head in line with round 11 counting from the top of the head.

— Arms :

Info :

Make two

Round 1 :

MC, 6 SC [6]

Round 2 :

INC x6 [12]

Round 3 :

(SC, INC )x6 [18]

Round 4 :

(2 SC, INC )x6 [24]

Round 5 :

SC in each stitch around [24]

Round 6 :

(2 SC, DEC )x6 [18] - Stuff the hoof

Info :

Change to colour A: (White )

Round 7 :

(SC, DEC )x6 [12]

Round 8-22 :

SC in each stitch around [12] *15 Rounds*

Info :

Stuff the arm lightly. End off with a slip stitch, Pinch the opening of the arm between your fingers and slip stitch or SC 6 across to close the arm. Leave a strand of yarn to sew the arms to the body one DC round under the head.

— Legs :

Info :

Make two

Round 1 :

MC, 6 SC [6]

Round 2 :

INC x6 [12]

Round 3 :

(SC, INC )x6 [18]

Round 4 :

(2 SC, INC )x6 [24]

Round 5 :

SC in each stitch around [24] -Stuff the hoof

Info :

Change to colour A: (White )

Round 6 :

(2 SC, DEC )x6 [18]

Round 7 :

(SC, DEC )x6 [12]

Round 8-17 :

SC in each stitch around [12] *10 Rounds*

Info :

Stuff the leg lightly. End off with a slip stitch. Pinch the opening of the leg between your fingers and slip stitch or SC 6 across to close the leg. Leave a strand of yarn to attach the legs to the bottom of the body. Attach each leg from the outer corner of the body.

— Facial Features :

Item Name (Eyes) :

Take black embroidery floss and make two long horizontal stitches. (Each stitch should be at least 4 stitches wide and have 7 stitches between them). To make the eye arch, you will hook the stitch and make a small slip stitch in the round above the eye, picking up the stitch to form the arch. Make a small V shape on the outer corner of each eye.

Info :

Make two small stitches above the eye for the brows and also two small stitches on the outer corner of the nose.

— Heart spots :

Info :

Making two or more is optional

Round 1 :

MC, CH 3, TCx3, DCx3, CH1, TCx1,CH1, DCx3,TCx3 CH3, slip stitch into the MC and pull the MC tail yarn tight to form the heart.

Info :

End off with a slip stitch, leaving a strand of yarn to attach the heart to the body of the cow.

— Tail :

Round 1 :

Chain 15, HDC in the third chain from the hook, HDC in each of the remaining chains [13]

Info :

Leave a strand of yarn to attach the tail to the body in round 9

Round 2 :

Insert your hook at the end of the tail and chain 3, Do 3 x TC in the loop of the tail, chain 3, and end with a slip stitch and weave in the ends.

— Flower :

Round 1 :

MC, 6 SC [6]

Round 2 :

INC x6 [12]

Round 3 :

[CH2,(DC, TC x2, DC ) in same stitch] SC in the next stitch.

Round 4 :

(DC, TCx2, DC ) in the next stitch, SC in the next stitch, REPEAT around the 12 stitches. (Having 6 petals at the end )

Info :

End off with a slip stitch, Leaving a strand of yarn to attach the flower to the side of the horn.

Assembly Instructions

  • Attach the nose to the face between rounds 14-21 counting from the top of the head, using the yarn tail left from the nose and sew securely.
  • Sew the two horns onto the head between rounds 5-10, centering them on the top of the head and sewing through the head rounds for a secure hold.
  • Sew the ear flaps (rounds 5-6) onto the head so they align with round 11 counting from the top of the head, ensuring symmetry before stitching.
  • Sew the arms to the body one DC round under the head, positioning them evenly on either side and securing with a whipstitch or mattress stitch.
  • Attach each leg to the bottom outer corners of the body, spacing them evenly and sewing through both body layers for stability.
  • Attach the tail to the body at round 9 using the yarn tail left from the tail piece and sew firmly so it sits centered at the back.
  • Sew hearts and the flower to the body and side of the horn respectively, using the yarn tails and placing them as shown in the photos for best effect.

Important Notes

  • 💡Safety eyes are a choking hazard for children under 5; use embroidery for facial details or inform customers if you include safety eyes.
  • 💡Use stitch markers to keep track of the beginning of each round when working in continuous rounds for accurate shaping.
  • 💡CH2 at the start of body rounds does not count as a stitch; follow the pattern note to avoid counting mistakes.
  • 💡Stuff the head firmly but do not stuff the body; the body is worked in DC stitches and requires no stuffing for the lovey shape.

This Cuddle Me Cow pattern brings a delightful handmade lovey to life with charming details and soft textures. Make it for babies, kids, or as a sweet gift to brighten someones day. Follow the clear instructions and enjoy the satisfying process of crafting a cuddly friend. 🧶💖

You ask,

we answer.

FAQs

What size will the finished piece be?

The finished amigurumi lovey measures approximately 20-25 cm tall when using double knit/light worsted yarn and a 3.5 mm hook; exact size varies with tension and yarn.

Can I use different yarn weights for this pattern?

Yes, you can use different yarn weights, but the final size and texture will change; if you choose bulkier yarn, use a larger hook and adjust stuffing and placement of features accordingly.

Do I need prior crochet experience for this pattern?

This pattern is rated intermediate, so basic knowledge of amigurumi techniques—working in the round, increases, decreases, and simple embroidery—is recommended.

How long does this project typically take to complete?

Most crocheters complete this project in 5-7 hours, though time may vary depending on experience, speed, and whether you make additional decorations like hearts and flowers.