๐Ÿงถ Beautiful โœจ Detailed ๐Ÿ’ Adorable

Cuddle me cow Amigurumi Pattern

Cuddle me cow Amigurumi Pattern
4.8โ˜… Rating
5-7 Hours Time Needed
2.0K Made This
โœ‚๏ธ

Intermediate Level

Ideal for those with basic crochet experience, featuring slightly more advanced stitches and techniques to expand your skills.

โฑ๏ธ

Weekend Treat

Takes 5-7 hours, making it an enjoyable project to finish over a couple of days.

๐Ÿฅ

Charming Critter

Delightful animal designs with sweet details that capture the essence of your favorite woodland and farmyard friends.

About This Cuddle me cow Amigurumi Pattern

This pattern creates a sweet, cuddly cow amigurumi with a sewn-on nose, horns, ears, heart spots and a decorative flower. The head and body are crocheted as one piece for a smooth finish and the limbs are worked separately for easy attachment. Techniques include working in continuous rounds, DC body shaping, and simple embroidery for facial details. Clear round-by-round instructions and photos help you assemble each element accurately.

Cuddle me cow Amigurumi Pattern crochet pattern - detailed view of completed project

Ideal for intermediate crocheters comfortable with basic increases, decreases and working in rounds. Includes materials list, stitch explanations, and step-by-step assembly guidance.

Why You'll Love This Cuddle me cow Amigurumi Pattern

I absolutely love this pattern because it combines simple shaping with charming details that bring the cow to life. The head-and-body-as-one approach gives a neat, seamless look that I always prefer for cuddly toys. I enjoy adding the little heart spots and the tiny flower โ€” they make each cow unique and gift-ready. The pattern also lets me practice embroidery for facial features, which adds so much personality to the finished piece.

Cuddle me cow Amigurumi Pattern step 1 - construction progress Cuddle me cow Amigurumi Pattern step 2 - assembly progress Cuddle me cow Amigurumi Pattern step 3 - details and accessories Cuddle me cow Amigurumi Pattern step 4 - final assembly and finishing

Switch Things Up

I love customizing this cow by switching colors โ€” try pastel pinks or greys for a softer look or bold spots for a playful version.

You can make a mini keychain version by using fingering weight yarn and a smaller hook for a tiny, cute result.

To create a chunkier cuddly friend, use a bulky yarn and a larger hook and adjust stuffing for a plush feel.

I often replace safety eyes with embroidery to make the toy safer for infants and give a sweet closed-eye expression.

Try adding wire inside the limbs to create posable arms and legs for display pieces or photo props.

I like to embroider different facial expressions โ€” a smile, wink or sleepy face โ€” to change the cow's personality.

Swap the heart spots for stars or circles to match nursery themes or make a matching set with complementary colors.

For a seasonal twist, crochet a tiny scarf or hat to outfit the cow for holidays or gift-giving occasions.

I sometimes make the flower larger or layer two flowers for a more decorative look on the horn.

Combine yarn textures (cotton for the body, acrylic for the details) to create subtle contrasts and tactile interest.

Common Mistakes & How to Fix Them

โœ— Skipping stitch markers during continuous rounds can make you lose track of the beginning of the round; use a marker and move it every round to stay accurate. โœ— Overstuffing the head or limbs creates lumps and distorts shaping; stuff gradually and evenly, adding small amounts until you reach the desired firmness. โœ— Forgetting to change hook size for the body may cause loose fabric; if your tension is tight use a 4mm hook on the body section as recommended. โœ— Placing safety eyes too late or asymmetrically will affect facial balance; place eyes between rounds 10 and 11, six stitches apart, before stuffing the head. โœ— Not weaving in ends as you go results in a long finishing session; weave and trim ends for each piece immediately after finishing it.

Cuddle me cow Amigurumi Pattern

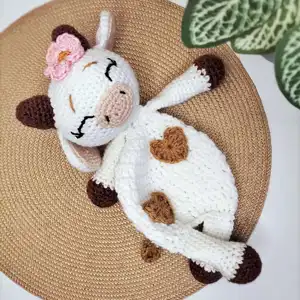
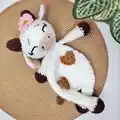
Make an adorable cuddly cow amigurumi to cherish or gift. This pattern walks you through creating a soft head-and-body piece with separate limbs, ears, horns, nose, heart spots and a tiny flower. You will learn stitches, assembly tips, and placement guides so your cow comes together beautifully. Perfect for gifting or snuggling.

Intermediate 5-7 Hours

Materials Needed for Cuddle me cow Amigurumi Pattern

โ€” Main Fabric

  • 01
    Double knit / light worsted yarn (DK) - main quantities below
  • 02
    Color A (White) - Head/Legs approx 50g; also used for centerpiece of flower 10g
  • 03
    Color B (Brown) - Hoof/Horns and tail approx 20g; petals for flower 10g
  • 04
    Color C (Pink) - Nose / Inner ears approx 15g
  • 05
    Color D (Black) - Hearts approx 15g
  • 06
    Optional Colour E (Yellow) and Colour F (Red) for flower details
  • 07
    A little bit of brown and black embroidery floss for facial details and white cotton thread to embroider a white stitch under each eye

โ€” Tools Required

  • 01
    Crochet hook size 3.50 mm
  • 02
    Crochet hook size 4.00 mm (optional for body if you have tight tension)
  • 03
    Scissors
  • 04
    Polyester stuffing
  • 05
    10 mm or 12 mm safety eyes (optional)
  • 06
    Stitch marker
  • 07
    Tapestry needle
  • 08
    Embroidery needle and brown/black embroidery floss
  • 09
    White cotton thread for tiny white stitch under each eye
  • 10
    Pins for assembly (optional)

Progress Tracker

0% Complete

โ€” Head :

Info :

Head and body are one piece

Round 1 :

MC, 6 SC [6]

Round 2 :

INC x6 [12]

Round 3 :

(SC, INC) x6 [18]

Round 4 :

(2 SC, INC) x6 [24]

Round 5 :

(3 SC, INC) x6 [30]

Round 6 :

(4 SC, INC) x6 [36]

Round 7 :

(5 SC, INC) x6 [42]

Round 8 :

(6 SC, INC) x6 [48]

Round 9 :

(7 SC, INC) x6 [54]

Round 10-16 :

SC in each stitch around [54] *7 Rounds*

Info :

If using safety eyes: Place eyes between round 10/11, 6 stitches apart. Use white cotton thread to embroider a white stitch under each eye.

Round 17 :

(7 SC, DEC) x6 [48]

Round 18 :

(6 SC, DEC) x6 [42]

Round 19 :

(5 SC, DEC) x6 [36]

Round 20 :

(4 SC, DEC) x6 [30]

Round 21 :

(3 SC, DEC) x6 [24]

Round 22 :

SC in each stitch around [24] stuff head

Round 23 :

(2 SC, DEC) x6 [18]

Round 24 :

(1 SC, DEC) x6 [12]

Round 25 :

(DEC) x6 [6]

โ€” Body :

Info :

The body requires no stuffing, working in DC stitches. CH2 at the beginning of each round doesn't count as a stitch.

Round 26 :

CH 2, (INC x 6) SLP st at the top of CH2 [12]

Round 27 :

CH2, (1 DC, INC) x6, SLP st at the top of CH2 [18]

Round 28 :

CH2, (2 DC, INC) x6, SLP st at the top of CH2 [24]

Round 29 :

CH2, (3 DC, INC) x6, SLP st at the top of CH2 [30]

Round 30 :

CH2, (4 DC, INC) x6, SLP st at the top of CH2 [36]

Round 31 :

CH2, (5 DC, INC) x6, SLP st at the top of CH2 [42]

Round 32-34 :

CH2, DC in each stitch around, SLP st at the top of CH2 [42] *3 Rounds*

Round 35 :

CH2, (5 DC, DEC) x6, SLP st at the top of CH2 [36]

Round 36 :

CH2, DC in each stitch around, SLP st at the top of CH2 [36]

Round 37 :

CH2, (4 DC, DEC) x6, SLP st at the top of CH2 [30]

Round 38 :

CH2, DC in each stitch around, SLP st at the top of CH2 [30]

Info :

Fold the bottom of the body in half and SC 15 stitches across the edge to close the body.

โ€” Nose :

Info :

COLOUR C (Pink)

Round 1 :

CH5, (2 SC in 2nd chain from hook), SC in next 2 stitches, 4 SC in the last stitch. Now working on the opposite side of the chain5, SC in the next 2 stitches, 2 SC in the last stitch. [12]

Round 2 :

(1 SC, INC) x6 [18]

Round 3 :

(2 SC, INC) x6 [24]

Info :

End off with a slip stitch, leaving a strand of yarn to sew the nose onto the face. Attach the nose between rounds 14-21 counting from the top of the head down.

โ€” Horns :

Info :

Make two. COLOUR B (Brown)

Round 1 :

MC, 6 SC [6]

Round 2 :

INC x6 [12]

Round 3-4 :

SC in each stitch around [12] *2 Rounds*

Round 5 :

(SC, INC) x6 [18]

Round 6-8 :

SC in each stitch around [18] *3 Rounds*

Info :

Stuff the horns. End off with a slip stitch, leaving a strand of yarn to sew the horns onto the head. Attach the horns between rounds 5-10 counting from the top of the head.

โ€” Ears :

Info :

Make two of each colour (4 pieces in total). Note: Make the inner ear first.

Inner ears Round 1 :

MC, 6 SC [6] (COLOUR C Pink)

Inner ears Round 2 :

INC x6 [12]

Inner ears Round 3 :

(SC, INC) x6 [18]

Inner ears Round 4 :

(2 SC, INC) x6 [24]

Info :

End off with a slip stitch and weave in the ends for the inner ear.

Outer ears Round 1 :

MC, 6 SC [6] (COLOUR A White)

Outer ears Round 2 :

INC x6 [12]

Outer ears Round 3 :

(SC, INC) x6 [18]

Outer ears Round 4 :

(2 SC, INC) x6 [24]

Info :

Don't cut the yarn, place Colour C (inner ear) on top of Colour A (outer ear) SC 24 stitches around the ear attaching the inner ear to the outer ear by inserting the hook through all four loops.

Row 5 :

CH1, SC in next 6 stitches [6]

Row 6 :

TYW, CH1, SC in next 6 stitches [6]

Info :

End off with a slip stitch, leaving a strand of yarn to sew the ear to the head. Assembling the ears: Sew the little ear flap (rounds 5-6) onto the head in line with round 11 counting from the top of the head.

โ€” Arms :

Info :

Make two. COLOUR B (Brown)

Round 1 :

MC, 6 SC [6]

Round 2 :

INC x6 [12]

Round 3 :

(SC, INC) x6 [18]

Round 4 :

(2 SC, INC) x6 [24]

Round 5 :

SC in each stitch around [24]

Round 6 :

(2 SC, DEC) x6 [18] - Stuff the hoof

Info :

Change to colour A (White)

Round 7 :

(SC, DEC) x6 [12]

Round 8-22 :

SC in each stitch around [12] *15 Rounds* - Stuff the arm lightly

Info :

End off with a slip stitch. Pinch the opening of the arm between your fingers and slip stitch or SC 6 across to close the arm. Leave a strand of yarn to sew the arms to the body one DC round under the head.

โ€” Legs :

Info :

Make two. COLOUR B (Brown)

Round 1 :

MC, 6 SC [6]

Round 2 :

INC x6 [12]

Round 3 :

(SC, INC) x6 [18]

Round 4 :

(2 SC, INC) x6 [24]

Round 5 :

SC in each stitch around [24] - Stuff the hoof

Info :

Change to colour A (White)

Round 6 :

(2 SC, DEC) x6 [18]

Round 7 :

(SC, DEC) x6 [12]

Round 8-17 :

SC in each stitch around [12] *10 Rounds* - Stuff the leg lightly

Info :

End off with a slip stitch. Pinch the opening of the leg between your fingers and slip stitch or SC 6 across to close the leg. Leave a strand of yarn to attach the legs to the bottom of the body. Attach each leg from the outer corner of the body.

โ€” Facial Features :

Info :

EYES: Take black embroidery floss and make two long horizontal stitches. (Each stitch should be at least 4 stitches wide and have 7 stitches between them). To make the eye arch, you will hook the stitch and make a small slip stitch in the round above the eye, picking up the stitch to form the arch. Make a small V shape on the outer corner of each eye. Make two small stitches above the eye for the brows and also two small stitches on the outer corner of the nose.

โ€” Heart Spots :

Info :

Making two or more is optional. COLOUR D (Black)

Round 1 :

MC, CH 3, TC x3, DC x3, CH1, TC x1, CH1, DC x3, TC x3, CH3, slip stitch into the MC and pull the MC tail yarn tight to form the heart.

Info :

End off with a slip stitch, leaving a strand of yarn to attach the heart to the body of the cow.

โ€” Tail :

COLOUR A Round 1 :

Chain 15, HDC in the third chain from the hook, HDC in each of the remaining chains [13]

Info :

Leave a strand of yarn to attach the tail to the body in round 9

COLOUR B Round 2 :

Insert your hook at the end of the tail and chain 3, DO 3 x TC in the loop of the tail, chain 3, and end with a slip stitch and weave in the ends.

โ€” Flower :

COLOUR A Round 1 :

MC, 6 SC [6] (Yellow center)

COLOUR A Round 2 :

INC x6 [12]

COLOUR B Round 3 :

[CH2, (DC, TC x2, DC) in same stitch] SC in the next stitch.

COLOUR B Round 4 :

(DC, TC x2, DC) in the next stitch, SC in the next stitch, REPEAT around the 12 stitches. (Having 6 petals at the end). End off with a slip stitch, leaving a strand of yarn to attach the flower to the side of the horn.

โ€” Assembly :

Info :

Sew and attach parts as instructed: attach nose between rounds 14-21, attach horns between rounds 5-10, attach ears with the flap in line with round 11, attach arms one DC round under the head, and attach legs to bottom corners of the body. Add hearts, tail and flower as desired.

Assembly Instructions

  • Attach the nose to the face between rounds 14-21 counting from the top of the head using the yarn tail and a tapestry needle, sew neatly and weave in ends.
  • Sew the horns onto the head between rounds 5-10, centering them on the crown and securing firmly with several stitches.
  • Position and sew the ear flaps (rounds 5-6) onto the head in line with round 11 from the top of the head for balanced placement.
  • Sew arms to the body one DC round under the head, using the long tail to stitch securely and sew through multiple stitches for strength.
  • Attach legs to the bottom of the body from the outer corners, spacing them evenly and sewing through the closed edge for stability.
  • Sew heart spots, tail and flower onto the body and horn using the leftover yarn strands, placing hearts on the body and flower on the side of the horn as pictured.

Important Notes

  • ๐Ÿ’กUse stitch markers to keep track of the start of continuous rounds, especially during increases and decreases.
  • ๐Ÿ’กStuff head and limbs gradually and evenly for a smooth shape; overstuffing can distort your amigurumi.
  • ๐Ÿ’กCH2 at the beginning of DC rounds does not count as a stitch; always follow the pattern note about counting.
  • ๐Ÿ’กPlace safety eyes before stuffing the head (between rounds 10 and 11) if you choose to use them, and note safety eyes are a choking hazard for children under 5.

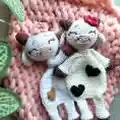
This cuddly Cuddle Me Cow is designed to be soft, sweet and full of handmade charm. Perfect for gifting or quiet snuggles, each cow can be customized with heart spots and a little flower for personality. Make one in classic farm colors or in playful pastels to suit your style. ๐Ÿ„๐Ÿงถ

You ask,

we answer.

FAQs

What size will the finished piece be?

The finished amigurumi measures approximately 20-25 cm tall depending on your yarn, tension and hook size.

Can I use different yarn weights for this pattern?

Yes, you can use different yarn weights but the final size will change; adjust hook size accordingly and be mindful of stuffing density for shape.

Do I need prior crochet experience for this pattern?

This pattern is rated intermediate, so basic knowledge of single crochet, increases, decreases, DC, and working in rounds is recommended.

How long does this project typically take to complete?

Most crocheters complete this project in 5-7 hours, though time may vary based on experience level and how detailed you are with embroidery and assembly.

Are safety eyes required?

No, safety eyes are optional; the pattern includes embroidery instructions for closed eyes which is safer for babies and young children.