🧢 Beautiful ✨ Detailed πŸ’ Adorable

Cute Cat Amigurumi Pattern

Cute Cat Amigurumi Pattern
4.2β˜… Rating
5-7 Hours Time Needed
1.9K Made This
βœ‚οΈ

Beginner Friendly Level

Perfect for those just starting their crochet journey, with clear instructions and simple techniques

⏱️

Weekend Treat

Takes 5-7 hours, making it an enjoyable project to finish over a couple of days.

🧸

Cute Companion

An adorable friend to cherish, handcrafted with love to bring comfort and joy for years to come.

About This Cute Cat Amigurumi Pattern

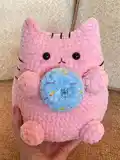
This pattern creates an adorable plush cat amigurumi with a small donut accessory. You will crochet a rounded body with ears, four limbs, a tail, and a sweet embroidered face. The pattern uses plush yarn for a soft textured finish and includes detailed placement and assembly tips. Suitable for crocheters learning simple amigurumi shaping techniques.

Cute Cat Amigurumi Pattern crochet pattern - detailed view of completed project

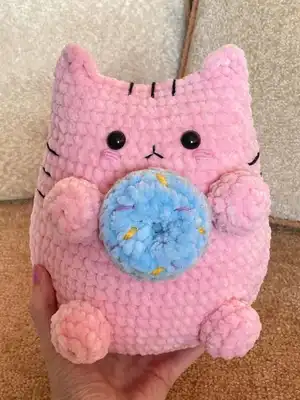
Includes step-by-step rounds for body, ears, arms, legs, tail and donut with clear sewing instructions. Finish with embroidered facial details and optional colored sprinkles on the donut.

Why You'll Love This Cute Cat Amigurumi Pattern

I absolutely love this pattern because it turns a few simple stitches into a charming, huggable character with personality. I enjoy how quickly the body grows round and plush when using velvet-style yarn, and the donut accessory adds a playful finishing touch. The embroidery options let me customize expressions to make each cat unique. It always feels satisfying to sew the pieces together and watch the cat come to life.

Cute Cat Amigurumi Pattern step 1 - construction progress Cute Cat Amigurumi Pattern step 2 - assembly progress Cute Cat Amigurumi Pattern step 3 - details and accessories Cute Cat Amigurumi Pattern step 4 - final assembly and finishing

Switch Things Up

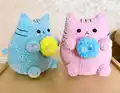
I love varying the colors to create different personalities β€” try pastel shades for a sweet nursery friend or bold colors for a playful character.

To make the cat larger or smaller, change yarn weight and hook size; thicker yarn and a larger hook create a cuddly jumbo version, while smaller yarn makes a tiny keychain-sized friend.

I sometimes add wire inside the tail to make it poseable, or use a shorter tail for a chubbier silhouette.

For the donut, swap colors or embroider extra sprinkles to match a theme, or add a safety ring to make it a removable toy accessory.

Try swapping safety eyes for embroidered eyes if you are making the toy for a baby or want a fully soft option.

Use metallic or sparkly embroidery thread for cheeks or sprinkles to add a little shimmer and make the piece stand out.

Experiment with facial expressions by moving the mouth stitch slightly up or down and changing the spacing of the eyes for cuter or quirkier looks.

I like to make matching sets β€” a small donut plus a tiny heart or bow β€” to personalize each cat for gifting.

Change the limb placement to create sitting or lying poses; pin parts before sewing to test placement and proportions.

If you prefer a more defined ear, work one extra round on the ear before folding and joining to give a sharper point.

Common Mistakes & How to Fix Them

βœ— Skipping stitch markers during increases and decreases can cause miscounted rounds and uneven shaping; use a marker at the start of each round and recount often to stay accurate. βœ— Overstuffing the toy will distort the shape and make sewing parts awkward; stuff gradually and evenly, adding small amounts until the piece feels firm but soft. βœ— Not hiding or securing yarn tails properly can cause ends to work loose over time; weave in ends securely and hide tails inside the stuffing for a neat finish. βœ— Placing safety eyes without confirming placement may create an unbalanced face; position eyes between the recommended rounds and check spacing visually before gluing or fastening. βœ— Using a much thicker or thinner yarn than recommended will change the final size and stitch gauge significantly; if you change yarn weight, adjust hook size and expect differences in placement for eyes and limbs.

Cute Cat Amigurumi Pattern

Make a sweet, squishy plush cat with this full crochet pattern. You will create a soft, rounded cat with tiny ears, arms, legs, tail and a cute donut accessory. Clear round-by-round instructions guide you through shaping, assembly and simple embroidery to finish the face. Perfect as a handmade gift or a charming decor piece you will love to display.

Beginner Friendly 5-7 Hours

Materials Needed for Cute Cat Amigurumi Pattern

β€” Main Fabric

  • 01
    Himalaya Dolphin Baby plush yarn - approximately 1 to 1.5 skeins for the cat (main color)
  • 02
    Small amounts of the same plush yarn in two contrasting colors for the donut (a few meters each)
  • 03
    YarnArt Jeans (or similar) - small amount for embroidered facial lines and body stripes
  • 04
    Black yarn (YarnArt Jeans used by designer) - small amount for mouth and stripes
  • 05
    Embroidery thread for nose details (small quantity)
  • 06
    Polyester stuffing - enough to fill body, arms, legs, tail and donut

β€” Tools Required

  • 01
    Crochet hook size 4.0 mm
  • 02
    Safety eyes 10 mm (2 pieces)
  • 03
    Glue for eyes (optional, author used a glue gun)
  • 04
    Scissors
  • 05
    Yarn needle for sewing and weaving ends
  • 06
    Stitch markers
  • 07
    Pins for assembly (optional)
  • 08
    Embroidery needle and thread for facial details and donut sprinkles
  • 09
    Polyester stuffing

Progress Tracker

0% Complete

β€” Body :

Round 1 :

make ch2, in the second ch from the hook: 6 sc (6)

Round 2 :

6inc (12)

Round 3 :

(1sc, inc)*6 (18)

Round 4 :

(2sc, inc)*6 (24)

Round 5 :

(3 sc, inc)*6 (30)

Round 6 :

(4sc, inc)*6 (36)

Round 7 :

(5sc, inc)*6 (42)

Round 8 :

(6sc, inc)*6 (48)

Round 9 :

(3sc, inc)*12 (60)

Round 10 :

(4sc, inc)*12 (72)

Round 11-16 :

(6 rounds) without changes (72)

Round 17 :

(4sc, dec)*12 (60)

Round 18-21 :

(4 rounds): without changes (60)

Round 22 :

(8sc, dec)*6 (54)

Round 23-24 :

(2 rounds): without changes (54)

Round 25 :

(7sc, dec)*6 (48)

Round 26-27 :

(2 rounds): without changes (48)

Round 28 :

(6sc, dec)*6 (42)

Round 29-33 :

(5 rounds): without changes (42)

β€” Crochet ears :

Infos :

Fold the bode in half and work, joining 2 sides:

Round 34 :

3 dc, 14 sl st, 3 dc

Info :

Cut off the yarn and hide the end.

β€” Arms and legs :

Info :

Arms and legs are crocheted in the same way (make 4)

Round 1 :

Make ch2, in the second ch from the hook: 6sc (6)

Round 2 :

6inc (12)

Round 34 :

(2 rounds): without changes (12)

Info :

Leave a long end for sewing

β€” Glue eyes :

Info :

Count 5 round from the top. Glue eyes between rounds 5 and 6 The distance between eyes is 5 stitches.

β€” Embroider a mouth :

Info :

Embroider a mouth as it is shown on the pictures using embroidery thread for nose and black yarn for mouth.

β€” Embroider cheeks :

Info :

Make several stitches to form cheeks (you may use embroidery thread/cotton thread or plush yarn, as you like).

β€” Tail :

Round 1 :

Make ch2, in the second ch from the hook: 6sc (6)

Round 2 :

6inc (12)

Round 3-4 :

(2 rounds): without changes (12)

Round 5 :

(1sc, dec)*4 (8)

Round 6-13 :

(8 rounds): without changes (8)

Info :

Leave a long end for sewing. Sew the tail at level of rounds 10-11.

β€” Donut :

Round 1 :

Make ch12, close in a ring, 12sc in a ring

Round 2 :

(1sc, inc)*6 (18)

Round 3 :

18sc

Round 4 :

BLO: 18sc

Round 5 :

1sc, dec (12)

Round 6 :

without changes (12)

Info :

Leave the end for sewing. Sew the first and the last rounds. Stuff as you go.

Info :

Embroider colored spots on the donut with embroidery thread to make sprinkles.

β€” Assembly :

Item Name (P1) :

Count from the ears 8 rounds and sew arms. Lightly stuff the arms. The distance between arms is 8 stitches.

Item Name (P2) :

Sew legs at level of rounds 11-12 of the body. The distance between legs is 8 stitches. Lightly stuff the legs.

Item Name (P3) :

Sew the donut to the arms joining to the side stitches of the arms.

Item Name (P4) :

Embroider lines of 2 cm on the head.

Item Name (P5) :

Embroider lines on the body: count 2 rounds down from the eyes, the width of the lines is 5-6 stitches.

Info :

Your cat is ready!

Assembly Instructions

  • Count from the ears eight rounds to position and sew the arms; lightly stuff each arm and space them 8 stitches apart for a natural look.
  • Sew the legs at the level of rounds 11-12 of the body, spacing the two legs 8 stitches apart, and lightly stuff the legs before finishing.
  • Sew the tail into the body at the level of rounds 10-11, using a long tail to secure and hide the ends inside the body.
  • Attach the donut to the arms by joining it to the side stitches of the arms and secure with small neat stitches so it sits centered between the arms.
  • Embroider facial features (mouth, nose) and cheeks after eyes are placed; add body stripes by counting two rounds down from the eyes and keeping lines 5-6 stitches wide.

Important Notes

  • πŸ’‘Use stitch markers to mark the start of each round to avoid losing your place when working in continuous rounds.
  • πŸ’‘Place and check the position of safety eyes before gluing or fastening them; the pattern recommends placing eyes between rounds 5 and 6 with five stitches between them.
  • πŸ’‘Stuff parts gradually while shaping to avoid lumps and to maintain the soft rounded silhouette of the cat.
  • πŸ’‘Weave in ends and hide tails inside stuffing when possible to keep the finished toy neat and durable.

This cute cat amigurumi makes a delightful handmade gift that brings soft, cozy charm to any room. Snuggle, display, or gift your creation with pride β€” each one is uniquely adorable and made with care. Have fun customizing colors and little details to create your perfect companion. 🧢🐱

You ask,

we answer.

FAQs

What size will the finished piece be?

The size of the finished toy is approximately 21-23 cm tall when using the recommended plush yarn and a 4.0 mm hook.

Can I use different yarn weights for this pattern?

Yes, you can use different yarn weights, but the final size and placement of eyes, limbs and embroidery will change; adjust hook size accordingly and expect to reposition features.

Do I need prior crochet experience for this pattern?

This pattern is rated Beginner Friendly; basic knowledge of single crochet, increases, decreases and working in rounds is recommended for best results.

How long does this project typically take to complete?

Most crocheters complete this project in 5-7 hours, though time may vary depending on experience level and how detailed you make the embroidery and accessories.