🧢 Beautiful ✨ Detailed πŸ’ Adorable

Cute cat Amigurumi Pattern

Cute cat Amigurumi Pattern
4.7β˜… Rating
5-7 Hours Time Needed
2.7K Made This
βœ‚οΈ

Beginner Friendly Level

Perfect for those just starting their crochet journey, with clear instructions and simple techniques

⏱️

Weekend Treat

Takes 5-7 hours, making it an enjoyable project to finish over a couple of days.

🧸

Cute Companion

An adorable friend to cherish, handcrafted with love to bring comfort and joy for years to come.

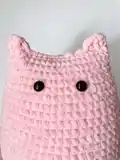
About This Cute cat Amigurumi Pattern

This pattern guides you through crocheting a plush Cute Cat with a small donut accessory using plush yarn. You will work in rounds to create a rounded body, add ears, arms, legs, tail, and simple facial embroidery. It uses basic stitches and easy shaping suitable for new crocheters.

Cute cat Amigurumi Pattern crochet pattern - detailed view of completed project

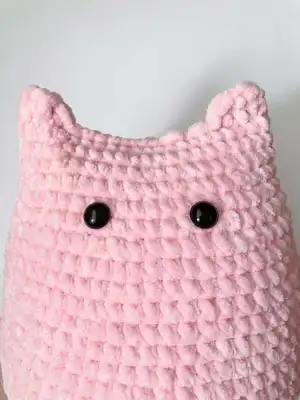
Includes materials list, abbreviations, clear round-by-round instructions, and assembly guidance. The finished toy measures approximately 21-23 cm using the recommended yarn.

Why You'll Love This Cute cat Amigurumi Pattern

I absolutely love this pattern because it turns simple stitches into a charming, huggable cat that brings instant smiles. I enjoy how quickly the body grows in rounds and how the plush yarn creates a soft, tactile finish perfect for cuddling. I also love the little donut accessory β€” it adds personality and a fun finishing touch to the toy. Sewing the parts together and adding simple embroidered details always makes the project feel rewarding and personal.

Cute cat Amigurumi Pattern step 1 - construction progress Cute cat Amigurumi Pattern step 2 - assembly progress Cute cat Amigurumi Pattern step 3 - details and accessories Cute cat Amigurumi Pattern step 4 - final assembly and finishing

Switch Things Up

I love how easy it is to customize this Cute Cat by changing yarn colors and small details.

You can make a pastel cat, a bright colorful cat, or even a striped version by alternating rounds of color.

Try using a thicker hook and bulky yarn to create a larger, cuddlier version of the cat for a cozy pillow-like toy.

Want a mini keychain version? Use a thinner yarn and smaller hook to scale the pattern down and add a keyring.

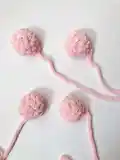
I often switch the donut colors or embroider different sprinkles to give each cat a unique accessory and personality.

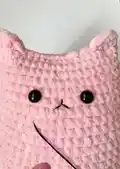
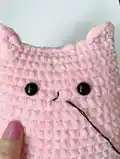
Swap safety eyes for embroidered eyes or felt for a child-safe toy option, and experiment with eye spacing to change expressions.

Embroider different mouth shapes or whisker positions to create happy, surprised, or sleepy faces.

Make a matching set by crocheting multiple cats in coordinating colors or mixing yarn textures for visual interest.

Add tiny felt clothing pieces like a scarf or little hat to increase play possibilities and give more character.

I recommend trying different stuffing levels to vary firmness β€” firmer for standing stability, softer for a squeezable toy.

Common Mistakes & How to Fix Them

βœ— Skipping stitch counts during increases or decreases leads to incorrect shaping; count stitches at the end of each round to make sure your totals match the pattern. βœ— Not stuffing gradually can cause lumps or a misshapen body; stuff a little at a time and shape as you go for an even, smooth finish. βœ— Placing safety eyes without measuring makes the face look uneven; measure and mark the eye positions between the specified rounds and stitches before attaching. βœ— Sewing parts without pinning first results in uneven placement; pin or tack parts in place and check symmetry before securing with stitches. βœ— Using a different yarn weight without adjusting the hook will change the final size and stitch tension; change hook size accordingly and make a small swatch to check sizing.

Cute cat Amigurumi Pattern

Create an irresistibly cuddly Cute Cat amigurumi with this step-by-step crochet pattern. You will make a soft plush cat complete with ears, arms, legs, tail and a tiny donut accessory. The pattern uses simple stitches and clear instructions so you can follow along with confidence. Perfect as a handmade gift or a cozy companion for your home.

Beginner Friendly 5-7 Hours

Materials Needed for Cute cat Amigurumi Pattern

β€” Main Fabric

  • 01
    Himalaya Dolphin Baby plush yarn - 1 to 1.5 skeins for the cat (main color)
  • 02
    Small amounts of two other colors of the same yarn for the donut (accent colors)
  • 03
    YarnArt Jeans (or similar) - small amount for embroidering lines on the donut and body
  • 04
    Black yarn or YarnArt Jeans - for embroidered lines on cat's body and mouth
  • 05
    Embroidery thread for nose details (small amount)
  • 06
    Polyester stuffing - enough to firmly stuff the body, arms, legs, and tail

β€” Tools Required

  • 01
    Crochet hook size 4 mm
  • 02
    Black safety eyes 10 mm (2 pieces)
  • 03
    Glue for eyes (glue gun recommended)
  • 04
    Scissors
  • 05
    Yarn needle for sewing and embroidery
  • 06
    Stitch markers (optional)
  • 07
    Polyester stuffing
  • 08
    Pins for assembly (optional)

Progress Tracker

0% Complete

β€” Body :

Round 1 :

make ch2, in the second ch from the hook: 6 sc (6)

Round 2 :

6inc (12)

Round 3 :

(1sc, inc)*6 (18)

Round 4 :

(2sc, inc)*6 (24)

Round 5 :

(3 sc, inc)*6 (30)

Round 6 :

(4sc, inc)*6 (36)

Round 7 :

(5sc, inc)*6 (42)

Round 8 :

(6sc, inc)*6 (48)

Round 9 :

(3sc, inc)*12 (60)

Round 10 :

(4sc, inc)*12 (72)

Round 11-16 :

(6 rounds) without changes (72)

Round 17 :

(4sc, dec)*12(60)

Round 18-21 :

(4 rounds): without changes (60)

Round 22 :

(8sc, dec)*6 (54)

Round 23-24 :

(2 rounds): without changes (54)

Round 25 :

(7sc, dec)*6 (48)

Round 26-27 :

(2 rounds): without changes (48)

Round 28 :

(6sc, dec)*6 (42)

Round 29-33 :

(5 rounds): without changes (42)

β€” Crochet ears :

Info :

Fold the bode in half and work, joining 2 sides:

Round 34 :

3 dc, 14 sl st, 3 dc

Info :

Cut off the yarn and hide the end.

β€” Arms and legs :

Info :

Arms and legs are crocheted in the same way (make 4)

Round 1 :

Make ch2, in the second ch from the hook: 6sc (6)

Round 2 :

6inc (12)

Round 34 (arm) :

(2 rounds): without changes (12)

Info :

Leave a long end for sewing

β€” Glue eyes :

Info :

Count 5 round from the top. Glue eyes between rounds 5 and 6 The distance between eyes is 5 stitches.

β€” Embroider a mouth :

Info :

Embroider a mouth (as it is shown on the pictures)

β€” Embroider cheeks :

Info :

Make several stitches (you may use embroidery thread/ cotton thread or plush yarn, as you like more).

β€” Tail :

Round 1 :

Make ch2, in the second ch from the hook: 6sc (6)

Round 2 :

6inc (12)

Round 3-4 :

(2 rounds): without changes (12)

Round 5 :

(1sc, dec)*4 (8)

Round 6-13 :

(8 rounds): without changes (8)

Info :

Leave a long end for sewing

Info :

Sew the tail at level of rounds 10-11

β€” Sew arms :

Info :

Count from the ears 8 rounds and sew arms. Lightly stuff the arms. The distance between arms is 8 stitches

β€” Donut :

Round 1 :

Make ch12, close in a ring, 12sc in a ring

Round 2 :

(1sc, inc)*6 (18)

Round 3 :

18sc

Round 4 :

BLO: 18sc

Round 5 :

1sc, dec (12)

Round 6 :

without changes (12)

Info :

Leave the end for sewing. Sew the first and the last rounds. Stuff as you go.

β€” Embroider colored spots :

Info :

Embroider colored spots on the donut as desired using embroidery thread or contrasting yarn.

Info :

Sew the donut to the arms joining to the side stitches of the arms.

β€” Sew legs :

Info :

Sew legs at level of rounds 11-12 of the body The distance between legs is 8 stitches. Lightly stuff the legs.

β€” Embroider lines on head and body :

Info :

Embroider lines of 2 cm on the head.

Info :

Embroider lines on the body: count 2 rounds down from the eyes, the width of the lines is 5-6 stitches.

β€” Final :

Info :

Your cat is ready!

Assembly Instructions

  • Glue or attach safety eyes between rounds 5 and 6, spacing them 5 stitches apart and securing with glue and washers as needed.
  • Sew ears to the top of the body where indicated by the folded ear pieces, hiding ends and positioning symmetrically.
  • Count 8 rounds down from the ears and sew the arms in place with a spacing of 8 stitches between them; lightly stuff arms before finishing.
  • Sew legs to the bottom of the body at the level of rounds 11-12, spacing legs 8 stitches apart and stuffing lightly for stability.
  • Attach the donut to the front by joining it to the side stitches of the arms, sewing securely so it sits centered on the body.

Important Notes

  • πŸ’‘Use stitch markers or a scrap yarn marker to identify round starts, especially when working many rounds without changes.
  • πŸ’‘Stuff evenly and gradually to maintain a smooth silhouette; overstuffing can distort shaping and make assembly harder.
  • πŸ’‘Pin parts in place and check symmetry before sewing permanently; small adjustments while pinned will improve final appearance.
  • πŸ’‘Weave in ends and secure embroidery threads to prevent unraveling, and use a glue gun for safety eyes if desired for extra security.

This Cute Cat amigurumi pattern is a fun and satisfying project that makes for a perfect handmade gift or room companion. It combines simple round shaping, soft plush yarn, and a cute donut accessory to create a lovable friend with personality. Enjoy stitching, assembling, and adding your own finishing touches to make it truly yours! 🧢😊

You ask,

we answer.

FAQs

What size will the finished piece be?

The finished amigurumi measures approximately 21-23 cm tall when using the recommended plush yarn and a 4 mm hook.

Can I use different yarn weights for this pattern?

Yes, you can use different yarn weights, but this will affect the final size and texture; adjust hook size accordingly and make a swatch to confirm dimensions.

Do I need prior crochet experience for this pattern?

This pattern is rated Beginner Friendly and uses basic stitches (sc, inc, dec, dc), so it is suitable for crocheters who know the fundamentals.

How long does this project typically take to complete?

Most crocheters complete this project in 5-7 hours, though time may vary based on experience level, yarn choice, and assembly complexity.