🧢 Beautiful ✨ Detailed πŸ’ Adorable

Cute Plush Ghost Amigurumi Pattern

Cute Plush Ghost Amigurumi Pattern
4.5β˜… Rating
5-7 Hours Time Needed
3.9K Made This
βœ‚οΈ

Beginner Friendly Level

Perfect for those just starting their crochet journey, with clear instructions and simple techniques

⏱️

Weekend Treat

Takes 5-7 hours, making it an enjoyable project to finish over a couple of days.

🧸

Cute Companion

An adorable friend to cherish, handcrafted with love to bring comfort and joy for years to come.

About This Cute Plush Ghost Amigurumi Pattern

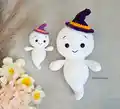
This pattern creates a soft plush ghost made with plush (velvet) yarn and finished with a tiny witch hat and embroidered face. You will crochet the arms, body and head seamlessly and add details like safety eyes and blush for personality. The design uses basic single crochet shaping and simple increases and decreases for charming curves.

Cute Plush Ghost Amigurumi Pattern crochet pattern - detailed view of completed project

Ideal for gifting or seasonal decor, this plush ghost measures about 25 cm tall without the hat when made with the recommended materials. The pattern uses US terminology and includes clear round-by-round directions.

Why You'll Love This Cute Plush Ghost Amigurumi Pattern

I absolutely love this pattern because it transforms simple stitches into a cuddly, characterful plush with minimal fuss. I enjoy working with plush yarn for its velvety texture that makes every piece feel special and soft. The hat and embroidered face give the ghost personality, and I always smile when I see the finished expression. Sharing this easy, satisfying project brings me joy because it’s accessible for beginners yet charming enough for experienced makers.

Cute Plush Ghost Amigurumi Pattern step 1 - construction progress Cute Plush Ghost Amigurumi Pattern step 2 - assembly progress Cute Plush Ghost Amigurumi Pattern step 3 - details and accessories Cute Plush Ghost Amigurumi Pattern step 4 - final assembly and finishing

Switch Things Up

I love customizing this ghost by changing yarn colors β€” try pastel shades for a sweet nursery friend or bright colors for a playful look.

You can make a mini version by using a finer yarn and smaller hook, or a jumbo version with bulky yarn and a larger hook for a big cuddly doll.

I often swap the hat colors and add tiny crocheted accessories like a scarf or tiny broom to give personality.

Embroider different facial expressions to change the mood β€” a big smile, surprised O-mouth, or sleepy eyes all work beautifully.

Try adding safety joints or pipe cleaner wire inside the arms to create posable limbs for display options.

For a safer toy for babies, embroider the eyes and mouth instead of using safety eyes and ensure seams are very secure.

Experiment with different stitches for texture β€” a few rounds of half double crochet or bobble stitch can add interesting detail to the body or hat brim.

I sometimes add a small pocket on the back for a secret noteβ€”just crochet a small flap and sew it on before stuffing the back.

Use felt cheeks or fabric paint instead of blush for a longer-lasting color on the face if the toy will be heavily handled.

Make a whole family of ghosts in coordinated colors for a charming seasonal display or gift set.

If you want a hanging ornament, leave a long yarn tail at the top of the hat and form a loop before closing for easy hanging.

Mix yarn texturesβ€”pair plush yarn for the body with regular acrylic for accessories to create visual contrast and easier detailing.

Common Mistakes & How to Fix Them

βœ— Skipping stitch markers during joining or when positioning features can cause misplacement of arms and eyes; place a marker at the back of the head and at joining points to keep orientation correct. βœ— Overstuffing the head or body leads to a misshapen finish and bulging stitches; stuff gradually and evenly, adding small amounts until you achieve a firm but slightly pliable shape. βœ— Not counting stitches after increases or decreases results in uneven shaping and mismatched rounds; count your stitches at the end of each round, especially after sections with multiple increases or decreases. βœ— Pulling the plush yarn too tightly makes the fabric too stiff and can hide the stitch definition; work with a relaxed, consistent tension for a soft, even texture. βœ— Forgetting to stuff the lower half of the arm before closing makes shaping difficult and the arm may look flat; stuff only the lower half as instructed so the arm sits naturally after flattening and joining.

Cute Plush Ghost Amigurumi Pattern

Make an irresistibly cute plush ghost using soft plush yarn and simple amigurumi techniques. This pattern guides you step-by-step to crochet the body, head, arms and a tiny witch hat, giving your ghost charm and personality. Perfect for seasonal decor or a cuddly handmade gift, you will enjoy the soft texture and sweet details. Clear rounds and helpful photos make the process fun and approachable.

Beginner Friendly 5-7 Hours

Materials Needed for Cute Plush Ghost Amigurumi Pattern

β€” Main Fabric

  • 01
    Plush yarn (100g/120m) - White (Himalaya Dolphin Baby 80301)
  • 02
    Plush yarn (100g/120m) - Purple (Himalaya Dolphin Baby 80340)
  • 03
    Plush yarn (100g/120m) - Orange (Himalaya Dolphin Baby 80316)
  • 04
    Black thread for embroidery - YarnArt Jeans 53 (small amount for eyebrows and mouth)
  • 05
    Polyester stuffing (fiber fill) - amount as needed (for a finished toy approx 25 cm tall without hat)
  • 06
    Safety eyes 14 mm (2 pieces)

β€” Tools Required

  • 01
    Crochet hook 4.00 mm
  • 02
    Safety eyes 14 mm (2 pieces)
  • 03
    Scissors
  • 04
    Yarn needle for sewing and embroidery
  • 05
    Stitch markers
  • 06
    Polyester stuffing (fiber fill)
  • 07
    Pins for assembly (optional)

Progress Tracker

0% Complete

β€” Materials and Tools :

Infos :

Plush yarn (100g/120m): White (Himalaya Dolphin Baby 80301), Purple (Himalaya Dolphin Baby 80340), Orange (Himalaya Dolphin Baby 80316). Black thread to embroider the eyebrows and the mouth (I use YarnArt Jeans 53). Safety eyes 14 mm. Crochet hook 4.00 mm. Stuffing (Polyester fiber fill). If you use these materials, the finished toy is around 25 cm (10") tall without the hat. There are no crochet instructions included in the pattern. It's assumed that you're familiar with the basic crochet stitches. The difficulty level of the pattern is EASY. I use US terminology in this pattern.

β€” Abbreviations :

Infos :

st - stitch. ch - chain. sl st - slip stitch. sc - single crochet. inc - increase. dec - decrease. (sc, inc)* n - repeat those in brackets n-times.

β€” Arms :

Info :

Crochet with the white yarn. Stuff only lower half of the arm.

Round 1 :

6 sc into a magic ring (6)

Round 2 :

6 inc (12)

Round 3-4 :

12 sc (2 rounds)

Round 5 :

(4 sc, dec)*2 (10)

Round 6 :

10 sc

Round 7 :

(3 sc, dec)*2 (8)

Round 8 :

8 sc

Round 9 :

Flatten the arm and crochet 4 sc through both sides.

Info :

Fasten off and cut the yarn.

β€” Body :

Info :

Crochet with the white yarn. Stuff as you go.

Round 1 :

6 sc into a magic ring (6)

Round 2 :

6 sc (6)

Round 3 :

(sc, inc)*3 (9)

Round 4 :

(2 sc, inc)*3 (12)

Round 5 :

4 inc, 4 dec (12)

Round 6 :

(sc, inc)*6 (18)

Round 7 :

3 sc, 4 inc, 3 sc, 4 dec (18)

Round 8 :

(2 sc, inc)*6 (24)

Round 9 :

6 sc, 4 inc, 6 sc, 4 dec (24)

Round 10 :

(3 sc, inc)*6 (30)

Round 11 :

9 sc, 4 inc, 9 sc, 4 dec (30)

Round 12 :

(4 sc, inc)*6 (36)

Round 13 :

12 sc, 4 inc, 12 sc, 4 dec (36)

Round 14 :

(11 sc, inc)*3 (39)

Round 15-18 :

39 sc (4 rounds)

Round 19 :

(11 sc, dec)*3 (36)

Round 20 :

36 sc

Round 21 :

(4 sc, dec)*6 (30)

Info :

Now we will join the arms:

Round 22 :

7 sc, 4 sc through the first arm and the body, 10 sc, 4 sc through the second arm and the body, 5 sc (30)

Round 23 :

(3 sc, dec)*6 (24)

Round 24 :

24 sc

Info :

Don't cut the white yarn, we will continue with the head.

β€” Head :

Info :

Continue crocheting with the white yarn. Stuff as you go.

Round 1 :

(sc, inc)*12 (36)

Round 2 :

(2 sc, inc)*12 (48)

Round 3 :

(7 sc, inc)*6 (54)

Round 4 :

4 sc, inc, (8 sc, inc)*5, 4 sc (60)

Round 5-7 :

60 sc (3 rounds)

Round 8 :

4 sc, dec, (8 sc, dec)*5, 4 sc (54)

Round 9-11 :

54 sc (3 rounds)

Info :

Insert the safety eyes between rounds 6 and 7 with 8 stitches between them (6 stitches visible). The marker is in the back of the head.

Round 12 :

(7 sc, dec)*6 (48)

Round 13 :

3 sc, dec, (6 sc, dec)*5, 3 sc (42)

Round 14 :

(5 sc, dec)*6 (36)

Round 15 :

2 sc, dec, (4 sc, dec)*5, 2 sc (30)

Round 16 :

(3 sc, dec)*6 (24)

Round 17 :

sc, dec, (2 sc, dec)*5, sc (18)

Round 18 :

(sc, dec)*6 (12)

Round 19 :

6 dec (6)

Info :

Make sure that the head is stuffed firmly. Close the opening and hide the yarn inside.

β€” Embroidering :

Infos :

With a black thread embroider the eyebrows in round 10. They are 2 st wide and with 8 st between them. Embroider the mouth in round 4. It's 3 st wide. Color the cheeks with pink blush.

β€” Hat :

Info :

Start crocheting with the purple yarn. Stuff lightly.

Round 1 :

6 sc into a magic ring (6)

Round 2-3 :

6 sc (2 rounds)

Round 4 :

(sc, inc)*3 (9)

Round 5-6 :

9 sc (2 rounds)

Round 7 :

6 sc, 3 inc (12)

Round 8 :

6 sc, (sc, inc)*3 (15)

Round 9 :

9 sc, (sc, inc)*3 (18)

Round 10 :

(2 sc, inc)*6 (24)

Info :

Change the yarn to orange color.

Round 11 :

(3 sc, inc)*6 (30)

Round 12 :

30 sc

Info :

Change the yarn to purple color.

Round 13 :

Front loops only: (sc, inc)*15 (45)

Round 14 :

45 sc

Info :

Make a sl st, fasten off and cut the yarn, leaving a tail for sewing. Sew the hat to the top of the head in the back loops of round 13. I sew it tilted to one side.

β€” Finishing :

Infos :

Your cute plush ghost is ready! I hope you have fun making it with me! If you have any questions about the pattern, feel free to write to me. I'm always happy to help.

Assembly Instructions

  • Insert the safety eyes between rounds 6 and 7 of the head with 8 stitches between them (6 stitches visible) and secure their backs tightly.
  • Flatten each arm and sew 4 sc through both sides as instructed, then join the arms to the body at round 22, aligning the 4 sc through arm stitches with the body stitches.
  • Sew the hat to the top of the head in the back loops of round 13, tilting it slightly to one side as shown in the photos, and secure with hidden stitches.
  • After finishing round 19 of the head close the opening neatly and hide the yarn tail inside, ensuring the head is stuffed firmly before final closure.

Important Notes

  • πŸ’‘Use a stitch marker to mark the start of rounds and the back of the head to ensure consistent placement of features and accurate joining.
  • πŸ’‘Stuff the head and body firmly but not overly tight to maintain the plush look; add stuffing gradually while shaping.
  • πŸ’‘Do not cut the white yarn after finishing the body rounds until you have joined and continued into the head as instructed.

This adorable plush ghost pattern combines simple shaping with plush yarn for a cuddly, characterful toy you will love making. It includes clear round-by-round instructions for arms, body, head and hat plus embroidery guidance for the face. Perfect for homemade gifts, seasonal decor or a cozy addition to your amigurumi collection. πŸ§ΆπŸ‘»

You ask,

we answer.

FAQs

What size will the finished piece be?

The finished amigurumi measures approximately 25 cm (10") tall without the hat when using the recommended plush yarn and 4.00 mm hook.

Can I use different yarn weights for this pattern?

You can, but the final size and texture will change; choose a hook that matches your yarn and be aware that non-plush yarn will give a different look.

Do I need prior crochet experience for this pattern?

This pattern is rated beginner friendly, so basic knowledge of single crochet, increases, decreases, and magic ring is recommended for best results.

How long does this project typically take to complete?

Most crocheters complete this project in 5-7 hours, though time may vary depending on experience and your working pace.