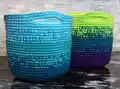
About This Cutie Utility Basket Pattern
This pattern creates a sturdy, medium-sized utility basket worked in continuous spirals for a neat finish. It uses three strands of worsted weight yarn held together to produce a firm fabric ideal for storage. The pattern includes integrated handle openings and color-change guidance for neat transitions. Follow the round-by-round instructions to achieve consistent shape and texture.

Designed for practicality and style, the basket is great for organizing shelves or gifting as a handmade home accent. The pattern provides yarn suggestions, gauge, and clear special instructions to help you create a professional-looking finished piece.
Why You'll Love This Cutie Utility Basket Pattern
I absolutely love this pattern because it transforms simple worsted weight yarn into a structured, useful basket that looks like a store-bought piece. I enjoy the tight stitch fabric you get from holding three strands together — it gives the basket durability and a lovely texture. The integrated handles are clever and practical, so you dont need to sew anything on later. I also love how quickly the basket grows once you reach the established stitch count, making it satisfying to complete over a weekend.
Switch Things Up
I love how easy it is to customize this basket by changing colors; try ombre gradients or bold contrasting stripes to make each basket unique.
If you want a smaller or larger basket, change your yarn weight and hook size — bulky yarn with a larger hook makes a chunkier basket, while thinner yarn creates a mini version.
I often substitute cotton yarn for durability in kitchen or bathroom baskets; cotton will give a slightly firmer, washable finish.
For a softer, slouchy basket, I will use only two strands instead of three or increase the hook size by one; this makes the fabric more flexible and relaxed.
I sometimes add a fabric lining sewn inside for a polished look and to protect delicate items; use a lightweight cotton and tack it in place with a few stitches.
Try decorative trims like a single-row surface slip stitch or a contrasting top edge to add visual interest to the rim of the basket.
I like to adjust the handle size by changing the CH 10 to CH 6 or CH 8 if I want smaller openings for different uses or aesthetics.
For kids rooms, I make playful versions with bright colors and add embroidered shapes on the side using leftover yarn scraps.
Make sets of baskets in graduated sizes by changing the rounds you increase or by making fewer/more base rounds before reaching the 72-stitch circumference.
I sometimes add a base reinforcement like a cardboard circle or stiff interfacing covered with felt for extra stability when the basket will hold heavy items.
Common Mistakes & How to Fix Them
✗ Skipping the instruction to hold three strands together will make your basket floppy and misshapen; always hold the specified three strands for the intended structure.
✗ Not winding skeins into center-pull balls can cause yarn tangling and frustration while crocheting; wind each skein into two center-pull balls before starting.
✗ Joining rounds or working with ends joined creates visible seams and misaligned stitches; work in continuous spirals and use a stitch marker to track rounds.
✗ Changing colors at the wrong time leads to messy color joins and loose ends; follow the last-stitch color change method described to switch strands neatly.
✗ Using a larger hook than recommended without adjusting tension will produce a larger, less stiff basket; if you change hook size, expect a slightly bigger and softer basket.