๐Ÿงถ Beautiful โœจ Detailed ๐Ÿ’ Adorable

Daisy Flowers Car Hanging Pattern

Daisy Flowers Car Hanging Pattern
4.1โ˜… Rating
5-7 Hours Time Needed
1.6K Made This
โœ‚๏ธ

Intermediate Level

Ideal for those with basic crochet experience, featuring slightly more advanced stitches and techniques to expand your skills.

โฑ๏ธ

Weekend Treat

Takes 5-7 hours, making it an enjoyable project to finish over a couple of days.

๐Ÿก

Cozy Accent

A warm touch for your space that transforms ordinary corners into inviting nooks filled with handmade charm.

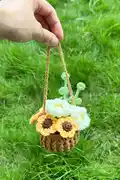
About This Daisy Flowers Car Hanging Pattern

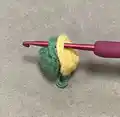
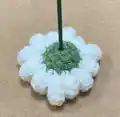
This pattern teaches you how to crochet a small hanging planter filled with daisy and yellow flowers, eucalyptus stems, and a tiny pot. It uses super-fine yarn and small hooks to create delicate petals and textured pots. You'll work rounds for pistils, petals, stems, soil, and pots then assemble everything into a hanging decoration. The instructions are illustrated with clear step calls and photos to help you at each stage.

Daisy Flowers Car Hanging Pattern crochet pattern - detailed view of completed project

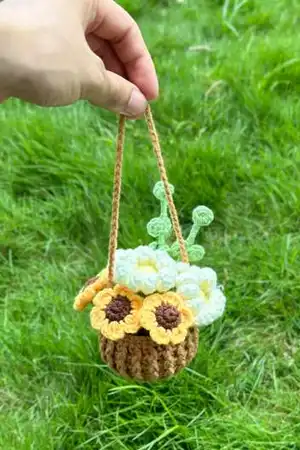
Perfect for an afternoon project, the pattern includes material and abbreviation lists plus step-by-step rounds. Great for gifting or decorating your car with a handmade accent.

Why You'll Love This Daisy Flowers Car Hanging Pattern

I absolutely love this pattern because it transforms simple stitches into a delightful miniature world of flowers and foliage. I enjoy the mix of small, detailed pieces like petals and stems that come together to form a charming hanging planter. I love the finishing step when you place the soil into the pot and arrange the flowersโ€”it always feels rewarding and creative. I also appreciate how adaptable the design is, letting me tweak colors and textures to suit seasons or recipients.

Daisy Flowers Car Hanging Pattern step 1 - construction progress Daisy Flowers Car Hanging Pattern step 2 - assembly progress Daisy Flowers Car Hanging Pattern step 3 - details and accessories Daisy Flowers Car Hanging Pattern step 4 - final assembly and finishing

Switch Things Up

I love customizing this pattern by changing colors to match seasons; try pastel pinks for spring or deep oranges for autumn.

I sometimes make the piece larger by using DK or worsted yarn and a bigger hook to create a chunky hanging planter.

I also make tiny keychain versions by using thinner yarn and a 2.0-2.5mm hook for miniatures you can clip to bags.

I like to mix yarn texturesโ€”the pot in a slubby yarn and flowers in a smooth cotton for contrast and visual interest.

I often swap the daisy petal count or size by chaining fewer or more stitches when making petals to alter fullness.

I add beads or small buttons in centers instead of the brown pistil for a sparkly accent when gifting to kids.

I use floral wire wrapped inside stems for extra strength and posability; I also sometimes bend stems after assembly for a natural curve.

I sometimes glue a small circle of felt inside the pot before inserting foam to protect the pot lining and hide glue points.

I enjoy embroidering tiny details on petals for characterโ€”try a couple of French knots or a small embroidered smile.

I recommend experimenting with different bindings for the hanging loop, such as braiding three strands of yarn or crocheting an i-cord for a neater finish.

Common Mistakes & How to Fix Them

โœ— Skipping stitch markers when joining rounds can cause misaligned petals and stems; use a marker at the start of each round to stay accurate. โœ— Not stuffing petals and pistils at the recommended points can make flowers look flat or misshapen; begin stuffing from the specified petal (9th for daisies, 4th for yellows) for the best shape. โœ— Pulling stitches too tight for small motifs creates stiff, uneven pieces; maintain an even, slightly loose tension so petals remain fluffy. โœ— Failing to leave tails when instructed can make assembly difficult; always cut yarn leaving the long tail for sewing or wrap wire as directed. โœ— Neglecting to wrap the wire and secure leaves properly may result in loose stems that fall apart; stick pieces together and start wrapping tightly around the wire as shown to secure leaves. โœ— Forgetting to count increases and decreases leads to incorrect stitch counts and poor shaping; count after every round, especially during increases (INC) and decreases (DEC).

Daisy Flowers Car Hanging Pattern

Make a charming daisy flower car hanging with this step-by-step crochet pattern. You will create tiny pots, fluffy daisy and yellow flowers, eucalyptus stems, and assemble them into a sweet hanging planter. The pattern includes clear rounds, material lists, and photo-inspired assembly tips to guide you. Perfect as a handmade gift or a cheerful car decoration.

Intermediate 5-7 Hours

Materials Needed for Daisy Flowers Car Hanging Pattern

โ€” Main Fabric

  • 01
    Super fine yarn, 1.8 oz (50 g) skeins - main weight used for flowers and stems
  • 02
    Color A: Green - small amounts for stems and leaves
  • 03
    Color B: White - yarn for daisy petals
  • 04
    Color C: Yellow - yarn for flower centers and yellow petals
  • 05
    Color D: Brown - yarn for pistil centers and pot accents
  • 06
    Additional colors: blue (optional) for accents
  • 07
    Cotton yarn or similar for softer structure (as listed)
  • 08
    Cotton filling for soil type 1 (small amount)
  • 09
    Foam (cut to fit pot) for soil type 2

โ€” Tools Required

  • 01
    Crochet hook size 2.5-3.0 mm
  • 02
    Crochet hook size 3.0 mm (used for pots)
  • 03
    Stitch markers
  • 04
    Sewing needle
  • 05
    Scissors
  • 06
    Hot glue gun
  • 07
    Wire (for stems and posability)
  • 08
    Foam (for filling Type 2 soil)
  • 09
    Cotton filling / polyester stuffing
  • 10
    Yarn needle for sewing pieces together

Progress Tracker

0% Complete

โ€” Daisy flower :

Info :

(make 2 : one by green one by yellow)

Row 1 :

MR, 6 SC (6sts)

Row 2 :

6 SC inc (12sts)

Row 3 :

12 SC (12sts)

Infos :

Petal (white) Seamless piece Join with petal crochet

Petal :

( chain 8, You're going to be working into the second from the hook : 7HDC, slst in next st ) x 12 times (start stuffing from 9th petal) *wrap yarn around the stems*

โ€” Yellow Flower :

Info :

(make 2 piece : one by green one by brown)

Row 1 :

MR, 6 SC (6sts)

Row 2 :

6 SC inc (12sts)

Infos :

Petal (yellow) Seamless piece Join with petal crochet

Petal :

Chain 2, 3HDC in one st. Chain 2, sl st in next st. Repeat x 6 times (start stuffing from the 4th petal)

โ€” Eucalyptus Stems :

Row 1 (make 2) :

MR, 8 SC (6sts) cut yarn and leave a shot tail for wrap wire

Row 1 (make 4) :

MR, 6 SC (6sts) cut yarn and leave a shot tail for wrap wire

Info :

The first one we stick 2 piece (8sc piece) together and star wrap around the wire to stick each leaves on the stem (look like photo)

โ€” Pots :

Row 1 :

8sc (8)

Row 2 :

8 inc (16)

Row 3 :

(sc,inc) 8 times (24)

Row 4 :

(2sc,inc) 8 times (32)

Row 5 :

(3sc,inc) 8 times (40)

Row 6 :

BLO 40dc (40)

Row 7-9 :

1FPDC, 1BPDC repeat in end (40)

Row 10 :

40sc (40)

Row 11 :

40slst

Info :

continue chain 70 to make hanging

โ€” The Soil :

Type 1 - Row 1 :

8 SC in an MR (8sts)

Type 1 - Row 2 :

8 SC INC (16sts)

Type 1 - Row 3 :

(1 SC + 1 INC ) 8 times (24sts)

Type 1 - Row 4 :

(2SC + 1 INC) 8 times (32sts)

Type 1 - Row 5-9 :

SC in each st to end

Type 1 - Row 10 :

(2 SC + 1 DEC) 8 times (24sts)

Type 1 - Row 11 :

(1 SC + 1 DEC) 8 times (16sts)

Info :

*stuffing*

Type 1 - Row 12 :

8 DEC (8sts)

Info :

Cut yarn and leave a long tail for sewing, close off the hole.

Type 2 :

Cut the foam to fit the size of the pot and place the foam in the plant pot

โ€” Mixed Flowers :

Info :

-This is all we have. Finally fixed tegheter

Step 1 :

Put the soil in plant pots

Step 2 :

Insert each flower into a pots

Assembly Instructions

  • Put the soil (Type 1 stuffed or Type 2 foam) into the pot, making sure it fits snugly for a stable base.
  • Position and insert each flower stem into the soil, arranging daisies and yellow flowers evenly around the pot opening for a balanced look.
  • Stick the two-piece eucalyptus element together where indicated and wrap the wire tightly around the stem to secure leaves as shown in the photos.
  • Attach the hanging chain (continue chain 70) to the pot edge and fasten securely so the planter hangs level.
  • Sew any openings closed using the long tail left after finishing rounds, and use hot glue sparingly to reinforce placements if needed.

Important Notes

  • ๐Ÿ’กUse stitch markers to keep track of round starts and join points, especially when working small motifs like pistils and petals.
  • ๐Ÿ’กStart stuffing petals at the recommended petal numbers to achieve the correct shape and volume; overstuffing will make petals rigid.
  • ๐Ÿ’กLeave long yarn tails when instructed for sewing parts together and for wrapping wire on stems to ensure secure attachment.
  • ๐Ÿ’กWork with consistent tension throughout and count stitches after increase/decrease rounds to avoid shaping errors.

This sweet Daisy Flowers car hanging brings cheerful blooms to your daily drive and makes a lovely handmade gift. ๐ŸŒผ๐Ÿงถ Handcrafted with small, detailed pieces and easy-to-follow rounds, it brightens any car or small space. ๐Ÿชดโœจ Enjoy making and gifting this petite hanging planterโ€”happy crocheting!

You ask,

we answer.

FAQs

What size will the finished piece be?

The finished hanging planter is a small decorative piece designed to hang in a car or small space; exact dimensions depend on your yarn and hook but expect a few inches across the pot and a hanging length of about the chain you create (chain 70 recommended for hanging).

Can I use different yarn weights for this pattern?

Yes, you can change yarn weight, but it will affect finished size and texture; if using thicker yarn, use a larger hook and expect a chunkier result, while thinner yarn and smaller hooks yield delicate miniatures.

Do I need prior crochet experience for this pattern?

This pattern is rated intermediate, so basic knowledge of single crochet, increases, decreases, HDC, and joining techniques is recommended for best results.

How long does this project typically take to complete?

Most crocheters finish this project in 5-7 hours depending on experience, assembly time, and how many flower sets you make.