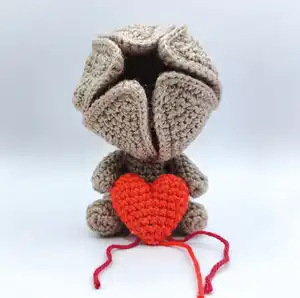
Make your own eerie and adorable Demodog amigurumi with this detailed crochet pattern. You will craft a star-shaped mouth with wired flaps, a cuddly body, tiny legs and arms, and a ripped-out heart for dramatic effect. The pattern includes step-by-step rounds, assembly notes, and finishing tips so you can follow along with confidence. Perfect as a spooky gift or a playful display piece for fans of unusual creatures.
Progress Tracker
0% Complete
— Materials & Tools :
Info :
Crochet hook size 2.5 mm. Sewing needle. Scissors. Wire ±1 mm / 18 or 19 Gauge. Pliers (for cutting and bending wire). Pins. Stitch markers and running stitch markers (scrap piece of yarn). Fiber fill. Yarn: Fingering 4 ply in the colors: Black, white, light brown/grey, scarlet and red. These are the colors I used: Body: Katia Capri 82126 Kaki. Mouth: Katia Capri 82056 Black. Mouth: Scheepjes Catona 192 Scarlet. Teeth: Katia Capri 82050 White. Heart: Katia Capri 82059 Red.
— Skills & abbreviations :
Info :
Please note: I use the yarn under/yarn over technique in this pattern, as this gives more straight lines.You can use the yarn over/yarn over technique, it won't change the end result too much.
Infos :
BLO Back loop only. ch chain stitch. dc double crochet. dec single crochet 2 stitches in front loops together. inc single crochet 2 stitches in same stitch. 3inc single crochet 3 stitches in same stitch. 3dec single crochet 3 stitches in front loops together. FLO Front loop only. mr Magic ring. Rnd Round. sc Single crochet stitch. slst Slip stitch. St, sts stitch, stitches. FO Finish off.
— Mouth :
Round 3 :
B (1sc, inc) x5 (15)
Round 4 :
B (2sc, inc) x5 (20)
Round 5 :
B (3sc, inc) x5 (25)
Info :
Change color to scarlet
Round 6 :
S (4sc, inc) x5 (30)
Round 7 :
S (5sc, inc) x5 (35)
Round 8 :
S (6sc, inc) x5 (40)
Round 9 :
S 8sc, ch1, turn. 7sc, inc, ch1, turn. 8sc, inc, ch1, turn. 8sc, dec, ch1, turn. 7sc, dec, ch1, turn. 6sc, dec, ch1, turn. 5sc, dec, ch1, turn. 4sc, dec, ch1, turn. 3sc, dec, ch1, turn. 2sc, dec, ch1, turn. 1sc, dec, ch1, turn. dec.
Infos :
FO, cut off yarn. Repeat round 9 x4. Start with new thread in next stitch in round 9 (slst, ch1 - start 1st stitch in the same stitch). Work away tail in the next 3 stitches as you go. When you reach the last flap, don't cut the thread, ch1, turn, and 12 sc down the flap. When you reach the starting point of the flap, sc into the last (a) and first (b) flap-stitch of round 9. These stitches will now contain 2 sc's, 1 for the flap, and 1 for the border. NOTE! When you reach the next flap (the first flap you made in rnd 9), it will have only 12 stitches on the right side, first sc on the flap will be an inc to make 13 (c). The next 4 flaps will need no increases here. Including the first stitch of rnd 9, you will have 13 stitches along the side of each flap (d). When you reach the top stitch (the point of the flap), sc 1 extra. So total of 3 stitches on top (rightside st. / middle st / leftside st.) Sc all around the flaps. (135 st. total) Finish off and work away thread.
— Teeth :
Info :
WHITE. Embroider teeth using white thread. They can be a bit messy, some short, some a little longer, but have them facing inward a bit. It doesn't matter if the backside looks messy, you won't see it when the head is finished.
— Head :
Round 3 :
(1sc, inc) x5 (15)
Round 4 :
(2sc, inc) x5 (20)
Round 5 :
(3sc, inc) x5 (25)
Round 6 :
(4sc, inc) x5 (30)
Round 7 :
(5sc, inc) x5 (35)
Round 8 :
(6sc, inc) x5 (40)
Round 9 to 14 :
40 sc (40) 6 rounds
Round 15 :
8sc, ch1, turn. inc, 7sc, ch1, turn. inc, 8sc, ch1, turn. dec, 8sc, ch1, turn. dec, 7sc, ch1, turn. dec, 6sc, ch1, turn. dec, 5sc, ch1, turn. dec, 4sc, ch1, turn. dec, 3sc, ch1, turn. dec, 2sc, ch1, turn. dec, 1sc, ch1, turn. dec. dec.
Infos :
FO, cut off yarn. Repeat rnd 15 for each flap. Start with new thread (slst, ch1) in next stitch in round 14. The first sc will be in the same stitch as the slst, ch1. Work away tail in the next 3 stitches as you go. When you reach the last flap, don't cut the thread, ch1, turn and 12 sc down the flap. When you reach the starting point of the flap, sc into the last and first flap-stitch of round 14. These stitches will now contain 2 sc's, 1 for the flap, and 1 for the border. Including this first stitch of rnd 14, you will have 13 stitches along the side of each flap. NOTE! When you reach the next flap (the first flap you made in rnd 14), it will have only 12 stitches on the right side, first sc on the flap will be an inc to fix this. The next 4 flaps will need no increases here. When you reach the top stitch (the point of the flaps), sc 1 extra. So total of 3 stitches on top (rightside st. / middle st / leftside st.) Sc all around all remaining flaps. (135 st. total) Don't cut thread!
Infos :
Using iron wire, make armature for flaps. You can use pliers to bend them into the star shape. Try to make the armature as similar to the mouth shape as possible. Twist the ends and wrap around with tape, to avoid pointy ends sticking out. To avoid breaking from bending, you can tape the bends in the wire. If it bends a lot, in time the wire might break from usage.
Infos :
Now we start to sc all around the mouth, together with the head, and have the armature trapped inside. Continue with the thread of the head. Sandwich the armature between the head and the mouth. 1. Push the hook through the next head stitch - underneath the armature - through the corresponding mouth stitch. 2. Pull up yarn, now you have 2 loops on the hook. 3. Pull up yarn over the armature and 4. Finish the stitch.
Infos :
When reaching the 3 top stitches of the 5 points of the flaps: inc, 3inc, inc. You should have 7 top stitches in total. Make sure the wire ends are inside the head. Continue this all around. (155 st. total) Make sure to stuff the head before closing the last flap. Don't fill the flaps with fiberfill. Finish off. Cut off yarn and work away thread.
— Arms x2 :
Round 2 to 6 :
8sc (8) 5 rounds
Info :
FO, slst, work away yarn, don't fill up yet!
— Body :
Info :
KAKI. For the Body, we start with an oval shape. You will be going down one side of the chain and back around the other side.
Round 1 :
ch6, sc in 2nd ch. from the hook and work down the chain, 3sc, 3inc, now work on the other side of the chain, 3sc, inc (12). Make 1 slst into the 1st st. of the next round. Treat this slst as the new end of the round, and place your running stitch marker after this slst. The next stitch you crochet is the 1st st of the new round.
Round 2 :
3sc, (inc) x3, 3sc, (inc)x3 (18)
Round 3 :
3sc, (1sc, inc)x3, 3sc, (1sc, inc)x3 (24)
Round 4 to 6 :
24sc (24) 3 rounds
Round 7 :
3sc, (1sc, dec)x3, 12sc (21)
Round 8 :
3sc, (dec)x3, 12sc (18). We'll be attaching the arms in the next round. Start sc on the first arm.
Round 9 :
8sc on 1st arm, continue with body, 2sc, (dec)x3, 2sc, 8sc on 2nd arm, continue with body, 3sc, dec, 3sc (30)
Info :
NOTE! To avoid a gap in the armpit, you can either sew the hole shut. Or after you finish stitching 8sc around the arm, you can do an extra stitch sewing the first stitch of the arm together with the last used stitch of the body again. In the next round, this stitch is to be ignored.
Round 10 :
(3sc, dec)x6 (24)
Round 11 :
(2sc, dec)x6 (18)
Round 12 :
(1sc, dec)x6 (12)
Infos :
Slst, FO, Leave long tail. It may seem a little off just now, but when you start stuffing firmly, it'll get into shape. The big bulge is it's booty. Add wire for the arms, bend the ends (to avoid poking out) and wrap the pointy ends with tape. Place it in the arms.
— Legs x2 :
Info :
KAKI. For the Legs we start with an oval shape. You will be going down one side of the chain and back around the other side.
Round 1 :
ch4, sc in 2nd ch. from the hook and work down the chain, 1sc, 3inc, now work on the other side of the chain, 1sc, inc, slst (8). Make 1 slst into the 1st st. of the next round. Treat this slst as the new end of the round, and place your running stitch marker after this slst. The next stitch you crochet is the 1st st of the new round.
Round 2 :
1sc, (inc)x3, 1sc, (inc)x3 (14)
Round 4 :
1sc, (dec)x3, 7sc (11)
Round 5 :
1sc, 3dec (single crochet 3 stitches in front loops together), 7sc (9)
Round 6 :
1sc, inc, 7sc (10)
Round 7 :
2sc, inc, 7sc (11)
Round 8 :
2sc, inc, 8sc (12)
Round 9 :
3sc, inc, 8sc (13)
Round 10 :
3sc, inc, 9sc (14)
Infos :
Slst, FO, leave long tail for sewing. Stuff the feet firmly, legs very lightly. Sew shut. Sew legs 6 stitches apart, (from bum). Counting from the last row of the leg, sew into 5 stitches of leg to attach to the body, also sew the inside of the leg of the 5th row to the body. Make sure the outside of the leg isn't stitched to body and can still bulge. It's best to place the body on a flat service and pin the legs first, to see if he can sit up properly.
— Tail :
Infos :
Slst, FO, leave long tail for sewing. Stuff lightly. Place 10 pins, as to where the tail will be place. (red pin is starting point.) Sew tail to body.
— Attaching body to head :
Infos :
Place 12 pins in head, as to where the body will be placed. Red pin is starting point. Use 3 stitches directly under flaps; in the middle / 3 stitches to the sides / 3 stitches for back of body. Now you can sew the body to the head. I've designed the Demodog using Fingering weight yarn. Should you want to make him in a heavier weight yarn, you might want to sew a few extra stitches at the back of the head, to keep him from falling over, as his head will be heavier. The body should be stuffed very firmly, to form a stable base for the head.
— Heart :
Info :
FO and work away yarn. Make another part just like the previous one by repeating rounds 1-3. Do not cut the yarn as we will continue using the yarn of the second part.
Round 4 :
Crochet the parts together, 12sc on part 1, and 11sc on part 2, we finish this round 1st earlier (23)
Round 6 :
(dec, 6sc)x3 (21)
Round 7 :
(dec, 5sc)x3 (18)
Round 8 :
(dec, 4sc)x3 (15)
Round 9 :
(dec, 3sc)x3 (12)
Info :
FO, sew shut. Have a few threads dangling from heart, different colors. As if resembling veins - it's a ripped out heart :)
You did it — your Demodog is complete and full of personality! The wired flaps and tiny heart make this a memorable, slightly spooky friend to display or gift. Take pride in the shaping and finishing you added by hand, and enjoy styling or photographing your new creature. 🧶💖