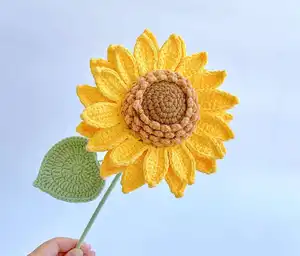
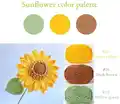
Create a bright, handcrafted sunflower with this step-by-step crochet pattern. The design uses 4-ply cotton yarn and wire-wrapped stems for a lifelike finish. Follow clear rounds and photo-guided tips to assemble a durable, beautiful floral accent for home or gifting.
Progress Tracker
0% Complete
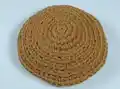
— Flower heart :
Infos :
*Every time start a new round, chain 1 as the turning chain (do not count as a stitch);*Every time close a round, work a slip stitch through the 1st stitch;
R1 :
6sc in a magic ring---6
From R6 :
work only in the half-side stitches that are far away from us. every time close a round, still work a normal slst(through a whole stitch, not just half side), still chain 1 to start every round;*The left half stitches of R5-8 will be the place to work flower seeds;
R6 :
(2sc, inc, 2sc)*6---36
R8 :
(3sc, inc, 3sc)*6---48
R10 :
54 sc--- 54, FO, cut off the yarn
— Flower seeds :
Info :
*work 4 rows of flower seeds at the left half stitches of R5-8.* *seeds numbers at each round: R5-15, R6-18, R7-21, R8-24.
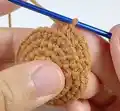
Seed placement :
Reconnect yarn to the 1st stitch of R5, chain 3, work a slst through the current space on the flower heart, 1skip (see pic), 2slst, repeat until the end. Work a slst through the 1st space to close R5.
R6-8 :
move yarn to the next round by working a slst through the 1st space of the new round, repeat the same process to finish all seeds. FO, move the tail to the back.
— Flower petals :
R1 :
Reconnect yarn to the 1st stitch of R9, chain 8, from the 2nd stitch from the hook, work 7sc, 1skip, 2slst, chain 8 ... repeat 18 times. Finally work a slst through the 1st stitch of this round to close. Keep the yarn.
R2 :
insert the wire, for each flower petal, work: sc, hdc, 3dc, sc, [sc, 1ch picot, sc], hdc, 3dc, hdc, sc, 1skip, 1slst (see pic). Repeat to work 18 petals. After finishing the last, work a slst through the 1st stitch to close round, FO. Cut off the yarn and wire.
R3 :
work the second layer of petals only in half-side stitches that are facing us. Reconnect the yarn, chain 10; from the 2nd stitch from the hook, work 9sc, 1skip, 2slst, chain 8 ... repeat 18 times. Finally work a slst through the 1st stitch of this round to close. Keep the yarn.
R4 :
insert the wire, for each flower petal work: sc, hdc, 5dc, sc, [sc, 1ch picot, sc], hdc, 5dc, hdc, sc, 1skip, 2slst. Repeat to work 18 petals. After finishing the last, work a slst through the 1st stitch to close round, FO. Cut off the yarn and wire.
— Flowers torus :
Infos :
* Every time start a new round, chain 1 as the turning chain (do not count as a stitch);*Every time close a round, work a slip stitch through the 1st stitch;
R1 :
6sc in a magic ring---6
R8 :
(2sc, inc, 2sc)*6---36
R10 :
(3sc, inc, 3sc)*6---48
R12 :
work only in the half-side stitch that is facing us (see pic). 1ch, [1dc inc, 3ch picot, 1dc inc], [1slst, 1ch], 1skip (see pic), repeat until the end. Finally, a slst through the 1st space to close round, FO, cut off the yarn
— Leaf :
R2 :
2ch as the turning chain, do not count as a stitch; [3dc], [dc inc]*2, [3tr], [dc inc]*2, [3dc, 2ch], 1slst through the 1st stitch of R1;
R3 :
2ch as the turning chain, do not count as a stitch; insert the wire (about 15cm long); [sc, hdc], [3dc], [dc inc]*6, [3dc], [dc inc]*6, [3dc], [hdc, sc, 1ch], 1slst through the 1st stitch of R2 (pic);
R4 :
1ch as the turning chain, do not count as a stitch; sc, hdc, [dc inc]*5, 11dc, [dc, tr, 2ch picot, tr, dc], 11dc, [dc inc]*5, hdc, sc, 1ch, 1slst through the 1st stitch of R3; FO, wrap the craft wires with the tail.
— Assemble all parts :
Step 1 :
Find 3 pieces of floral stem (to make the stem stronger than just using 1 piece; 40cm long, 2mm wide), wrap one end (about 5cm long) together with yarn, fold as shown on pic.
Step 2 :
Sew the flower with the torus together with a yarn needle. Stop when finishing 3/4 to insert the floral stem we prepared and the filling.
Step 3 :
Continue sewing the flower with the torus. Hide the tail.
Step 4 :
Apply some glue at the end of the floral torus to prevent it from moving.
Step 5 :
Wrap the floral stem with a long piece of green yarn, attach the leaf as well; Apply glue at the end of stems to fix. Done!
This sunny crochet sunflower pattern brings a cheerful, long-lasting bloom to your home! Make a bouquet or single stem to brighten any room. 🌻 Perfect for gifts and decor — happy crocheting! 🧶