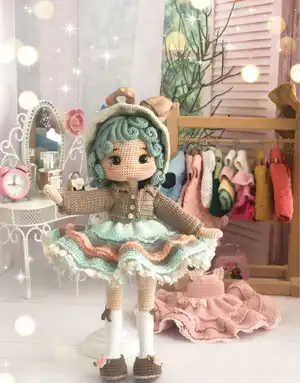
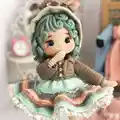
Make a charming handmade Doll Aybuke with this complete crochet amigurumi pattern. You will find step-by-step rounds for head, body, arms, legs, hair, hat, dress, jacket and accessories. The pattern includes materials, abbreviations and photo guidance so you can recreate every delightful detail with confidence.
Progress Tracker
0% Complete
— Arms :
Round 1 :
Sc 6 in a magic ring = (6)
Round 2 :
(Sc, inc)*3 = (9)
Round 3 :
(Sc 2, inc)*3 = (12)
Round 4-6 :
(3 rounds) Sc in each st around = (12)
Round 7 :
Sc 8, (dec)*2 = (10)
Round 9-29 :
(21 rounds) Sc in each st around = (9)
Info :
There is only wire in the arm, we do not fill fiber. You can look at the pictures on the body page for the wire assembly.
— Feet-Legs :
Info :
Hook: 1.75 mm, with white yarn;
Round 1 :
Ch 7, starting from the 2nd ch from hook inc, sc 4, sc 5 into the same st, sc 4, inc = (17)
Round 2 :
(Inc)*2, sc 4, (inc)*5, sc 4, (inc)*2 = (26)
Round 3 :
Sc, inc, sc 6, (sc, inc)*5, sc 6, inc, sc = (33)
Info :
Cut a piece of flat plastic sole in size of the sole piece of the foot.
Round 4 :
Work in blo, sc in each st around = (33)
Round 5-8 :
(4 rounds) sc in each st around = (33)
Round 9 :
Dec, sc 9, (dec)*6, sc 10 = (26)
Info :
Place the plastic sole in foot, fill the foot with fiberfill and add stuffing as the work progresses.
Round 10 :
Dec, sc 8, (dec)*4, sc 8 = (21)
Round 11 :
Sc 8, dec, sc, dec, sc 8 = (19)
Round 12 :
Sc 7, dec, sc, dec, sc 7 = (17)
Round 13 :
Sc 6, dec, sc, dec, sc 6 = (15)
Round 14-17 :
(4 rounds) Sc in each st around = (15)
Round 18 :
Sc, inc, sc 13 = (16) ('inc' is in the middle of the back)
Round 19-20 :
Sc in each st around = (16)
Round 21 :
Inc, sc, inc, sc 13 = (18) ('inc' is in the middle of the back)
Round 22-24 :
(3 rounds) Sc in each st around = (18)
Round 25 :
Sc 3, inc, sc 14 = (19) ('inc' is in the middle of the back)
Round 26-29 :
(4 rounds) Sc in each st around = (19)
Round 30 :
Sc 4, dec, sc 13 = (18) ('dec' is in the middle of the back)
Round 31 :
Sc 3, (dec)*2, sc 11 = (16)
Round 32 :
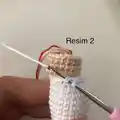
Leave the white yarn on the right side of the work, leave a long tail and cut the yarn. Attach the skin color yarn in the back loop of the st; work in blo, sc 16 = (16)
Info :
Wrap the white yarn tail around the leg and fix it. (photo 1) OR sl st 16 in the front loops of this round with white yarn. (photo 2)
Round 33 :
Sc 10, (inc)*4, sc 2 = (20) ((inc)*4 is in the middle of the front *knee*)
Round 34 :
Sc 10, (dec)*4, sc 2 = (16) ((dec)*4 is in the middle of the front)
Round 35 :
Sc in each st around = (16)
Round 36 :
Sc 3, inc, sc 2, inc, sc 9 = (18) ('sc 2' is in the middle of the back)
Round 37-38 :
(2 rounds) Sc in each st around = (18)
Round 39 :
Sc 4, inc, sc 2, inc, sc 10 = (20) ('sc 2' is in the middle of the back)
Round 40-41 :
(2 rounds) Sc in each st around = (20)
Round 42 :
Sc 5, inc, sc 2, inc, sc 11 = (22) ('sc 2' is in the middle of the back)
Round 43-44 :
(2 rounds) Sc in each st around = (22)
Round 45 :
Sc 6, inc, sc 2, inc, sc 12 = (24) ('sc 2' is in the middle of the back)
Round 46-50 :
(5 rounds) Sc in each st around = (24)
Round 51 :
Sc 7, cut the yarn.
Info :
First leg has finished. Note: The place of the last st may be different because of the yarn you use and your crocheting style. In the last round, the end point should be in the inner middle. Crochet second leg in the same way but crochet the last round as given below; 51) Sc 17
— Body :
Round 1 :
Ch 3, join the 2nd leg to the 1st leg, sc 24, sc 3 on ch, sc 24, sc 3 on ch (back)) = (54) (Place the stitch marker here)
Round 2 :
(Sc 8, inc)*6 = (60)
Round 3-8 :
(6 rounds) Sc in each st around = (60)
Round 9 :
(Sc 8, dec)*6 = (54)
Round 10-11 :
(2 rounds) Sc in each st around = (54)
Info :
Continue with skin color yarn;
Round 12 :
(Sc 7, dec)*6 = (48)
Round 13 :
Sc 3, dec, (sc 6, dec)*5, sc 3 = (42)
Round 14 :
Sc in each st around = (42)
Round 15 :
Sc 10, dec, sc 20, dec, sc 8 = (40) ('dec's are on the sides)
Round 16-17 :
(2 rounds) Sc in each st around = (40)
Round 18 :
Sc 10, dec, sc 19, dec, sc 7 = (38)
Round 19 :
Sc in each st around = (38)
Round 20 :
Sc 10, dec, sc 18, dec, sc 6 = (36)
Round 21-26 :
(6 rounds) Sc in each st around = (36)
Round 27 :
Sc 11, inc, sc 18, inc, sc 5 = (38) ('inc's are on the sides)
Round 28 :
Sc 11, inc, sc 19, inc, sc 6 = (40)
Round 29 :
Sc 9 in sts at the back, sc 2 in sts of both the arm and body together, sc 18 in sts in the front, sc 2 in sts of both the arm and body together, sc 9 in sts at the back = (40)
Round 30 :
Sc 9, sc 7 in sts on the first arm, sc 18, sc 7 in sts on the second arm, sc 9 = (50)
Info :
In this round place the wire into the arms and body. Cut a piece of wire of 25 cm long and bend both ends of the wire and secure the ends with tape. Place the wire into the arms. Make 3 layers of some wire to be 13 cm long, tape the ends and insert into the body as shown in the picture.
Round 31 :
Dec, sc 23, dec, sc 23 = (48)
Round 32 :
(Sc 6, dec)*6 = (42)
Round 33 :
(Sc 5, dec)*6 = (36)
Round 34 :
(Sc 4, dec)*6 = (30)
Round 35 :
(Sc 3, dec)*6 = (24)
Round 36 :
(Sc 2, dec)*6 = (18)
Round 37-40 :
(4 rounds) Sc in each st around = (18)
— Head :
Round 1 :
Sc 6 in a mr = (6)
Round 3 :
(Sc, inc)*6 = (18)
Round 4 :
Sc, inc, (sc 2, inc)*5, sc = (24)
Round 5 :
(Sc 3, inc)*6 = (30)
Round 6 :
Sc 2, inc, (sc 4, inc)*5, sc 2 = (36)
Round 7 :
(Sc 5, inc)*6 = (42)
Round 8 :
Sc 3, inc, (sc 6, inc)*5, sc 3 = (48)
Round 9 :
(Sc 7, inc)*6 = (54)
Round 10 :
Sc 4, inc, (sc 8, inc)*5, sc 4 = (60)
Round 11-19 :
(9 rounds) Sc in each st around = (60)
Round 20 :
Sc 24, ch 1 skip 1 st, sc 9, ch 1 skip 1 st, sc 25
Round 21 :
Sc 16, (inc, sc)*4, inc, sc 9, inc, (sc, inc)*4, sc 17 = (70)
Round 22-27 :
(6 rounds) Sc in each st around = (70)
Info :
Insert the 10 mm black safety eyes in the holes made in round 20.
Round 28 :
(Sc 5, dec)*10 = (60)
Round 29 :
Sc 2, dec, (sc 4, dec)*9, sc 2 = (50)
Round 30 :
(Sc 3, dec)*10 = (40)
Round 31 :
Sc, dec, (sc 2, dec)*9, sc = (30)
Round 32 :
(Sc 3, dec)*6 = (24)
Round 33 :
(Sc 2, dec)*6 = (18)
Info :
* NOSE: With skin color yarn, by centering both eyes stitch the nose on 3 sts between rounds 22 - 23.
Info :
* SHAPING THE MOUTH: Use two long needles for making the mouth. Insert the needles between the rounds 27 and 28 leaving 4 sts between them and get them out of the top of the head. Pull the yarn lightly from the top and tie it. Color the mouth with pink thread.
Info :
* SHAPING THE EYES: To make an eye hole, insert the needle from the back of the head at eye level, pull the needle out of the point 1 (marked with arrow). Insert the needle from point 2 and pull it out of point 3. Insert the needle from point 4 and take the needle out of the back of the head where you made the first entry. Pull the yarn ends proportionally from the back, form the eye holes and knot the yarn ends securely.
Info :
Click the link for the video tutorial of forming the eye hole: https://youtu.be/Rs_GQG56h0E
Info :
* EYEBROW - EYELASHES: With brown yarn, stitch the eyebrows on 3 sts 4 sts above the eyes leaving 8 sts between them. The eyelashes are embroidered on the eye without separating the layers of the yarn as in the picture.
Info :
The lower eyelash is embroidered with a single layer of yarn. White part of the eye is embroidered with white yarn. Click on the link below for making Aybuke doll's eyelash, eyebrow and mouth makeup: https://www.youtube.com/watch?v=3vwmSlsx4sw After finishing the head, sew it to the body.
— Hair :
Info :
Hook: 2 mm. Click on the video link for detailed tutorial about Aybuke doll's hair: https://www.youtube.com/watch?v=gbEhSdpKPcw
Round 1 :
Sc 6 in a mr = (6)
Round 3 :
(Sc, inc)*6 = (18)
Round 4 :
Work in FLO, (sc 2, inc)*6 = (24)
Round 5 :
(Sc 3, inc)*6 = (30)
Round 6 :
(Sc 4, inc)*6 = (36). Do not cut the yarn and continue crocheting the hair strands.
Row 1 :
Ch 35, starting from the 2nd ch from hook, sl st 1, sc 2, inc, (hdc 2, hdcinc)*3, hdc 21, sl st in the next st on round 6 of the round part
Row 2 :
Ch 28, starting from the 2nd ch from hook, sl st 1, sc 2, inc, (hdc 2, hdcinc)*3, hdc 14, sl st in the next st on round 6 of the round part
Row 3 :
Ch 26, starting from the 2nd ch from hook, sl st 1, sc 2, inc, (hdc 2, hdcinc)*2, hdc 15, sl st in the next st on round 6 of the round part
Row 4 :
Ch 23, starting from the 2nd ch from hook, sl st 1, sc 2, inc, (hdc 2, hdcinc)*2, hdc 12, sl st in the next st on round 6 of the round part
Row 5 :
Ch 17, starting from the 2nd ch from hook, sl st 2, sc 2, hdc 12, sl st in the next st on round 6 of the round part
Row 6 :
Ch 15, starting from the 2nd ch from hook, sl st 2, sc 2, hdc 10, sl st in the next st on round 6 of the round part
Info :
(This hair strand - made with 15 chs - should be over the left eye while being sewn to the head.)
Row 7 :
Ch 28, starting from the 2nd ch from hook, sl st 1, sc 2, inc, (hdc 2, hdcinc)*3, hdc 14, sl st in the next st on round 6 of the round part
Row 8 :
Ch 30, starting from the 2nd ch from hook, sl st 1, sc 2, inc, (hdc 2, hdcinc)*3, hdc 16, sl st in the next st on round 6 of the round part
Row 9 :
Ch 37, starting from the 2nd ch from hook, sl st 1, sc 2, inc, (hdc 2, hdcinc)*4, hdc 20, sl st in the next st on round 6 of the round part
Row 10 :
Ch 40, starting from the 2nd ch from hook, sl st 1, sc 2, inc, (hdc 2, hdcinc)*5, hdc 20, sl st in the next st on round 6 of the round part
Row 11-36 :
(26 rows) Ch 30, starting from the 2nd ch from hook sl st 1, sc 2, hdc 26, sl st in the next st on round 6 of the round part. Cut the yarn. (photo 5)
Info :
Note: Alternatively, if you want these back hair strands to be longer, you can crochet the rows 11 - 36 as described below (photo 4): 11 - 36 (26 rows) Ch 60, starting from the 2nd ch from hook sl st 1, sc 2, hdc 56, 'sl st in the next st on round 6 of the round part'. Cut the yarn.
Info :
2nd LAYER OF HAIR: Attach the yarn to one of the back loops of round 4 of the round part of the hair. (Photo 2) 1 - 18) (18 rounds) Ch 60, starting from the 2nd ch from hook, sl st 1, sc 2, hdc 56, sl st in the next st on round 4 of the round part (Photo 3, The wrong side of the work should be facing outwards)
Info :
SEWING HAIR TO THE HEAD: Note: Pay attention to the fact that the hair is sewn to the head with the wrong side facing out. Place the hair on the top of the head first and fix it with pins. Place the 15-chain hair strand which is on the 1st layer of the hair over the doll's eye. Place the 30-chain hair strands on the back of the head and fix them with pins and then sew them on with a needle and yarn.
Info :
Shape the ends of the hair in the front by curling them inward and fix them by sewing with a needle and yarn or sticking with hot silicone.
— Hat :
Round 1 :
Ch 17, starting from the 2nd ch from hook sc 15, 3-sc inc, continue from the other side of the chain sc 15, turn = (33)
Round 2 :
Ch 1, sc 15, (inc)*3, sc 15, turn = (36)
Round 3 :
Ch 1, sc 15, (sc, inc)*3, sc 15, turn = (39)
Round 4 :
Ch 1, sc 15, (sc 2, inc)*3, sc 15, turn = (42)
Round 5 :
Ch 1, sc 15, (sc 3, inc)*3, sc 15, turn = (45)
Round 6 :
Ch 1, sc 15, (sc 4, inc)*3, sc 15, turn = (48)
Round 7 :
Ch 1, sc 15, (sc 5, inc)*3, sc 15, turn = (51)
Round 8 :
Ch 1, sc 15, (sc 6, inc)*3, sc 15, turn = (54)
Round 9 :
Ch 1, sc 15, (sc 7, inc)*3, sc 15, turn = (57)
Round 10 :
Ch 1, sc 15, (sc 8, inc)*3, sc 15, turn = (60)
Round 11 :
Ch 1, sc in each st along, turn = (60)
Round 12 :
Work in FLO, ch 1, sc in each st along, turn = (60)
Round 13 :
Ch 1, sc 3, hdc 4, dc 46, hdc 4, sc 3, turn = (60)
Round 14 :
Ch 1, sc in each st along, turn = (60)
Round 15 :
Ch 1, sc 3, hdc 4, dc 46, hdc 4, sc 3, turn = (60)
Round 16 :
Ch 1, sc in each st along, turn = (60)
Round 17 :
Ch 1, sc 3, hdc 4, dc 46, hdc 4, sc 3, turn = (60)
Round 18 :
Ch 1, sc in each st along, turn = (60)
Round 19 :
Ch 1, sc 3, hdc 4, dc 46, hdc 4, sc 3, turn = (60)
Round 20 :
Ch 1, sc in each st along, turn = (60)
Round 21 :
Ch 1, sc 3, hdc 4, dc 46, hdc 4, sc 3, turn = (60)
Round 22 :
Ch 1, sc in each st along, turn = (60)
Round 23 :
Work in BLO, ch 1, sc 14, hdcinc, dc 14, (dcinc)*2, dc 14, hdcinc, sc 14, turn = (64)
Round 24 :
Ch 1, sc 14, hdc 2, hdcinc, (dc 4, dcinc)*3, (dcinc, dc 4)*3, hdcinc, hdc 2, sc 14, turn = (72)
Round 25 :
Ch 1, sc 13, hdcinc, (dc 10, dcinc)*3, dc 10, hdcinc, sc 14, turn = (77)
Round 26 :
Ch 1, sc 10, hdc 6, dcinc, (dc 8, dcinc)*5, hdc 6, sc 9 = (83) Cut the yarn.
Info :
Attach the yarn to one of the front loops of round 23. (Photo 2)
Round 23 (cont) :
Work in FLO, sc 14, hdcinc, dc 14, (dcinc)*2, dc 14, hdcinc, sc 14, turn = (64)
Round 24 (cont) :
Ch 1, sc 14, hdc 2, hdcinc, (dc 4, dcinc)*3, (dcinc, dc 4)*3, hdcinc, hdc 2, sc 14, turn = (72)
Round 25 (cont) :
Ch 1, sc 13, hdcinc, (dc 10, dcinc)*3, dc 10, hdcinc, sc 14, turn = (77)
Round 26 (cont) :
Ch 1, sc 10, hdc 6, dcinc, (dc 8, dcinc)*5, hdc 6, sc 9, turn = (83) Cut the yarn.
Round 27 :
Do not cut the yarn and continue crocheting. Take the back loop sts of the front piece and front loop sts of the back piece together and sl st on the edges of the TWO pieces to join them = (83cc) (photo 3)
Info :
Make a bow by using a 3.5 cm wide wire ribbon or grosgrain ribbon and decorate the hat with it.
— Dress :
Info :
Hook: 2.2 mm or 2 mm. Click the link for Aybuke doll fake double crochet (fdc) tutorial: https://www.youtube.com/watch?v=rkJ_Nq_uigE
Round 1 :
Ch 40, starting from the 9th ch from hook (sc, inc)*16, turn = (48) (Note: 9 stitches are left unworked for buttonhole)
Round 2-3 :
(2 rows) Ch 1, sc 48, turn = (48)
Round 4 :
Sc 8, ch 8 skip 8 sts, sc 16, ch 8 skip 8 sts, sc 8, turn
Round 5 :
Ch 1, sc 8, sc 8 on chain, sc 16, sc 8 on chain, sc 8, turn = (48)
Round 6-13 :
(8 rows) Ch 1, sc 48, turn = (48). Continue by crocheting fdc on the skirt part of the dress.
Info :
(Fake double crochet: Do not yarn over and insert your hook into the stitch where you want to place the fake dc stitch. Yarn over and pull through. You have two loops on hook. Yarn over again and pull through the first loop of two loops on hook. Yarn over again and pull through the remaining loops on hook.)
Info :
Click the link for the video tutorial: https://youtu.be/rkJ_Nq_uigE
Round 14 :
Join both edges with a sl st. Work in FLO, ch 2, fdcinc in each st around, sl st in the 1st st = (96)
Round 15-22 :
(8 rounds) Ch 2, fdc in each st around, sl st in the 1st st = (96)
Round 23 :
Work in BLO, ch 2, (fdc, fdcinc)*repeat to the end of the row, sl st in the 1st st
Round 24 :
Ch 2, fdc in each st around, sl st in the 1st st
Round 25 :
Ch 2, (fdc 2, dcinc)*repeat to the end of the row, sl st in the 1st st
Round 26 :
Ch 2, fdc in each st around, sl st in the 1st st
Round 27 :
Ch 2, (fdc 3, dcinc)*repeat to the end of the row, sl st in the 1st st
Round 28 :
Work in BLO, ch 2, fdc in each st around, sl st in the 1st st
Round 29-32 :
(4 rows) Ch 2, fdc in each st around, sl st in the 1st st
Round 33 :
Work in BLO, (Ch 3, skip 1 st, sc)*repeat to the end of the row. Fasten off.
Info :
* Attach the yarn of the dress to the starting st of the front loop of row 23; (ch 3, skip 1 st, sc 1)*repeat to the end of the row. * Attach the yarn of the dress to the starting st of the front loop of row 28; (ch 3, skip 1 st, sc 1)*repeat to the end of the row
Info :
Sew cotton lace at the edge of the skirt. Using the same cotton lace, sew the lace that you cut 8 cm long by shrinking it with needle thread on the skirt of the dress at certain intervals.
Info :
FOR THE SLEEVES OF THE DRESS; crochet only on top edge of the arm opening of the dress and attach the yarn to one of the sts at the arm opening, (ch 1, sl st 1)*repeat for a few sts. Fasten off.
Info :
FOR BOTTOM SKIRT OF TULLE; cut the tulle in strips of 3 cm wide and 19 cm long and attach them to the back loops of row 14 as if attaching hair strands to head.
Info :
Click the link for the video tutorial: https://youtu.be/aaXrwQJzohk Sew on a button at the back of the dress.
— Jacket :
Info :
Hook 2 mm, with the yarn with the color of jacket (Alize diva 167),
Round 1 :
Ch 37, starting from the 2nd ch from hook, sc 36, turn = (36)
Round 2 :
Ch 1, (sc 2, inc)*12, turn = (48)
Round 3 :
Ch 1, sc in each st along, turn = (48)
Round 4 :
Ch 1, (inc, sc 3)*12, turn = (60)
Round 5 :
Ch 1, sc in each st along, turn = (60)
Round 6 :
Ch 1, sc 9, ch 10 skip 12 sts, sc 18, ch 10 skip 12 sts, sc 9, turn
Round 7 :
Ch 1, sc in each st along, turn = (56)
Round 8-10 :
(3 rounds) Ch 1, sc in each st along, turn = (56)
Info :
(The length of the jacket should be enough to the waist of the dress)
Round 11 :
Work in BLO, (ch 4, skip 1 st, sl st 1)*28
Info :
Do not cut the yarn and sl st in each st along the front edge of the jacket through the neckline. By centering the collar on the neckline of the jacket, mark its place with pins and start crocheting it on the neckline between the pins.
Round 1 (collar) :
Sc 30, turn = (30)
Round 2-6 (collar) :
(5 rounds) Ch 1, sc 30, turn = (30)
Round 7 (collar) :
Work in FLO, (ch 4, skip 1 st, sc 1)*15
Info :
Do not cut the yarn and sl st in each st along the other front edge of the jacket. Fasten off.
Info :
Sew 3 mini buttons on jacket. Surface sl st along the edge of jacket by attaching the yarn with the color of the dress from the back for the stitching image on the collar, sleeves and pockets on the jacket.
— Sleeves of Jacket :
Info :
With the color of jacket, 1) Attach the yarn from one of the sts left for the sleeve of the jacket, sc 23, sl st in the 1st st
Round 2-23 :
(22 rounds) Ch 1, sc 23, sl st in the 1st st
Round 24 :
Work in BLO, (ch 4, skip 1 st, sc)*12
Info :
For the stitching image on the collar, sleeves and pockets on the jacket: Surface sl st along the edge of jacket by attaching the yarn with the color of the dress from the back.
— Shoes :
Round 1 :
Ch 7, starting from the 2nd ch from hook inc, sc 4, sc 5 in the same st, sc 4, inc = (17)
Round 2 :
(Inc)*2, sc 4, (inc)*5, sc 4, (inc)*2 = (26)
Round 3 :
Sc, inc, sc 6, (sc, inc)*5, sc 6, inc, sc = (33)
Round 4 :
Sc in each st around = (33)
Round 5 :
Sc 12, inc, sc 8, inc, sc 11 = (35)
Round 6 :
Work in blo, sc in each st around = (35)
Round 7-10 :
(4 rounds) Sc in each st around = (35)
Round 11 :
Sc 11, (dec)*8, sc 8 = (27)
Round 12 :
Sl st 27 (You can crochet this row after putting the shoes on feet)
Info :
Attach the yarn with the same color of the dress to the front loops of round 6, (sl st 1, ch 1)* repeat to the end of the round. Cut the yarn. Decorate the shoes using two ready-made ribbon roses or buttons.
This Doll Aybuke pattern is full of charming details and thoughtful construction to help you create a memorable keepsake. 🧶 The layered skirt, curly hair strands, and tiny wardrobe accents make each finished doll uniquely delightful. 🌸 Keep stitching, enjoy the process, and treasure the handmade magic you create. ✨