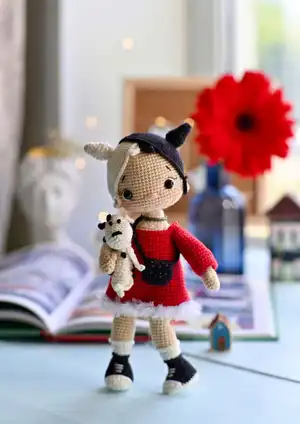
Make your own charming Cruella-inspired amigurumi doll with clear step-by-step instructions and helpful photos. This pattern guides you through crocheting the head, body, limbs, hair details, dress, shoes and accessories. Perfect for crocheters who love character dolls and detailed finishing touches.
Progress Tracker
0% Complete
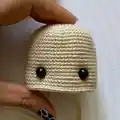
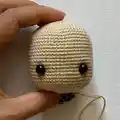
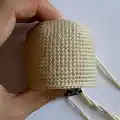
— Head :
Round 3 :
(1 sc, inc) x6 (18)
Round 4 :
(2 sc, inc) x6 (24)
Round 5 :
(3 sc, inc) x6 (30)
Round 6 :
(4 sc, inc) x6 (36)
Round 7 :
(5 sc, inc) x6 (42)
Round 8 :
(6 sc, inc) x6 (48)
Round 9 :
(7 sc, inc) x6 (54)
Round 10 :
(8 sc,inc)x6 (60)
Round 11-26 :
60 sc (16 rounds)
Info :
Insert eyes between 21-22 rows in the distance of 13 sc
Round 27 :
(8 sc,dec)x6 (54)
Round 28 :
(7 sc,dec) x6 (48)
Round 29 :
(4 sc,dec) x8 (40)
Round 30 :
(3 sc,dec) x8 (32)
Round 31 :
(2 sc,dec) x8 (24)
Round 32 :
(2 sc,dec) x6 (18)
Info :
Cut the yarn. Hide the thread.
— Hairstyle (2 PCS.) :
Round 3 :
(1 sc, inc) x6 (18)
Round 4 :
(2 sc, inc) x6 (24)
Round 5 :
(3 sc, inc) x6 (30)
Round 6 :
(4 sc, inc) x6 (36)
Round 7 :
(5 sc, inc) x6 (42)
Round 8 :
(6 sc, inc) x6 (48)
Round 9 :
(7 sc, inc) x6 (54)
Round 10 :
(8 sc, inc)x6 (60)
Round 11 :
(9 sc, inc) x6 (66)
Round 12-13 :
66 sc (2 rounds)
Round 14 :
(10 sc, inc) x6 (72)
Round 15 :
72 sc, 13 ch, cut the thread.
— Bang :
Item Name (P1) :
Hook №2, begin crocheting in black color 1 detail (1 detail in white color) : 1 rnd: 5 ch, from second 2 sc, 1 hdc,1 dc. Leave a long thread for sewing.
— Ponytail (2 PCS) :
Round 2 :
(1 sc, inc )x3 (9)
Round 4 :
(2 sc, inc ) x3 (12)
Round 5 :
(3 sc, inc ) x3 (15)
Round 7 :
(3 sc,dec)x6 (12)
Round 8 :
(2 sc,dec)x3 (9)
Round 9 :
(1 sc,dec)x3 (6)
Info :
Leave a long end for sewing. Stuff while sewing.
— Ears (2 PSC.) :
Item Name (P1) :
Hook №2, begin crocheting in main beige color. 1 rnd : 5 sc in MR. Cut the yarn. Leave a long tail for sewing.
— Face Decoration :
Infos :
Head design can be viewed by clicking on the button below. 1. Needle sculpting for the eyes area and the eyes details. 2. Making the nose we make a stitch 3 sc long between 21-22 rows, the distance from the eye to the nose on each side is 5 sc
— Hands 2 PSC :
Round 3-4 :
12 sc (2 rounds)
Round 5 :
6 sc, bubble, 5 sc (12)
Round 7 :
(4 sc,dec)x2 (10)
Round 8-24 :
10 sc (17 rounds)
Info :
Cut the thread and hide.
— Legs 2 PCS :
Info :
If you want your doll to be able to bend the legs, you need to take a wire for each leg and insert the frame while knitting, you can see an example in the photo. (We make the frame at will)
Round 1 :
8 ch, from second 6 sc, 3 sc in the last chain, on the other side of the chain 5 sc, inc (16)
Round 2 :
inc, 5 sc, inc,1 sc, inc, 5 sc,inc, 1 sc (20)
Round 3 :
1 sc, inc, 5 sc,inc, 3 sc,inc, 5 sc, inc,2 sc (24)
Round 4 :
2 sc, inc, 5 sc,inc, 5 sc,inc, 5 sc, inc,3 sc (28)
Info :
Prepare the insoles. On thick cardboard or plastic (for example, a cover from cotton swabs), we circle the part, cut it out, try it on and put it aside. We make 2 insoles for 2 shoes at once, glue after we crochet the fifth row. BLO
Round 6 :
9 sc, BLO 9 sc (should be in the center of the leg), for both loops 10 sc (28)
Info :
Change color for black. For both loops
Round 8 :
27 sc, We do not crochet one loop so that the beginning of the row is strictly in the center.
Round 9 :
8 sc, 6 dec, 8 sc (22)
Round 10 :
7 sc, 4 dec, 7 sc (18)
Round 12 :
(1 sc,dec)x6 (12)
Info :
Change color for white. BLO
Round 15 :
(2 sc,inc)x4 (16)
Round 16-17 :
16 sc (2 rounds)
Info :
Change color for main. BLO
Round 17 :
15 sc, inc (17) (for both loops)
Round 19 :
inc, 16 sc (18)
Round 21 :
inc, 17 sc (19)
Round 23 :
18 sc, inc (20)
Round 25 :
dec, 16 sc, dec (18)
Round 26 :
2 sc, dec, 10 sc, dec, 2 sc (16)
Round 28 :
2 sc, inc, 10 sc, inc, 2 sc (18)
Round 30 :
(5 sc,inc)x3 (21)
Round 31-34 :
21 sc (4 rounds)
Info :
Change color for white
Round 35 :
(6 sc,inc)x3 (24)
Round 36-38 :
24 sc (3 rounds)
Item Name (P1) :
Left leg: 39 rnd: 18 sc, ( so that the connection of the legs is on the inside of the thigh), cut the thread and hide
Item Name (P1) :
Right leg: 39 rnd: 12 sc (so that the connection of the legs is on the inside of the thigh), do not cut the thread
Info :
Sock with a white thread. FLO 17 rnd: 16 sl st. Cut the thread and hide.
Info :
Black thread shoes. FLO 13 rnd: 12 sc. Cut the thread and hide.
— Sneakers (Front) :
Info :
Hook №2, crocheting with white color: FLO 5th row, center (where they crocheted BLO 9 sc). Turning rounds, keep the foot towards you
Round 1 :
2 sc, sl st, ch, turn
Round 2 :
3 sc, sl st, ch, turn
Round 3 :
4 sc, sl st, ch, turn
Round 5 :
5 sc, sl st, ch, turn
Round 6 :
6 sc, sl st, ch, turn
Round 7 :
7 sc, sl st, ch, turn
Round 8 :
8 sc, sl st, ch, turn
Info :
Cut the thread and hide.
— Body :
Round 40 :
1 ch from the right leg, attach it to the left leg to make the legs clubfoot, i.e. work some shifting sc in the last shifting sc of the left leg; if it's necessary, work required number of shifting sc. Then work along left leg 24 sc, 2 inc along chain, 24 sc along right leg, 2 sc along chain + 6 shifting sc (54)
Round 41-46 :
54 sc (6 rounds)
Round 47 :
(7 sc,dec)x6 (48)
Round 49 :
(14 sc,dec)x3 (45)
Round 51 :
(13 sc,dec)x3 (42)
Info :
Change color for main. BLO
Round 53-55 :
42 sc (3 rounds)
Round 56 :
(12 sc,dec)x3 (39)
Round 57-58 :
39 sc (2 rounds). Attach the arms.
Round 59 :
3 sc, 5 sc with hand, 16 sc, 5 sc with hand, 10 sc (39). And we insert the wire frame into our hands.
Round 60 :
3 sc, 5 sc by hand, 16 sc, 5 sc by hand, 10 sc (39)
Round 61 :
(11 sc,dec)x3 (36)
Round 62 :
(1 sc, dec)x12 (24)
Round 63 :
(2 sc, dec) x6 (18)
Round 64-67 :
18 sc (4 rounds)
Info :
Leave a long tail thread for piece attaching.
— Sleeve (1 PCS.) :
Round 1 :
18 ch, sl st close in a circle, 18 sc
Round 2 :
(5 sc,inc)x3 (21)
Round 4 :
(6 sc, inc) x3 (24)
Round 5-6 :
24 sc (2 rounds)
Round 7 :
(6 sc, dec ) x3 (21)
Round 9-11 :
21 sc (4 rounds)
Round 12 :
(5 sc,dec)x3 (18)
Round 13-14 :
18 sc (2 rounds)
Info :
Cut the thread and hide.
— Dress :
Round 1 :
60 ch, sl st close in a circle
Round 2-3 :
60 sc (2 rounds)
Round 4 :
(18 sc,dec)x3 (57)
Round 6 :
(17 sc,dec)x3 (54)
Round 7-17 :
54 sc (11 rounds)
Round 18 :
(16 sc,dec)x3 (51)
Round 19-21 :
51 sc (3 rounds)
Round 22 :
2 sc on dress, 6 sc with sleeve, 16 sc on dress, (1 sc,dec)x3, 18 sc (48)
Round 23 :
2 sc, 12 sc on sleeve, 40 sc on dress (54)
Round 24 :
4 sc, 3 hdc, 2 dc, 3 hdc, 42 sc (54)
Info :
Cut the thread and hide.
Item Name (P1) :
With a white mink color, Hook №2, hold the dress with the hem towards you: 1 rnd: 60 sc. Cut the thread and hide.
— Bag :
Round 1 :
8 ch, from third 5 dc, 3 dc in the last chain, on the other side of the chain 4 dc, inc from dc (14)
Round 3-5 :
14 sc (3 rounds)
Info :
Next, crochet in turning rows: 6 rnd: 1 sc, turn, 6 sc, 1 ch, turn
Round 7-10 :
6 sc, 1 ch, turn (4 rounds)
Info :
Cut the thread and hide. We fasten the thread on the side, dial 50 ch, fasten to the other end of the ss.
This Cruella-inspired doll pattern brings a playful, stylish character to your crochet collection. Create a unique gift or a display piece with detailed hair, dress and tiny accessories. Follow the step-by-step rounds and assembly notes for a polished finish. 🧶🧵✨