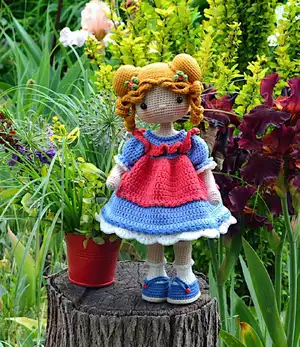
Make your own charming Doll Eliza with this detailed amigurumi pattern. You will be guided step-by-step through crocheting the legs, body, head, wig, dress and accessories to create a delightful handcrafted doll. The pattern includes clear stitch counts, color notes and assembly tips so you can reproduce the exact look or customize as you wish. Perfect for makers who enjoy thoughtful projects and beautiful finished toys.
Progress Tracker
0% Complete
— Arms :
Info :
Use your 2.0 mm crochet hook and skin yarn.
Round 1 :
6 sc in the magic ring (6)
Round 3 :
1 sc in each st around (12)
Round 4 :
(3 sc, inc)*3 times (15)
Round 5 :
1 sc in each st around (15)
Round 6 :
2 inc, 13 sc (17)
Round 7 :
1 sc in each st around (17)
Round 8 :
2 dec, 3 sc, dec, 3 sc, dec, 3 sc (13)
Round 9 :
dec, 5 sc, 1 dec, 4 sc (11)
Round 10 :
6 sc, 1 inc, 4 sc (12)
Info :
Stuff the ready part of the arm tightly.
Round 11-32 :
12 sc (22 rnd) (12)
Left arm (Round 33) :
5 sc, slst
Info :
Cut off and fix the yarn for left arm.
Right arm (Round 33) :
1 sc, slst
Info :
Cut off and fix the yarn for right arm.
— Shoes :
Info :
Starting at sole, with hook 2.0 mm. Work the sole in spiral rounds. Make 2 soles for each shoe in beige colored yarn (87) color.
Info :
Ch 8 and work starting from the 2 nd ch from the hook. (don’t turn your work, crochet on the other side of the ch!)
Round 1 :
1 inc, 5 sc, 3 sc in one st, 6 sc (16)
Round 2 :
2 inc, 5 sc, 3 inc, 5 sc, 1 inc (22)
Round 3 :
2 inc, 1 sc, 1 inc, 5 sc, 1 inc, 1 sc, 2 inc, 1 sc, 1 inc, 5 sc, 1 inc, 1 sc, 1 inc, 1 sc, 7 sc, 1 inc, 1 sc (38)
Round 4 :
1 inc, 2 sc, 1 inc, 1 sc, 1 inc, 7 sc, 1 inc, 1 sc, 1 inc, 2 sc, 1 inc, 1 sc, 1 inc, 7 sc, 1 inc, 1 sc (38)
Info :
Now move the beginning of the row to the middle of the sole, crochet 3 sc to do it. Try using cardboard or plastic in the bottom of the sole, so that the doll will stand upright more easily. Cut two pieces of cardboard or plastic in size of the sole (rd 1-5). Put aside for later.
Info :
Fasten off in the invisible way. To do so pull the yarn end through the last stitch, thread the yarn end into the needle, skip one stitch and guide the yarn into the next stitch. Insert the needle back in the same hole where the yarn comes from. Fasten the obtained stitch. Mark this stitch, we will need it later on. Fasten off and weave in the yarn end.
Info :
Put the two soles on top of each other, wrong side against wrong side, so that the heel (where the closing stitches are situated) is facing you.
Info :
Now we need to connect the soles together with a round slst. To do so, take yellow yarn and pull up a loop, insert the hook into the second pair of stitches, yarn over and pull the yarn through this pair of stitches. The first slst is ready. Note: Try to crochet slst loosely, not pulling the stitches too tightly. Repeat with the second pair of soles. We should get 38 slst in this round in total.
Info :
Now, we start to crochet the shoes. We are going to be working in joined rounds. Note: slst, ch 1 at the beginning of the row, does not count as a stitch now and throughout. Crochet the first sc of each round into the base of the ch.
Round 1-4 :
1 ch (not count as st), 1 sc into the base of the ch, 37 sc, slst to the 1st st of the round to join (38)
Round 5 :
1 ch, 1 sc into the base of the ch, 13 sc, (sc2tog, 1 sc)*3 times, sc2tog, 13 sc, slst to the 1st st of the round to join (34)
Info :
Crochet the first sc of the first round in this stitch. To do so, take blue yarn, pull up a loop and crochet 1 ch. Crochet 1 sc into the same stitch in which we inserted the hook. The first sc of the first round is ready.
Round 6 :
1 ch, 1 sc into the base of the ch, 8 sc, (sc2tog, 1 sc)*5, sc2tog, 8 sc, slst to the 1st st of the round to join (28)
Round 7 :
7 sc, 7 sc2tog, 7 sc (21)
Round 8 :
8 sc, 2 hdc, 1 dc2tog, 1 hdc, 8 sc (20)
Round 9 :
(1 dec, 3 sc) * 4 times (16)
Round 10 :
7 sc, 1 dec, 7 sc (15)
Round 13 :
inc, 14 sc (16)
Round 14 :
1 sc, inc, 14 sc (17)
Info :
When you are finished with rnd 5, do not break the blue yarn. To shift blue yarn to front side attach the yarn color white. 6th row is crocheted into the back loop of the stitch.
Round 6 (with white) :
1 ch, 1 sc into the base of the ch, 8 sc, (sc2tog, 1 sc)*5, sc2tog, 8 sc, slst to the 1st st of the round to join (28)
Info :
Then go on crocheting spiralwise.
Round 7 :
7 sc, 7 sc2tog, 7 sc (21)
Round 8 :
8 sc, 2 hdc, 1 dc2tog, 1 hdc, 8 sc (20)
Round 9 :
(1 dec, 3 sc) * 4 times (16)
Round 10 :
7 sc, 1 dec, 7 sc (15)
Round 13 :
inc, 14 sc (16)
Round 14 :
1 sc, inc, 14 sc (17)
Info :
When you are finished with rnd 14, do not break the white yarn. To shift white yarn to front side attach the yarn color skin. 15 th row is crocheted into the back loop of the stitch.
Round 16 :
2 sc, inc, 14 sc (18)
Round 18 :
3 sc, inc, 14 sc (19)
Round 20 :
4 sc, inc, 14 sc (20)
Round 22 :
5 sc, inc, 14 sc (21)
Info :
When you finished the rnd 24, postpone crochet of the leg and pass to crochet of the lace of the sock and of the shoe-laces. Attach the blue yarn to the 5th row in the center of the back of the shoe. Crochet into the front loops of each stitch around.
Right shoe (lace round) :
8 slst, 25 ch, 26 slst (34). Finish the row with slst, cut and fix the yarn.
Left shoe (lace round) :
26 slst, 25 ch, 8 slst (34). Finish the row with slst, cut and fix the yarn.
Info :
Attach the white yarn to the 14th row in the center of the back of the leg. Crochet into the front loops of each stitch around (1 slst, 2 ch). Finish the row with slst, cut and fix the yarn. Continue crocheting the legs of the yarn color skin. Stuff the leg in the process of crocheting.
Round 25 :
1 sc, dec, 6 sc, dec, 10 sc (19)
Round 26 :
3 sc, 2 dec, 5 sc, 5 inc, 2 sc (22)
Round 28 :
3 sc, 2 inc, 5 sc, 5 dec, 2 sc (19)
Round 30 :
1 sc, inc, 8 sc, inc, 8 sc (21)
Round 32 :
6 sc, inc, 14 sc (22)
Round 34 :
7 sc, inc, 14 sc (23)
Round 36 :
8 sc, inc, 14 sc (24)
Round 38 :
9 sc, inc, 14 sc (25)
Info :
Put a stitch marker here to mark the new beginning of the round.
Attach the light pink yarn :
Crochet 1 round 25 slst - this round is not counted in the pattern.
Round 41 :
25 sc (insert the hook through the center of slip stitches and into the body color stitches of 39th round (foto)) (25)
Left leg (Round 43) :
Crochet 19-20 sc after R 42 (the end of a row has to be in an internal part of the leg), slst and cut off and fix the yarn.
Info :
Repeat rows 1-42 for the second (right) leg. R 43: Crochet 32-33 sc (In the present row we add 7-8 sc more or less so that the row is finished in the middle of the inner part of the leg. I made 8 sc. You might need more or fewer sc depending on the thickness of the yarn or tightness of your crocheting). Do not cut off the yarn.
— Body :
Info :
We join the legs and begin crocheting the body. Turn the legs with the heels facing you. On the right leg make 2 ch and attach it to the left leg.
Round 44 :
25 sc on the left leg detail, then 2 sc on chain, 25 sc on the right leg, 1 sc on the other side of the on chain.
Round 45 :
1 sc on chain, (inc, 2 sc)*4 times, 28 sc, (2 sc, inc)*4 times, 1 sc (62)
Round 47 :
19 sc, dec, 20 sc, dec, 19 sc (60)
Round 50 :
19 sc, dec, 18 sc, dec, 19 sc (58)
Round 52 :
8 sc, dec, 7 sc, dec, (8 sc, dec)*2 times, 7 sc, dec, 8 sc, dec (52)
Round 54 :
2 sc, dec, 4 sc, dec, 7 sc, dec, 14 sc, dec, 7 sc, dec, 4 sc, dec, 2 sc (46)
Round 55 :
46 sl st into the back loop of the stitch (46)
Info :
Cut off the light pink yarn and attach the skin yarn.
Round 56 :
46 sc into the back loop of the stitch (46)
Round 57 :
(dec, 7 sc)*5 times, 1 sc (41)
Round 61 :
4 sc, (dec, 6 sc)*4 times, dec, 3 sc (36)
Round 63 :
8 sc, inc, 18 sc, inc, 8 sc (38)
Round 64-65-66-67-68 :
38 sc (38)
Round 69 :
9 sc, inc, 18 sc, inc, 9 sc (40)
Info :
In this round we'll add the arms. Attach the arms – make sure that the top of the arm is level with row 71 of the body when the arms are down by the doll’s sides. Note: Make sure thumbs are pointing in the correct direction!
Round 72 :
9 sc on back of body, 3 sc in 3 stitches of left arm and 3 stitches of the body at the same time, 17 sc on front of body, 3 sc in 3 stitches of right arm and 3 stitches of the body at the same time, 8 sc on back of body (40)
Round 73 :
9 sc on back of body, 9 sc in stitches of 1st arm, 17 sc on front of body, 9 sc in stitches of 2nd arm, 8 sc on back of body (52)
Round 75 :
3 sc, dec, 17 sc, dec, 5 sc, dec, 17 sc, dec, 2 sc (48)
Round 76 :
6 sc, dec, 9 sc, dec, 11 sc, dec, 9 sc, dec, 5 sc (44)
Round 77 :
4 sc, dec, 11 sc, dec, 7 sc, dec, 11 sc, dec, 3 sc (40)
Round 78 :
2 sc, dec, 5 sc, dec, 6 sc, dec, 3 sc, dec, 6 sc, dec, 5 sc, dec, 1 sc (34)
Round 79 :
1 sc, dec, 2 sc, dec, 3 sc, dec, (2 sc, dec)*3 times, 3 sc, dec, 2 sc, dec, 1 sc (26)
Round 80 :
(1 sc, dec)*2 times, 2 sc, dec, (1 sc, dec)*3 times, 2 sc, dec, 1 sc, dec (18)
Round 81 :
(4 sc, dec)*3 times (15)
Round 82-83-84-85 :
15 sc (15)
Info :
Head instructions follow. Note: On while crocheting you should make sure that the marker stays in the center of the back of the head. For that you can crochet an extra sc if needed and move the marker.
— Head :
Round 3 :
(1 sc, inc)*6 times (18)
Round 4 :
1 sc, inc, (2 sc, inc)*5 times, 1 sc (24)
Round 5 :
(3 sc, inc)*6 times (30)
Round 6 :
2 sc, inc, (4 sc, inc)*5 times, 2 sc (36)
Round 7 :
(5 sc, inc)*6 times (42)
Round 8 :
3 sc, inc, (6 sc, inc)*5 times, 3 sc (48)
Round 9 :
(7 sc, inc)*6 times (54)
Round 10 :
4 sc, inc, (8 sc, inc)*5 times, 4 sc (60)
Round 22 :
17 sc, (inc, 1 sc)*5 times, 7 sc, (1 sc, inc)*5 times, 16 sc (70)
Round 27 :
(4 sc, dec)*3 times, 34 sc, (dec, 4 sc)*3 times (64)
Info :
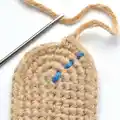
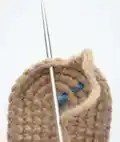
You can place the eyes between the 21th and 22th rounds. The distance between the eyes should be 12 stitches.
Round 29 :
(2 sc, dec)*16 times (48)
Round 30 :
3 sc, dec, (6 sc, dec)*5 times, 3 sc (42)
Round 31 :
(5 sc, dec)*6 times (36)
Round 32 :
2 sc, dec, (4 sc, dec)*5 times, 2 sc (30)
Round 33 :
(3 sc, dec)*6 times (24)
Round 34 :
1 sc, dec, (2 sc, dec)*5 times, 1 sc (18)
Round 35 :
(4 sc, dec)*3 times, slst (15)
Info :
Stuff the ball firmly and shape. Cut off the yarn leaving a long tail for sewing. Mark the place for the nose 2 rows down from the eyes. After finishing the nose have the needle exit at the top of the head, fix the thread well and hide its ends inside the head. Put some blusher on the toy’s cheeks. Place the head onto the body so that the eyes of the doll look forward. Sew the head to the neck with the end of yarn. You can also add some stuffing material in the neck to strengthen it before you finish sewing.
— Wig :
Info :
Use a 2mm crochet hook and mustard colored yarn. Crochet the wig in spiral rounds. Next, we need to crochet turning rows instead of rounds later for the hairline.
Round 3 :
(1 sc, inc)*6 times (18)
Round 4 :
1 sc, inc, (2 sc, inc)*5 times, 1 sc (24)
Round 5 :
(3 sc, inc)*6 times (30)
Round 6 :
2 sc, inc, (4 sc, inc)*5 times, 2 sc (36)
Round 7 :
(5 sc, inc)*6 times (42)
Round 8 :
3 sc, inc, (6 sc, inc)*5 times, 3 sc (48)
Round 9 :
(7 sc, inc)*6 times (54)
Round 10 :
4 sc, inc, (8 sc, inc)*5 times, 4 sc (60)
Round 13 :
(9 sc, inc)*6 times (66)
Round 14-15-16 :
66 sc (66)
Round 17 :
16 sc, inc, 32 sc, inc, 16 sc (68)
Round 21 :
33 sc, ch 1, turn (33) leave the remaining stitches unworked
Round 22 :
start in the third stitch from the hook skip (ch1 + 1 st), 66 sc ignore the marker at the beginning of the row, ch 1, turn (66)
Round 23 :
skip (ch1 + 1 st), 63 sc, ch 1, turn (63)
Round 24 :
skip (ch1 + 1 st), 60 sc, ch 1, turn (60)
Round 25 :
skip (ch1 + 1 st), 49 sc, 37 ch, start in third ch from hook, hdc in next 35 ch, sc in next 10 st, now we need to crochet along the edge of the turning rows "ladder": 3 sc, 1 slst, 37 ch, start in third ch from hook, hdc in next 35 ch, slst in the same st, 37 ch, start in third ch from hook, hdc in next 35 ch, slst in the next (tip) st, slst, 37 ch, start in third ch from hook, hdc in next 35 ch, slst in the same st, 37 ch, start in third ch from hook, hdc in next 35 ch, slst. Cut off and fix the yarn.
— Curl up the curls :
Info :
Make curled locks by crocheting chains and working into them to form spirals; attach curls to hairline and pin into place while assembling.
Section knot :
R 1: 6 sc in MR (6). R 2: 6 inc (12). R 3: (1 sc, inc)*6 times (18). R 4: 1 sc, inc, (2 sc, inc)*5 times, 1 sc (24). R 5: (3 sc, inc)*6 times (30). R 6: 2 sc, inc, (4 sc, inc)*5 times, 2 sc (36). R 7: (5 sc, inc)*6 times (42). R 8-12: 42 sc (42). R 13: (5 sc, dec)*6 times (36). R 14: FLO: ((1 sc, 1 dc, 1 sc) in one stitch), skip 1 stitch *18 times till the end of the row. In the end: sl st. Cut off the yarn, leaving the long end for sewing. Stuff balls.
— Flower :
Info :
Crochet 2 leaves. Use the 2,5 mm crochet hook and green colored yarn.
Round 1 (Leaves) :
5 ch and work starting from 2th st from the hook – 1 sc, 2 hdc, 1 sc, 5 ch, starting from 2th st from the hook - 1 sc, 2 hdc, 1 sc, sl st into the last loop of the first leaf ,5 ch, starting from 2th st from the hook - 1 sc, 2 hdc, 1 sc, sl st into the last loop of the first leaf. We leave the thread in order to tie it to the bunch.
Round 1 (Roses) :
Use the 2,5 mm crochet hook and red colored yarn. R 1: 6 sc in MR. Sew on the leaves.
— Dress :
Info :
Use the 2,5 mm crochet hook and light blue colored yarn. The dress is crocheted by turning the rows starting from the neck. Ch 33 and work starting from 2th st from the hook. Note: ch 1 and ch 2 at the beginning of the row, does not count as a stitch now and throughout. Crochet the first sc (or dc, hdc) of each round into the base of the ch.
Round 1 :
32 sc, turn the work (32)
Round 2 :
1 ch (does not count as st), 2 sc, inc, (3 sc, inc)*3 times, 2 sc, (inc, 3 sc)*3 times, inc, 2 sc, turn the work (40)
Round 3 :
1 ch, 3 sc, inc, (4 sc, inc)*3 times, 2 sc, (inc, 4 sc)*3 times, inc, 3 sc, turn the work (48)
Info :
In the 4rd row crochet all sc into the back loop of the stitch.
Round 4 :
1 ch, 4 sc, inc, (5 sc, inc)*3 times, 2 sc, (inc, 5 sc)*3 times, inc, 4 sc, turn the work (56)
Round 5 :
1 ch, 8 sc, 4 ch, (skip 12 sc), 16 sc, 4 ch, (skip 12 sc), 8 sc, turn the work (40)
Round 6-8 :
40 sc, turn (40)
Info :
Cut off the light blue. Attach the coral yarn. In the 9rd row crochet all sc into the back loop of the stitch.
Round 9 :
2 ch, 40 inc dc, turn the work (80)
Round 10 :
2 ch, (2 dc, inc)*26 times, 2 dc, turn the work (106)
Info :
Work in joined rounds. From this point we start crocheting in the round.
This Doll Eliza pattern brings a handcrafted classic toy to life with sweet details and a layered wardrobe. Whether you make her as a gift or a keepsake she will carry a little story in every stitch. Make one in the suggested colors or change yarns to personalize her look — she’s a delight to make and to love. 🧶🧵