🧢 Beautiful ✨ Detailed πŸ’ Adorable

Donut Amigurumi Pattern

Donut Amigurumi Pattern
4.1β˜… Rating
2-3 Hours Time Needed
3.6K Made This
βœ‚οΈ

Beginner Friendly Level

Perfect for those just starting their crochet journey, with clear instructions and simple techniques

⏱️

Bite-Sized Project

Finishes in 2-4 hoursβ€”perfect for an afternoon of creative relaxation.

🎁

Tiny Treasure

Small, sweet, and gift-worthy creations that fit perfectly in the palm of your hand with detailed charm.

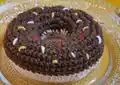
About This Donut Amigurumi Pattern

This simple amigurumi pattern creates a small crocheted donut with a separate frosting/topping and embroidered sprinkles. It uses basic single crochet rounds and simple increases to shape the donut, making it ideal for beginners. The finished donut is a sweet, decorative toy or display piece that you can personalize with color choices and sprinkle details.

Donut Amigurumi Pattern crochet pattern - detailed view of completed project

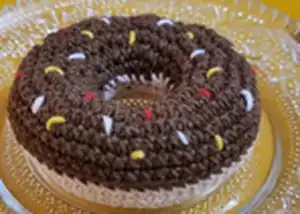
You will make a beige base and a brown (or any color) frosting/top, then join them with BLO slip stitches. The pattern encourages small custom touches, like different sprinkle colors and yarn combinations.

Why You'll Love This Donut Amigurumi Pattern

I absolutely love this pattern because it is quick to make and endlessly customizable, perfect for small gifts and practice projects. I enjoy how fast the rounds come together and how satisfying the assembly is when the two pieces are joined. The design is forgiving, so I can experiment with different yarn colors and sprinkle styles without worrying about perfection. Sharing these little handmade donuts always brings a smile, and I love seeing how others personalize theirs.

Donut Amigurumi Pattern step 1 - construction progress Donut Amigurumi Pattern step 2 - assembly progress Donut Amigurumi Pattern step 3 - details and accessories Donut Amigurumi Pattern step 4 - final assembly and finishing

Switch Things Up

I love customizing this donut by changing the frosting color; try pastel shades for a soft look or bright candy colors for a playful result.

I often switch yarn weight and hook size to make a whole set of donuts in different sizes β€” bulky yarn makes a chunky plush version while sport weight keeps it small and neat.

I like to add different types of sprinkles: embroidery with short yarn pieces, tiny French knots, or small beads for a bit of sparkle.

If I want a keychain, I add a short chain and a sturdy stitch at the top before closing the donut to make it portable.

I sometimes embroider a little face on the frosting for a kawaii-style donut β€” eye placement and expression change the personality entirely.

Use felt for sprinkles or toppings if you prefer a flat, more graphic look; glue or stitch them on after assembly.

To create a filled dessert set, I pair this donut with a small crocheted cup or plate using the same yarn palette for cohesion.

I suggest trying a variegated yarn for the frosting to get subtle color shifts that look like glaze swirls without changing yarn mid-project.

For a more realistic donut, lightly stuff the center and pinch slightly before closing to create a crisper ring shape.

If I want sturdier play items, I use tighter tension and smaller hooks to make the stitches dense and durable for handling.

Common Mistakes & How to Fix Them

βœ— Not making a long enough tail when starting the base; make a long tail of about 15 cm as instructed to ensure you have enough yarn for sewing later. βœ— Forgetting to count stitch increases on each round which causes mismatched shaping; count after every round and follow the given stitch totals for each round. βœ— Cutting the frosting yarn too early and losing the working tail; follow the note about leaving or cutting the tail exactly as directed so you have the correct length for attachment. βœ— Understuffing or overstuffing the donut can distort the shape; stuff gradually and check the shape as you join the outside until the recommended stitch count is reached.

Donut Amigurumi Pattern

Make a delightful crocheted donut with frosting and colorful sprinkles that is perfect for gifting or decorating. This beginner-friendly pattern walks you through simple rounds to create both the donut base and a separate frosting/top. You'll learn basic increases, working in the round, and a neat finish using BLO slip stitches to join the layers. Enjoy a quick, satisfying make that results in a charming handmade treat.

Beginner Friendly 2-3 Hours

Materials Needed for Donut Amigurumi Pattern

β€” Main Fabric

  • 01
    Sport/Fine Yarn (4 Ply) - main beige color for base (Alize Cotton Gold - beige recommended)
  • 02
    Sport/Fine Yarn (4 Ply) - brown for frosting (YarnArt Jeans - brown recommended)
  • 03
    Assorted small amounts of colored yarns for sprinkles (various colors)
  • 04
    Polyester Fiberfill for stuffing

β€” Tools Required

  • 01
    Crochet Hook : 3 mm
  • 02
    Stitch marker
  • 03
    Yarn Needle/Tapestry Needle
  • 04
    Polyester Fiberfill

Progress Tracker

0% Complete

β€” Materials :

Infos :

Yarn : Sport/Fine Yarn/4 Ply Weight Yarn. I used Alize Cotton Gold-Beige Colour and YarnArt Jeans-Brown Colour (55 % Acrylic, 45 % Cotton). Some colours of yarn for sprinkles. Crochet Hook : 3 mm. Stitch marker. Yarn Needle/Tapestry Needle. Polyester Fiberfill.

β€” Abbreviations :

Infos :

Ch:Chain. Sl: slip stitch. Sc: single crochet. Inc: increase. BLO: Back Loop Only.

β€” Difficulty :

Info :

Difficulty: Easy/Beginner

β€” DONUT BASE :

Info :

Start with BEIGE YARN, make a long tail about 15 cm and start with 20 chain

Round 1 :

sc 20 in the chain (20)

Round 2 :

(sc, inc) x 10 (30)

Round 3 :

(2 sc, inc) x 10 (40)

Round 4 :

(3 sc, inc) x 10 (50)

Round 5 :

(4 sc, inc) x 10 (60)

Round 6-8 :

Sc around

Info :

Sl, leave a long tail for sewing

β€” DONUT FROSTING / TOPPING :

Info :

Make same with BROWN (ANY COLOUR) YARN but no need give a long tail (sl and cut the yarn)

Round 1 :

sc 20 in the chain (20)

Round 2 :

(sc, inc) x 10 (30)

Round 3 :

(2 sc, inc) x 10 (40)

Round 4 :

(3 sc, inc) x 10 (50)

Round 5 :

(4 sc, inc) x 10 (60)

Round 6-8 :

Sc around

Info :

Sl, cut the yarn

Info :

With yarn Needle attach colours yarn as the sprinkles.

β€” ATTACHMENT :

Step 1 :

First attach the inner of donuts (base and frosting/topping) using the long tail of yarn with slip stich (20).

Step 2 :

Then attach the outside (base and top side): slip stitch donut base with frosting (BLO frosting/top base) until 50 stitch, then fill the polyfill.

Step 3 :

Then slip stitch all until done (60).

Assembly Instructions

  • Attach the inner parts of the donuts (base and frosting/topping) first using the long tail of the base with slip stitch for 20 stitches to secure the inner ring.
  • Attach the outside by slip stitching the donut base to the frosting/top in BLO (back loop only) until you reach 50 stitches, then add polyester fiberfill to the donut hole and body.
  • After stuffing, continue slip stitching the remaining rounds until you complete 60 stitches and the donut is fully closed and secure.
  • Use a yarn needle to embroider or tack small strands of colored yarn onto the frosting as sprinkles, spacing them evenly around the top.
  • Weave in all tails and tuck ends neatly into the body so they are hidden and secure before final trimming.

Important Notes

  • πŸ’‘Make a long tail of about 15 cm when starting the base so you have enough yarn to sew the inner rings together later.
  • πŸ’‘When joining the frosting and base use BLO (back loop only) for the frosting/top to create a neat ridge and secure attachment.
  • πŸ’‘Stuff the donut when prompted (after reaching around 50 stitches) to ensure an even, rounded shape without overfilling.

This cute donut pattern is a delightful, quick make that brightens any shelf or gift box. 🍩 Customize colors and sprinkles to match your style for a playful, handmade treat. 🧢 Share your creations and tag the designer to spread the handmade joy!

You ask,

we answer.

FAQs

What size will the finished piece be?

The finished donut size will vary by yarn and hook, but using sport/fine yarn and a 3 mm hook yields a small palm-sized donut ideal for display or play.

Can I use different yarn weights for this pattern?

Yes, you can use different yarn weights but this will change the final size; adjust your hook accordingly and expect a larger donut with thicker yarn.

Do I need prior crochet experience for this pattern?

This pattern is beginner friendly and requires basic single crochet and increases; familiarity with working in the round and slip stitch is helpful.

How long does this project typically take to complete?

Most crocheters can finish this small donut in 2-3 hours, though time may vary depending on experience and customization choices.