🧢 Beautiful ✨ Detailed πŸ’ Adorable

Groot with Headphones and Audio Player Amigurumi Pattern

Groot with Headphones and Audio Player Amigurumi Pattern
4.2β˜… Rating
12-15 Hours Time Needed
3.3K Made This
βœ‚οΈ

Intermediate Level

Ideal for those with basic knitting experience, featuring slightly more advanced stitches and techniques to expand your skills.

⏱️

Slow & Steady

A 10-12 hour projectβ€”great for savoring the process over several sessions.

🧸

Cute Companion

An adorable friend to cherish, handcrafted with love to bring comfort and joy for years to come.

About This Groot with Headphones and Audio Player Amigurumi Pattern

This Groot amigurumi pattern brings everyone's favorite tree guardian to life in the most adorable way possible. The pattern includes detailed instructions for creating not just Groot himself, but also his iconic headphones, trendy glasses, cozy plaid blanket, and even a retro audio player with cassette. Every element is carefully designed to capture Groot's gentle nature and love for music. The pattern uses multiple colors and techniques to create realistic textures and details that make this piece truly special.

Groot with Headphones and Audio Player Amigurumi Pattern crochet pattern - detailed view of completed project

What sets this pattern apart is the incredible attention to detail - from the embroidered eyebrows to the tiny alien companion that comes with the audio player. The finished piece becomes both a cuddly toy and a display-worthy collectible that any Marvel fan would treasure.

Why You'll Love This Groot with Headphones and Audio Player Amigurumi Pattern

I absolutely love how this pattern combines the beloved character of Groot with modern accessories that give him so much personality! The way the headphones sit perfectly on his branchy crown and how the little glasses add such character to his sweet face never fails to make me smile. What I find most rewarding is watching Groot come to life as you add each accessory - the plaid blanket gives him such a cozy, homey feel, and that retro audio player with its tiny details is just pure magic. The pattern is challenging enough to keep you engaged but not overwhelming, making it perfect for expanding your amigurumi skills while creating something truly special.

Groot with Headphones and Audio Player Amigurumi Pattern step 1 - construction progress Groot with Headphones and Audio Player Amigurumi Pattern step 2 - assembly progress Groot with Headphones and Audio Player Amigurumi Pattern step 3 - details and accessories Groot with Headphones and Audio Player Amigurumi Pattern step 4 - final assembly and finishing

Switch Things Up

I love how this pattern gives you so many opportunities to make it uniquely yours! While the traditional brown and green Groot is classic, I've experimented with making him in different seasonal colors - imagine a autumn Groot in gorgeous oranges and reds, or even a winter wonderland version in whites and silvers.

The accessories are where you can really let your creativity shine. I've made versions where Groot has different styles of headphones - some with fun patterns, others in metallic yarns that catch the light beautifully. The plaid blanket is another area where you can go wild - try stripes, polka dots, or even work in some sparkly thread for extra magic.

What I find most exciting is personalizing the audio player. You could make it look like a modern device instead of retro, or add tiny crocheted earbuds instead of big headphones. I've even seen makers add tiny crocheted phones or tablets to make Groot a true tech-savvy guardian. The little alien companion is perfect for experimenting with unusual color combinations too - who says aliens have to be gray?

Common Mistakes & How to Fix Them

βœ— Forgetting to stuff sections properly before closing, which can result in a floppy or misshapen Groot βœ— Not securing eye placement correctly before fastening, leading to uneven or crooked facial expressions βœ— Rushing through color changes without properly securing threads, causing loose ends and color bleeding βœ— Skipping the back loop only instructions which are crucial for creating the proper texture and crown detail

Groot with Headphones and Audio Player Amigurumi Pattern

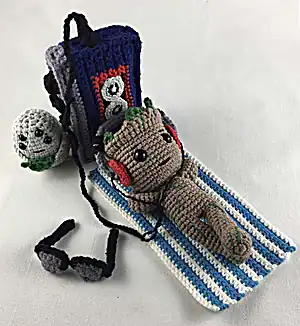
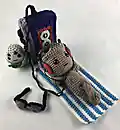
Create your very own adorable Groot from Guardians of the Galaxy with this detailed amigurumi pattern! This charming tree character comes complete with trendy headphones, stylish glasses, and a retro audio player that will melt hearts everywhere. Perfect for Marvel fans and crochet enthusiasts alike, this pattern combines classic amigurumi techniques with fun modern accessories. The finished Groot stands proudly with his signature branches and sweet expression, ready to groove to his favorite tunes. Whether you're making this as a gift for a superhero lover or adding to your own collection, this pattern delivers both charm and personality in every stitch.

Intermediate 12-15 Hours

Materials Needed for Groot with Headphones and Audio Player Amigurumi Pattern

β€” Main Fabric

  • 01
    Yarn in brown, green, red, black, blue, gray, light gray, white, and azure colors (55% cotton + 45% acrylic, 180yds/1.76oz) (#2 fine weight)
  • 02
    Cotton acrylic blend recommended for durability and washability

β€” Tools Required

  • 01
    Crochet hook 2.5mm
  • 02
    Crochet hook 1.40mm (for smile detail)
  • 03
    Two 9mm black plastic safety eyes
  • 04
    Four 6mm plastic safety eyes
  • 05
    Needle for sewing
  • 06
    Scissors
  • 07
    Polyester fiberfill stuffing
  • 08
    Stitch markers

Progress Tracker

0% Complete

β€” Legs :

Round 1 :

6sc in MR

Round 2 :

6inc (12)

Round 3 :

12sc BLO (12)

Rounds 4-5 :

12sc (2 rows)

Round 6 :

dec, 4sc, dec, 4sc (10)

Round 7 :

dec, 8sc (9)

Rounds 8-14 :

9sc (7 rows)

Round 15 :

8sc, slst

Info :

Do not forget to fill with stuffing while knitting. Do not cut threads from second leg, continue to knit body.

β€” Body :

Round 16 :

2ch, attach first leg 9sc, 2sc by ch, 9sc on second leg, 2sc by ch (22)

Rounds 17-25 :

22sc (9 rows)

Round 26 :

(3sc, dec)*4, 2sc (18)

Round 27 :

(1sc, dec)*6 (12)

Round 28 :

12sc

Info :

Continue stuffing while knitting. Continue to knit head.
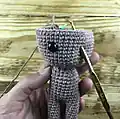
β€” Head :

Round 29 :

12inc (24)

Round 30 :

(1sc, inc)*12 (36)

Rounds 31-32 :

36sc (2 rows)

Round 33 :

(5sc, inc)*6 (42)

Rounds 34-41 :

42sc (8 rows)

Info :

Insert eyes in row 37, 5sc between eyes. Check positioning before securing.

Round 42 :

(5sc, dec)*6 BLO (36)

Round 43 :

(4sc, dec)*6 (30)

Round 44 :

(3sc, dec)*6 (24)

Round 45 :

(2sc, dec)*6 (18)

Round 46 :

(1sc, dec)*6 (12)

Round 47 :

6dec

β€” Crown :

Round 43 :

Return to row 42 FLO, 2ch, 42hdc, slst (42)

Round 44 :

ch, 11sc, 4hdc, 6dc, 2ch, slst into next stitch, 2ch, 3dc, 1hdc, 16sc, slst (41)

Green Branches :

Insert green thread in 17th loop of row 44: 2ch, 2dc, 1hdc

Second Branch :

Insert thread in 22nd loop: 2ch, 1hdc, 1sc

Third Branch :

Insert thread in 29th loop: 2ch, 1hdc, 1sc

β€” Arms :

Round 1 :

5sc in MR

Round 2 :

5sc

Round 3 :

inc, 4sc (6)

Round 4 :

6sc

Round 5 :

inc, 5sc (7)

Round 6 :

7sc

Round 7 :

inc, 6sc (8)

Rounds 8-14 :

8sc (7 rows)

Round 15 :

Fold edges together and knit 3sc

Info :

Fill lower part to row 8, fold and hold row 8 to fill upper part. Sew arms to row 26.

β€” Smile :

Pattern :

Using thinnest thread with 1.40mm hook: 5ch. Sew in row 33.

β€” Headphones :

Round 1 :

6sc in MR

Round 2 :

Change to red, 6inc (12)

Round 3 :

(1sc, inc)*6 (18)

Round 4 :

18sc

Round 5 :

(1sc, dec)*6 (12)

Round 6 :

6dec

β€” Headphone Band :

Row 1 :

33ch, turn

Row 2 :

32sc, ch, turn (32)

Row 3 :

32sc

Info :

Fold first row to third and sew along entire length. Attach to headphones and head.

β€” Glasses :

Lenses (4 pieces) :

Row 1: 7ch, turn. Row 2: 6sc, ch, turn (6). Row 3: skip first stitch, 4sc, slst, ch, turn (4). Row 4: skip first stitch, 2sc, slst, ch, turn (2). Row 5: skip first stitch, 1sc

Lens Assembly :

Fold two lenses together, insert black thread: ch, 2slst, 6sc, 2slst

Eyeglass Arms (2 pieces) :

23ch, turn; 22sc. Fold in half and sew.

β€” Plaid Blanket :

Row 1 :

41ch, turn

Rows 2-25 :

40sc alternating white and azure every 2 rows, ch, turn (40)
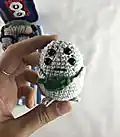
β€” The Alien :

Round 1 :

6sc in MR

Round 2 :

6inc (12)

Round 3 :

(1sc, inc)*6 (18)

Round 4 :

(2sc, inc)*6 (24)

Round 5 :

(3sc, inc)*6 (30)

Rounds 6-16 :

30sc (11 rows)

Round 17 :

(3sc, dec)*6 (24)

Round 18 :

24sc

Round 19 :

(2sc, dec)*6 (18)

Round 20 :

(1sc, dec)*6 (12)

Round 21 :

6dec

Info :

Place first pair of eyes in row 16, 4sc between. Place second pair in row 18, 2sc between.

β€” Alien Arms :

Pattern :

7ch, turn; 2slst, 4sc (6). Sew to rows 12-13.

β€” Alien Legs :

Pattern :

5ch, turn; 4sc. Sew to row 2.

β€” Leaf :

Pattern :

7ch, turn; 1sc, 1hdc, 2sc, 2slst, 1ch, 2slst, 1sc, 2hdc, 1slst, 2ch (15)

β€” Audio Player :

Detail 1 :

26ch, turn. Rows 2-3: 25sc blue. Row 4: 4sc blue, 13sc red, 8sc blue. Rows 5-10: Create screen pattern with blue, red, and black. Rows 11-14: Blue. Rows 15-16: Gray.

Detail 2 :

26ch, turn. Rows 2-14: 25sc blue. Rows 15-16: Gray.

Detail 3 :

26ch, turn. Rows 2-4: 25sc blue.

Detail 4 :

26ch, turn. Rows 2-4: 25sc gray.

Detail 5 (2 pieces) :

4ch, turn. Rows 2-14: 3sc blue. Rows 15-16: Gray.

β€” Buttons :

Small Buttons (3 pieces) :

3ch, turn; inc, 3sc in one stitch, 1sc (6); 6sc BLO, slst (6)

Big Button :

4ch, turn; inc, 1sc, 4sc in one stitch, inc (9); 9sc BLO, slst (9)

β€” Cassette (2 pieces) :

Round 1 :

5sc in MR

Round 2 :

Change to black, 5inc (10)

Round 3 :

Change to light gray, (1sc, inc)*5 (15)

Round 4 :

(2sc, inc)*5 (20)

β€” Plug :

Round 1 :

6sc in MR

Round 2 :

6sc BLO (6)

Rounds 3-4 :

6sc (2 rows)

Round 5 :

BLO dec, 1sc, dec, 1sc (4)

Round 6 :

4sc

Info :

Fill plug, fold edges and connect with slip stitch, then chain 70ch for cord.

Assembly Instructions

  • Sew arms to body at row 26, ensuring they are positioned symmetrically and securely attached.
  • Embroider eyebrows using divided yarn threads, creating natural-looking branch texture above the eyes.
  • Attach smile in row 33 using the thinnest black thread for a delicate, sweet expression.
  • Embroider green decorations on Groot's body using single threads for thin, realistic branch details.
  • Attach headphones to head, then sew headphone band connecting both sides securely.
  • Position glasses carefully on face and attach eyeglass arms for a perfect fit.
  • Assemble audio player by linking all details together with single crochet, stuffing before finishing.
  • Sew all buttons to the gray side of the audio player, positioning them as shown in pattern images.
  • Attach cassette pieces to audio player and connect plug with 70-chain cord to headphones.

Important Notes

  • πŸ’‘Use stitch markers to keep track of rounds, especially during complex color changes in accessories
  • πŸ’‘Stuff all pieces firmly but not too tightly to maintain proper shape and allow for easy assembly
  • πŸ’‘When working with multiple colors, secure thread ends properly to prevent unraveling during use
  • πŸ’‘Position safety eyes carefully before securing - check alignment from multiple angles first
  • πŸ’‘Take your time with the embroidered details as they bring Groot's personality to life
  • πŸ’‘Test fit all accessories before final attachment to ensure proper proportions and positioning

This enchanting Groot amigurumi pattern captures the beloved Guardian of the Galaxy in his most adorable form, complete with all his favorite accessories! From his trendy headphones to his cozy plaid blanket, every detail has been lovingly crafted to bring out Groot's gentle personality and love for music. The pattern includes not just Groot himself, but also his tiny alien companion and retro audio player, creating a complete scene that tells a story. Whether you're a Marvel fan or simply love detailed amigurumi projects, this pattern offers the perfect blend of challenge and charm that will keep you engaged from start to finish. 🧢 Happy crocheting! 🧡✨

You ask,

we answer.

FAQs

What skill level is required for this pattern?

This is an intermediate level pattern that requires knowledge of basic crochet stitches, color changes, and some embroidery techniques. Previous amigurumi experience is helpful.

How big will the finished Groot be?

The finished Groot measures approximately 8-10 inches tall depending on your tension and hook size, perfect for display or cuddling.

Can I use different colors than specified?

Absolutely! While the pattern specifies traditional Groot colors, you can customize the accessories in any colors you prefer to create your unique version.

Are the accessories removable?

The headphones and glasses can be made removable if you prefer, though the pattern instructions show them as sewn-on for security.

What's the most challenging part of this pattern?

The audio player assembly with its multiple colored sections and small details requires the most attention, but detailed step-by-step instructions make it manageable.

Can I make this pattern child-safe?

Yes! Use embroidered eyes instead of safety eyes for very young children, and ensure all small parts are securely attached.