Make a colorful, cuddly panda with this detailed amigurumi pattern. You will work simple amigurumi techniques and finish with sewn-on features and bright accent pieces. Perfect for gifting or decorating, the pattern includes step-by-step rounds, assembly instructions, and helpful tips to guide you through each stage. Enjoy creating a unique handmade friend full of personality.
Progress Tracker
0% Complete
— Pattern Details :
Info :
Size: 16 inches from bottom to top of head with weight 6 yarn and a 3.75 mm hook
Info :
Skill Level Needed: Intermediate- suitable for novice crocheters, requires patience and precisions when assembling the panda and basic crochet skills.
Info :
Contact Info: If you have any questions or concerns about this pattern, please do not hesitate to contact me. I will get back to you within 24 hours. sweetoddityart@gmail.com https://www.etsy.com/shop/sweetoddityart
Info :
Materials Needed: Yarn: Worsted Weight #6, approximately 150g of main color and 50g of accent colors. Color A: White, Color B: Pink, Color C: Green, Color D: Blue, Color E: Orange, Color F: Purple, Color G: Black. Hook Size: F hook or 3.75 mm. 23 mm safety eyes, 24 mm safety nose. Scissors, sewing needle, stitch marker, fiberfill stuffing.
Info :
Abbreviations: mr= magic ring, ch= chain, sc= single crochet, sl= slip stitch, dc= double crochet, inc= increase, dec=decrease, BLO= back loops only, F/O= Fasten off, hdc= half double crochet, bob= bobble stitch, FLO= front loops only, inc3= 3 sc in the same stitch
Info :
Notes: Do not join rounds unless stated, work in a continuous spiral. Use a stitch marker to mark the beginning of each round. All stitches are worked in both loops unless stated otherwise in the pattern.
— Eye Patches :
Round 1 :
Make 6 sc into a magic ring= 6
Round 2 :
Increase in each st around= 12
Round 3 :
(inc x 3, 3 sc) x 2= 18
Round 4 :
((sc, inc) x 3, 3 sc) x 2= 24
Info :
F/O and leave a long tail for sewing. Place the safety eyes after the 2nd increase, between rounds 1 and 2.
— Head :
Info :
Crocheted from top of head to bottom. With Color A: Ch 6
Round 1 :
sc in 2nd ch from hook, 4 sc, inc3 in last chain, working on the opposite side of the chain: 3 sc, inc= 12
Round 2 :
inc, 3 sc, inc x 3, 3 sc, inc x 2= 18
Round 3 :
(2 sc, inc) x 6= 24
Round 4 :
(3 sc, inc) x 6= 30
Round 5 :
(4 sc, inc) x 6= 36
Round 6 :
(5 sc, inc) x 6= 42
Round 7 :
(6 sc, inc) x 6= 48
Round 8-14 :
sc in each st around
Info :
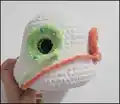
(In round 15: Mark the 1st sc and last sc of your first 12 sc worked in between your increases.) The picture is to show you where the eyes go without the patches in the way.
Round 15 :
((sc, inc) x 3, 12 sc, (inc, sc) x 3)) x 2= 60
Round 16 :
((2 sc, inc) x 2, 18 sc, (inc, 2 sc) x 2)) x 2= 68
Round 17-20 :
sc in each st around
Info :
Place eyes and eye patches between rounds 12 and 13 above the stitch markers. The eyes will be 10 holes apart. Stuff the head as you work.
Round 21 :
Dec x 6, 10 sc, dec x 10, 18 sc, dec x 4= 48
Round 22 :
(6 sc, dec) x 6= 42
Round 23 :
(5 sc, dec) x 6= 36
Round 24 :
(4 sc, dec) x 6= 30
Round 25 :
(3 sc, dec) x 6= 24
Info :
F/O the head. Sew the eye patches onto the head.
— Body :
Info :
Starting with Color A:
Round 1 :
Make 12 sc into a magic ring= 12
Round 2 :
(sc, inc) x 6= 18
Round 3 :
(2 sc, inc) x 6= 24
Round 4 :
(3 sc, inc) x 6= 30
Round 5 :
(4 sc, inc) x 6= 36
Round 6 :
(5 sc, inc) x 6= 42
Round 7 :
(6 sc, inc) x 6= 48
Round 8 :
(7 sc, inc) x 6= 54
Round 9-15 :
sc in each st around
Round 16 :
15 sc, (dec, 2 sc) x 3, 15 sc, (dec, 2 sc) x 3= 48
Round 17 :
sc in each st around
Round 18 :
(6 sc, dec) x 6= 42
Round 19-20 :
sc in each st around
Round 21 :
(5 sc, dec) x 6= 36
Info :
Start stuffing the body
Round 22 :
sc in each st around
Round 23 :
sc in each st around
Round 24 :
(4 sc, dec) x 6= 30
Round 25-26 :
sc in each st around
Round 27 :
(3 sc, dec) x 6= 24
Round 28 :
sc in each st around
Info :
F/O and leave a long tail for sewing
— Arms :
Info :
Make 1 in Color C, 1 in Color B
Round 1 :
Make 6 sc into a magic ring= 6
Round 2 :
Increase in each st around= 12
Round 3 :
(sc, inc) x 6= 18
Round 4 :
(2 sc, inc) x 6= 24
Round 5 :
4 sc, (Color G: bob, Color C: sc) x 3, 14 sc
Round 6 :
Sc in each st around
Round 7 :
(dec, 10 sc) x 2= 22
Round 8 :
(dec, 9 sc) x 2= 20
Info :
Start stuffing the arms
Round 9 :
(dec, 8 sc) x 2= 18
Info :
Do not stuff the arms any more
Round 10 :
Sc in each st around
Round 11 :
(dec, 7 sc) x 2= 16
Round 12 :
Sc in each st around
Round 13 :
(dec, 6 sc) x 2= 14
Round 14 :
Sc in each st around
Round 15 :
(dec, 5 sc) x 2= 12
Round 16 :
Sc in each st around
Info :
Work a sc, fold the arms in half and sc the opening closed. F/O and leave a long tail for sewing
— Ears :
Info :
Make 1 in Color B, 1 in Color D
Round 1 :
Make 6 sc into a magic ring= 6
Round 2 :
Increase in each st around= 12
Round 3 :
(sc, inc) x 6= 18
Round 4 :
(2 sc, inc) x 6= 24
Round 5 :
sc in each st around
Info :
Do not stuff the ears
Round 6 :
(2 sc, dec) x 6= 18
Round 7 :
(sc, dec) x 6= 12
Info :
Fold the ears in half and sc the opening closed. F/O and leave a long tail for sewing
— Muzzle :
Round 1 :
Make 6 sc into a magic ring= 6
Round 2 :
Increase in each st around= 12
Round 3 :
(sc, inc) x 6= 18
Round 4 :
sc, inc, (2 sc, inc) x 5, sc= 24
Round 5 :
sc in each st around
Info :
Place the safety nose in between rounds 2 and 3. F/O and leave a long tail for sewing
— Tail :
Round 1 :
Make 6 sc into a magic ring= 6
Round 2 :
Increase in each st around= 12
Round 3 :
(sc, inc) x 6= 18
Round 4 :
Sc in each st around
Round 5 :
(sc, dec) x 6= 12
Info :
Start stuffing the tail
Info :
F/O and sew the tail closed. Leave a long tail for sewing
— Legs :
Info :
Make 1 in Color E and 1 in Color F. Starting with Color G:
Round 1 :
Make 6 sc into a magic ring= 6
Round 2 :
Increase in each st around= 12
Info :
Change to Color E or F:
Round 3 :
(sc, inc) x 6= 18
Round 4 :
(2 sc, inc) x 6= 24
Round 5 :
3 sc, inc, (Color E or F: 3 sc, Color G: inc) x 3, Color E or F: (3 sc, inc) x 2= 30
Round 6 :
(4 sc, inc) x 6= 36
Round 7-8 :
sc in each st around
Round 9 :
10 sc, (2 sc, dec) x 4, 10 sc= 32
Round 10 :
10 sc, (sc, dec) x 4, 10 sc= 28
Round 11 :
10 sc, dec x 4, 10 sc= 24
Info :
Start stuffing the legs
Round 12 :
(dec, 10 sc) x 2= 22
Round 13 :
sc in each st around
Round 14 :
(dec, 9 sc) x 2= 20
Round 15 :
sc in each st around
Info :
F/O and leave a long tail for sewing
— Assembly :
Info :
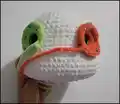
Head/Body/Ears/Muzzle: 1. If you want a needle sculpted look: Place a pin on the center of the head in between rounds 22 and 23. Thread your needle with a strand of yarn. (Any color yarn will work) Insert the needle into the hole on the bottom of the head. Bring the needle up to a corner on the bottom of an eye. Insert the needle into another hole next to that one and bring it through the head to a hole on the bottom of the opposite eye. Insert the needle into a hole next to that one and bring the needle down to the pinned spot. Insert the needle in another hole next to that one. Repeat this about 2 more times like a triangle pulling slightly to indent the eyes and make a little mouth.
Info :
2. Pin the muzzle onto the head in between the eyes. You may need to add more stuffing as you sew.
Info :
3. Sew the head and body together. You may need to add more stuffing before you close the head and body together.
Info :
Arms: 1. Pin the arms to the sides of the body approximately between rounds 26 and 27. 2. Sew the arms onto the body.
Info :
Legs: 1. Pin the legs onto the front of the body. 2. Sew the legs onto the body.
Info :
You have your finished panda bear! Thank you for your purchase! If you have any questions or concerns please email me at sweetoddityart@gmail.com or etsy convo me. I will get back to you asap. Please share your finished panda with me as often as you want! I love seeing them!
— Helpful Tips :
Info :
Exact Colors Used: All colors are Premier Parfait Turquoise Mango Iris White Hibiscus Key Lime. Eyes can be found at nightmarestitchery.com
Info :
You can use different eye sizes. You might have to adjust the placements if you change the sizes. You can use different hook sizes and weights of yarn. It will just change the size of your panda and you might need to adjust eye and nose placement. How you stuff matters! The type of stuffing you use, how you stuff, all this matters on how your panda turns out. I prefer Polyfil stuffing but you can use other types.
This colorful Dottie panda is designed to bring a smile and a pop of color to your handmade collection. Follow each round and the assembly photos to create a polished, cuddly friend you will love to display or gift. Thank you for supporting small designers — enjoy stitching and sharing your creation! 🧶🐼✨