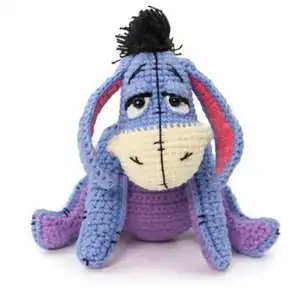
Make a sweet, squeezable Dreamy Donkey with this step-by-step crochet pattern. You will find clear instructions for every piece, from eye-whites to legs, plus assembly tips to bring your donkey to life. Perfect for crafting a thoughtful handmade gift or a charming addition to your amigurumi collection. Follow the photos and notes to achieve adorable results.
Progress Tracker
0% Complete
— Eye-white :
Info :
*white semi-cotton yarn, 2 mm hook (for a bigger donkey use 0,5-1 mm larger hook)
Round 0 :
Chain 4 (foundation)
Round 1 :
(start in the 2nd chain from the hook) 2 SC, 4 SC into the last chain from the hook, on the other side: SC, SS (8)
Info :
Join the oval with SS in the first St of a round. Fix the thread, leave a long ending for sewing and withdraw it to the wrong side. Insert the eyes so that they are offset to the centre (don't fix the cap, if it is available in the kit).
— Eyelid :
Info :
*blue semi-cotton yarn, 2 mm hook (you may use a larger hook size if the eyelids are small for the eyes)
Info :
Tighten the ring not to the end, so that the stitches are located along the semicircle (see photo). Fix the thread and leave a long ending for sewing.
— Head :
Info :
*start working with ivory semi-cotton thread, 2 mm hook. *stuff in process
Round 0 :
Chain 6 - work in spiral (without a turning CH and SS) as in all amigurumi toys (oval-shape detail)
Round 1 :
(start in the 2nd chain from the hook) 4 SC, 3 SC into the last chain from the hook; on the other side of the chain: 3 SC, INC (12)
Round 2 :
INC, 3 SC, 3 INC, 3 SC, 2 INC (18)
Round 3 :
SC, INC, 3 SC, (SC, INC)*3, 3 SC, (SC, INC)*2 (24)
Round 4 :
2 SC, INC, 3 SC, (2 SC, INC)*3, 3 SC, (2 SC, INC)*2 (30)
Round 5 :
3 SC, INC, 3 SC, (3 SC, INC)*3, 3 SC, (3 SC, INC)*2 (36)
Round 6 :
4 SC, INC, 3 SC, (4 SC, INC)*3, 3 SC, (4 SC, INC)*2 (42)
Info :
Next, we need to align the crocheting with the initial round (if required) so that the round begins exactly on the side of the oval; for this purpose we move the stitch marker one St above the line of the initial chain (see photo).
Info :
In Round 8 we make an extension (increases) for a smile; to do it - work 3 SC in one front loop; attach additional stitch marker to back loops - so not to miss them, because we are going to make a smile tightening with the help of these back loops further in Round 13.
Round 8 :
(20 SC, 3 SC in one front loop)*2 (46)
Round 9-10 :
2 rounds 46 SC
Round 11 :
(21 SC, DEC)*2 (44)
Round 12 :
(20 SC, DEC)*2 (42)
Info :
Change the color to blue.
Round 13 :
2 SC, DEC, 13 SC, DEC, SC, SC together with the back loop from Round 8, 20 SC, SC together with the back loop from Round 8 (40)
Info :
In Round 13 make a smile tightening with the help of back loops from Round 8.
Round 14 :
2 SC, DEC, 11 SC, DEC, 23 SC (38)
Round 15 :
2 SC, DEC, 9 SC, DEC, 23 SC (36)
Round 16 :
2 SC, DEC, 7 SC, DEC, 23 SC (34)
Round 17 :
2 SC, DEC, 5 SC, DEC, 23 SC (32)
Round 18 :
5 SC, INC, 26 SC (33)
Round 19-23 :
5 rounds 33 SC
Info :
If you use plastic eyes with caps, insert them at this stage between Rounds 18 and 19 at the distance of 4-6 SC.
Round 24 :
(9 SC, DEC)*3 (30)
Round 25 :
(3 SC, DEC)*6 (24)
Round 26 :
(2 SC, DEC)*6 (18)
Round 27 :
(SC, DEC)*6 (12)
Info :
Tighten the hole, fix the thread and hide the end inside the head.
— Ear :
Info :
*crochet 4 identical details: 2 details made of blue yarn and 2 details made of pink yarn, 2 mm hook. *don't stuff. *make a turn and work a turning CH at the end of each round
Round 1 :
(start in the 2nd chain from the hook) 2 SC
Round 18 :
Skip a St, 5 SC (5)
Round 19 :
Skip a St, 4 SC (4)
Round 20 :
Skip a St, 3 SC (3)
Round 21 :
Skip a St, 2 SC (2)
Round 22 :
Skip a St, SC (1)
Info :
Fix the thread and hide ends between loops on the one side of the detail.
Info :
Ear assembly: attach blue and pink parts of the ear to each other so that the hidden ends of the threads appears inside; pink part is at the front, blue part is at the back; crochet two details together with SC with blue thread; begin with the upper side part of the ear, where was Round 0; work 3 SC in the bottom and two upper back loops of the ear; fix the thread with SS in the first St of crocheting around, leave a long ending to sew.
— Head assembly :
Info :
Sew eyelids so that the inner parts are higher than the outer ones.
Info :
While sewing eyelids you may circle the eye-white with blue thread and fix it with a stitch.
Info :
Embroider eyelids line with black thick thread.
Info :
Embroider stitch line in the middle of the head with thin black thread; embroider additional stitches straight across the main line to fix it and make a stitch to fix the smile in the middle.
Info :
Embroider eyebrows and nostrils.
Info :
Sew the ears between Rounds 24 and 26.
— Body :
Info :
*blue semi-cotton yarn, 2 mm hook. *stuff in process
Round 3 :
(SC, INC)*6 (18)
Round 4 :
(2 SC, INC)*6 (24)
Round 5 :
(3 SC, INC)*6 (30)
Round 6 :
(4 SC, INC)*6 (36)
Round 7 :
(5 SC, INC)*6 (42)
Round 8 :
(6 SC, INC)*6 (48)
Round 9 :
(7 SC, INC)*6 (54)
Round 10 :
(8 SC, INC)*6 (60)
Round 11 :
(9 SC, INC)*6 (66)
Round 12-21 :
10 rounds 66 SC
Info :
A series of decreases begins in Round 22; pay attention to the shifting line of the beginning of the round - it must always be straight (stitch marker is behind, in the middle, on the back), so that the DECs do not shift to the side; to do this, monitor position of the stitch marker in the round with DECs; if it shifts, move it exactly to the middle of the back.
Round 22 :
15 SC, (4 SC, DEC)*6, 15 SC (60)
Round 24 :
15 SC, (3 SC, DEC)*6, 15 SC (54)
Round 26 :
15 SC, (2 SC, DEC)*6, 15 SC (48)
Round 28 :
15 SC, (SC, DEC)*6, 15 SC (42)
Round 30 :
15 SC, 6 DEC, 15 SC (36)
Round 31-34 :
4 rounds 36 SC
Round 35 :
12 SC, 6 DEC, 12 SC (30)
Round 36-38 :
3 rounds 30 SC
Round 39 :
9 SC, 6 DEC, 9 SC (24)
Info :
Then count 7 SC from the middle of the neck (on the back) on the left and on the right and place stitch markers (they should be placed symetrically on the sides). Continue working until the left stitch marker: 6 SC, SS. Then work a turning CH, turn, skip SS from the previous row and work 12 SC, SS until the next stitch marker. Fix the thread and leave a long ending for sewing the head.
— Front leg :
Info :
*all 4 details are crocheted by one pattern, but first crochet 2 details of lilac color, and then - blue ones, because we will continue the assembly of the leg without cutting the thread of the blue detail. *2 mm hook. *make a turn and work a turning CH at the end of each round
Round 1 :
(start in the 2nd chain from the hook) 2 SC
Round 21 :
Skip a St, 3 SC (3)
Round 22 :
Skip a St, 2 SC (2)
Info :
Work a CH, turn the detail to the side and crochet it around with SC; work 3 SC in two upper loops on the sides, and in two lower loops - 2 SC. (Only for lilac details) Fix the thread with SS in the first St, hide endings between loops on the one side of the detail.
Info :
Leg assembly: don't cut the thread of the blue detail; attach the lilac detail at the back and start crocheting around two details together with SC. Stuff at the end of crocheting around. Fix the thread with SS in the very first St, hide it inside. (Optional) Embroider stitches along the leg with black thin thread.
— Back leg :
Info :
*all 4 details are crocheted by one pattern, but first crochet 2 details of lilac color, and then - blue ones, because we will continue the assembly of the leg without cutting the thread of the blue detail. *when crocheting the second detail of each color turn the detail and crochet it around in the other direction (thus, there should be two details - left and right, in mirror reflection). *2 mm hook. *make a turn and work a turning CH at the end of each round
Round 1 :
(start in the 2nd chain from the hook) 4 SC, INC (6)
Round 2 :
INC, SC, 2 DEC (5)
Round 3 :
Skip a St, 4 SC (4)
Round 5 :
Skip a St, 2 SC (2)
Round 19 :
Skip a St, 6 SC, DEC (7)
Round 20 :
Skip a St, 4 SC, DEC (5)
Round 21 :
Skip a St, 2 SC, DEC (3)
Info :
Work a CH, turn the detail to the side and crochet it around with SC; work 3 SC in two upper loops on the sides, 3 SC in one loop on the toe, and don't work increases on the heel. (Only for lilac details) Fix the thread with SS in the first St, hide endings between loops on the one side of the detail: for the left leg - on one side, for the right - on the other.
Info :
Leg assembly: don't cut the thread of the blue detail; attach the lilac detail at the back and start crocheting around two details together with SC, work 3 SC in one loop on the toe; stuff at the end of crocheting around; fix the thread with SS in the very first St, hide it inside. (Optional) Embroider stitches along the leg with black thin thread.
— Belly :
Info :
*lilac semi-cotton yarn, 2 mm hook. *make a turn and work a turning CH at the end of each round
Round 1 :
(start in the 2nd chain from the hook) 4 SC
Round 4 :
INC, 4 SC, INC (8)
Round 5 :
INC, 6 SC, INC (10)
Round 6 :
INC, 8 SC, INC (12)
Round 7 :
INC, 10 SC, INC (14)
Round 8 :
INC, 12 SC, INC (16)
Round 9 :
INC, 14 SC, INC (18)
Round 10 :
INC, 16 SC, INC (20)
Info :
Work a CH, crochet the detail around with SC, work 3 SC in two loops on the sides from above and from below. Work SS in the first loop of crocheting around and leave a long ending to sew.
Round 11 :
INC, 18 SC, INC (22)
Round 12-17 :
6 rows 22 SC
Round 18 :
Skip a St, 19, DEC (20)
Round 19 :
Skip a St, 17, DEC (18)
Round 20 :
Skip a St, 15, DEC (16)
Round 21 :
Skip a St, 13, DEC (14)
Round 22 :
Skip a St, 11, DEC (12)
Round 23 :
Skip a St, 9, DEC (10)
Round 24 :
Skip a St, 7, DEC (8)
Round 25 :
Skip a St, 5, DEC (6)
Round 26 :
Skip a St, 3, DEC (4)
This dreamy little donkey is designed to steal hearts with floppy ears, soulful eyes, and a stitched smile. Handmade details like eyelids and embroidered features make each toy unique and full of personality. Create one for yourself or make a whole herd to gift—these donkeys are irresistibly charming. 🧶😊🧵