🧶 Beautiful ✨ Detailed 💝 Adorable

Pompompurin Amigurumi Pattern

Pompompurin Amigurumi Pattern
4.0★ Rating
5-7 Hours Time Needed
3.2K Made This
✂️

Intermediate Level

Ideal for those with basic crochet experience, featuring slightly more advanced stitches and techniques to expand your skills.

⏱️

Weekend Treat

Takes 5-7 hours, making it an enjoyable project to finish over a couple of days.

🧸

Cute Companion

An adorable friend to cherish, handcrafted with love to bring comfort and joy for years to come.

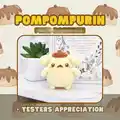
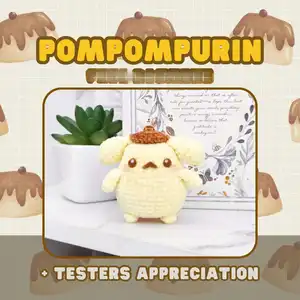
About This Pompompurin Amigurumi Pattern

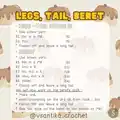
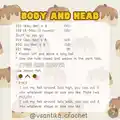
This pattern makes a small Pompompurin amigurumi — a squishy, pudding-inspired dog with a beret and tiny limbs. Youll crochet the body and head in one piece with separate small parts for arms, ears, legs, tail and a beret. The design uses basic amigurumi techniques: magic ring, single crochet, increases and decreases, and simple finishing with felt facial pieces.

Pompompurin Amigurumi Pattern crochet pattern - detailed view of completed project

Perfect for hobbyists who enjoy quick, satisfying makes with cute results. Great for gifts, bag charms (make smaller), or shelf decor.

Why You'll Love This Pompompurin Amigurumi Pattern

I absolutely love this pattern because it captures Pompompurins charm with very simple stitches and minimal assembly. I enjoy how the body-and-head-in-one construction creates a smooth, rounded shape without complicated joining. The small parts (ears, arms, legs, beret) let me personalize each plush while keeping the make quick and satisfying. Sewing on the beret and felt features is such a fun finishing touch that brings lots of personality to the finished piece.

Pompompurin Amigurumi Pattern step 1 - construction progress Pompompurin Amigurumi Pattern step 2 - assembly progress Pompompurin Amigurumi Pattern step 3 - details and accessories Pompompurin Amigurumi Pattern step 4 - final assembly and finishing

Switch Things Up

I love customizing this pattern by changing yarn colors to create different personalities — try pastel shades for a soft look or brighter yarn for a playful vibe.

You can change the size by swapping yarn weight and hook size; use bulky yarn for a chunky plush or finer yarn for a delicate mini keychain version.

I often add embroidery details like tiny freckles or a small bow to make each Pompompurin unique and personalized.

Try making the beret in a contrasting color or add stripes to the beret for extra visual interest.

Replace the felt eyes with safety eyes if you prefer a glossier finish, or embroider the eyes for a safer option for small children.

For a posable version, consider inserting a thin wire into the arm cores before stuffing, which lets you adjust arm poses slightly.

Make a whole set by crocheting multiple sizes — a mini keyring, a small shelf plush, and a larger cuddle buddy for variety.

I sometimes add tiny crocheted props like a little pastry or a mini scarf to give extra character and storytelling potential.

Experiment with textures by using boucle or velvet yarn for a plush, tactile finish that matches the pudding theme.

If youre gifting, sew a small felt name tag or attach a crocheted heart for a personal touch that recipients will love.

Common Mistakes & How to Fix Them

✗ Skipping stitch counts during increases or decreases can produce an uneven shape; count stitches after every round to ensure accuracy and correct any mistakes immediately. ✗ Forgetting to stuff as you go causes lumps or mis-shaped body sections; stuff gradually between rounds to maintain a smooth, even shape throughout. ✗ Not leaving long tails when fastening off makes sewing parts on difficult; always leave a long tail for sewing and weaving in ends securely. ✗ Attaching limbs without pinning first often results in asymmetry; use safety pins to position parts and check placement before sewing them in place.

Pompompurin Amigurumi Pattern

Create an adorable Pompompurin plush with this detailed crochet pattern designed for crafters who love kawaii characters. The pattern walks you through each piece — body, head, ears, arms, legs, tail and beret — with clear rounds and assembly notes. Youll finish with a charming little pudding-dog perfect for gifts or shelf decor. Follow the step-by-step instructions and enjoy making a sweet handmade companion.

Intermediate 5-7 Hours

Materials Needed for Pompompurin Amigurumi Pattern

— Main Fabric

  • 01
    Brown yarn - small amount for beret and facial details (as listed in materials)
  • 02
    Yellow yarn - main color for body, head, limbs and tail (as listed in materials)
  • 03
    Brown felt - for eyes and mouth pieces
  • 04
    Pink blush (optional) - small amount for rosy cheeks
  • 05
    Polyester stuffing - enough to firmly fill body, head and small parts

— Tools Required

  • 01
    Crochet hook (appropriate size for chosen yarn)
  • 02
    Tapestry needle for sewing and weaving in ends
  • 03
    Scissors and glue
  • 04
    Stuffing (polyester fiberfill)
  • 05
    Brown felt for eyes and mouth
  • 06
    Pins or safety pins for positioning parts
  • 07
    Optional: stitch markers

Progress Tracker

0% Complete

— Abbreviations & Materials :

Infos :

Abbreviations: R - Round. MR - Magic Ring. ch - chain. sc - single crochet. inc - increase. dec - decrease. slst - slip stitch. st(s) - stitch(es). Materials: Brown yarn. Yellow yarn. Crochet hook. Tapestry needle. Scissors and glue. Stuffing. Brown felt. Optional : pink blush.

— Arms and Ears :

Item Name (P1) :

ARMS (MAKE 2) : Use yellow yarn. R1. 5sc in a MR (5). R2-4. 5sc (3 rounds) (5). Do not stuff, fasten off and leave a long tail.

Item Name (P2) :

EARS (MAKE 2) : Use yellow yarn. R1. 5sc in a MR (5). R2. (inc) x 5 (10). R3. (sc, inc) x 5 (15). R4. 15sc (15). R5. (3sc, dec) x 3 (12). R6. 12sc (12). Stuff as you go. R7. (2sc, dec) x 3 (9). R8. (sc, dec) x 3 (6). Info : Flatten the opening and crochet 3sc through both layers of sc. Fasten off and leave a long tail.

— Legs, Tail, Beret :

Item Name (P3) :

LEGS + TAIL (MAKE 3) : Use yellow yarn. R1. 6sc in a MR (6). R2. 6sc (6). Fasten off and leave a long tail.

Item Name (P4) :

BERET : Use brown yarn. R1. 6sc in a MR (6). R2. (inc) x 6 (12). R3. (sc, inc) x 6 (18). R4. (2sc, inc) x 6 (24). R5. 24slst (24). Fasten off and leave a long tail.

Info :

We will now work on the beret's stalk : Make ch4. start crocheting on the 3rd ch from hook : 2sc. Fasten off and leave a long tail. Sew the stalk on the beret (in the middle of MR).

— Body and Head :

Infos :

NOTES : The body and head will be crocheted in one go, starting from the body to the head. We will start with a chain. Stitches are worked around both sides of the foundation chain.

Round 1 :

Ch9, start crocheting on the 2nd ch from hook : R1. inc, 6sc, 3sc in the last ch. Continue on the other side of the foundation chain : 7sc (18)

Round 2 :

R2. 2inc, 6sc, 3inc, 6sc, inc (24)

Round 3 :

R3. (sc, inc) x2, 6sc, (sc, inc) x3, 7sc, inc (30)

Round 4 :

R4. (2sc, inc) x2, 6sc, (2sc, inc) x3, 8sc, inc (36)

Round 5 :

R5-6. 36sc (2 rounds) (36)

Round 6 :

R7. (5sc, inc) x 6 (42)

Round 7 :

R8-10. 42sc (3 rounds) (42)

Round 8 :

R11. (5sc, dec) x 6 (36)

Round 9 :

R12-14. 36sc (3 rounds) (36)

Round 10 :

R15. (4sc, dec) x 6 (30)

Round 11 :

R16-18. 30sc (3 rounds) (30)

Info :

Stuff as you go.

Round 12 :

R19. (3sc, dec) x 6 (24)

Round 13 :

R20. (sc, dec) x 8 (16)

Round 14 :

R21. 8dec (8)

Info :

Fasten off and leave a long tail. Sew the hole closed and weave in the yarn tails.

— Eyes and Mouth :

Info :

Use brown felt. EYES : I cut my felt around 2sts high, you can cut it into whatever shape or size you like. Make two. MOUTH : I cut my felt around 3sts wide, you can cut it into whatever shape or size you like.

— Assembly :

Info :

You can pin the parts with safety pins before sewing. Sew the legs at the bottom side of the body. Sew the arms at the side of the body (around R12-13). Sew the ears at the side of the head (around R19-20). Sew the beret on the top of the head. Sew the tail at the back (around R7). Optional : Sew a small 'x' below the tail. Glue the eyes and mouth on the face. Use pink blush for the rosy cheeks. Weave in all the yarn tails and you're done !

Assembly Instructions

  • Pin all parts with safety pins first to confirm placement before sewing them permanently into position.
  • Sew the legs at the bottom side of the body so the amigurumi can sit evenly and remain stable.
  • Sew the arms at the side of the body around rounds 12-13, angling slightly for a natural pose.
  • Sew the ears to the side of the head around rounds 19-20, spacing them symmetrically for balance.
  • Sew the beret on the top of the head, attaching the stalk in the middle of the beret's magic ring.
  • Sew the tail to the back around round 7 and optionally sew a small 'x' below the tail for a cute detail.

Important Notes

  • 💡Use safety pins or stitch markers to position small parts before sewing to ensure symmetry and correct placement.
  • 💡Stuff parts gradually and evenly while crocheting to avoid lumps and to maintain the intended shape.
  • 💡Leave long yarn tails when fastening off so you have enough length to sew pieces securely and weave in ends.

This Pompompurin amigurumi pattern is a cozy, cute project that makes a perfect handmade gift. The simple stitches and sweet details let you finish a charming plush to cherish or share. Have fun customizing the face and beret for your own unique pudding-dog friend! 🧶🎀

You ask,

we answer.

FAQs

What size will the finished piece be?

The finished amigurumi measures approximately 10-15 cm tall depending on your yarn weight and hook tension.

Can I use different yarn weights for this pattern?

Yes, you can use different yarn weights, but this will affect the final size; use an appropriate hook for your chosen yarn and expect changes in finished dimensions.

Do I need prior crochet experience for this pattern?

This pattern is rated intermediate, so basic knowledge of single crochet, increases, decreases and working in rounds is recommended.

How long does this project typically take to complete?

Most crocheters complete this project in 5-7 hours, though time may vary by experience level and how much time you spend on sewing and finishing details.

How should I attach the felt eyes and mouth?

Cut felt shapes to the recommended sizes and glue them onto the face, or sew them on for extra durability; place them while the head is lightly stuffed to check positioning.