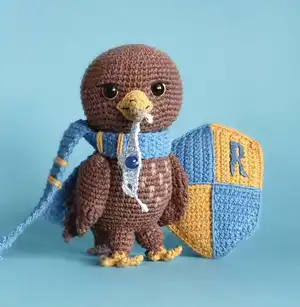
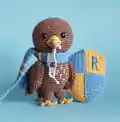
Make a charming eagle amigurumi with detailed step-by-step instructions, photos, and helpful shaping tips. This pattern guides you through crocheting the head, body, feet, wings, beak, scarf, crest and tiny accessories. Youll learn wiring for posable wings, cotter pin installation for stability, and embroidery details for expressive eyes. Perfect for makers who enjoy detailed, characterful projects.
Progress Tracker
0% Complete
— Beak :
Infos :
Use: bronze yarn, hook 1.75; black floss, needle; black paint, brush
Round 3 :
1sc, inc*2, 1sc (6) (pic 1)
Round 4 :
1sc, inc, 1sc, inc, 1sc, 1sc in the last sc of the 2r (grabbing) (8) (pic 2--3)
Round 5 :
2sc, inc, 1sc, inc, 1sc, inc, 1sc (11)
Round 6 :
2sc, 2ch, 1sc in chain (pic 4-5), 7sc, 2ch, 1sc in chain, 2sc, 2 sl st (pic 6)
Info :
Separate 2 threads from black floss. Embroider mouth and nostrils (pic 7-8). The beak can be left as is, but for more believability, you can shade the black paint over the tip. To do this, prepare the paint and slightly dilute it with water. Then dry the brush, dip it in black paint and paint the tip of the beak. Then draw in the diluted paint and brush it on the beak. Be careful not to use too much paint.
— Head :
Infos :
Use: brown yarn, hook 1.75; black & orange floss, needle; safety eyes; teddy joints; filler
Round 1 :
12sc in 5 ch (on both sides of the chain) (pic 10)
Round 2 :
(1sc, inc)*6 (18)
Round 3 :
1sc, inc, (2sc, inc)*5, 1sc (24)
Round 4 :
(3sc, inc)*6 (30)
Round 5 :
2sc, inc, (4sc, inc)*5, 2sc (36)
Round 6 :
(5sc, inc)*6 (42)
Round 7 :
3sc, inc, (6sc, inc)*5, 3sc (48)
Round 8 :
(7sc, inc)*6 (54)
Round 9-13 :
54sc in th each round (54)
Round 14 :
10sc, 2ch, skip 2st, 8sc, skip 2st, 2ch, 32sc (54) (pic 11, 11a)
Round 15 :
10sc, dec, inc, 6sc, inc, dec, 32sc (54)
Round 16 :
9sc, dec, 1sc, inc, 6sc, inc, dec, 32sc (54)
Round 17 :
9sc, dec, 1sc, inc, 7sc, inc, dec, 31sc (54)
Round 18 :
54sc in th each round (54)
Round 19 :
5sc, inc, 23sc, inc, 24sc (56)
Info :
Install the black eyes in the holes (pic 12-13).
Round 20 :
(5sc, dec)*8 (48)
Round 21 :
2sc, dec, (4sc, dec)*7, 2sc (40)
Round 22 :
(3sc, dec)*8 (32)
Round 23 :
1sc, dec, (2sc, dec)*7, 1sc (24)
Info :
Insert cotter pin into shim and install to the head (pic 14-16).
Round 24 :
(1sc, dec)*8 (16)
Round 26 :
dec*4 (4), close the round. Fasten the yarn and cut off (pic 17).
Info :
Next, well do a light shaping, to create a more bird-like look. The shaping is usually used when crocheting toys with plush yarn, and is done before the piece is filled with filler. Since this is quite difficult to do for the first time, and with cotton yarn, well do the shaping right now.
Info :
HOW TO make shaping (pic 18-19): Insert a needle with a long piece of brown yarn (without knots) at point f. Bring the needle out with one end of the yarn at point c, leaving the other end of the yarn at point f. Insert the needle at point d and exit at point f. Make one knot and proceed to install the second yarn to shape. Insert a needle with a long piece of brown yarn (without knots) at point g. Bring the needle out with one end of the yarn at point b, leaving the other end of the yarn at point g. Insert the needle at point a and exit at point g. Make one knot. Lightly tighten the knots, play with the shape. Try putting the beak between the eyes and choose a version of shaping that you like. Dont tighten too much so you dont get hollows in the head. Make another control knot on both sides. Cut the yarn and hide the yarn tails.
Info :
Embroider with orange floss iris as shown in the pic 20-21. Using black floss, embroider the eyelid as shown in pic 20-21. Install the beak with pins and sew it on.
— Feet :
Infos :
Use: brown & bronze yarn, hook 1.75; black paint & brush, filler
Round 1 :
6sc in MR, close round with sl st (pic 27)
Round 2 :
2ch, 1sc to the 2nd loop from hook, 2 sl st through the back loop (pic 28), 3sc in 4ch, sl st, 3sc in 4ch, sl st, 3sc in 4ch, 2 sl st (pic 29). Make sl st to the front loop (pic 30-31), 6sc through the front loop, close the round, fasten the yarn and cut off (pic 32-33). Join brown yarn over back claw (pic 34).
Round 5-7 :
12sc in the each round. Close the round, fasten yarn and cut off (pic 36).
Info :
With black paint carefully draw the claws. When dyeing, wool may appear, use a scissor to cut it off (pic 37-38). Repeat all the steps for the second foot (pic 39). Hang the pin in the 10sc of the last round for the right foot, and in the 7sc - for the left.
— Body :
Infos :
Use: brown & bronze yarn, hook 1.75; filler
Info :
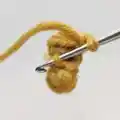
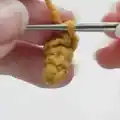
Next in the description you will come across «feather». This tip will help you make it. HOW TO crochet «feather»: Insert the hook and grab the cacao yarn (pic 40). Take the hook out with the cacao yarn (pic 41). Grab the brown yarn and finish SC (pic 42-43).
Round 1 :
16sc in 7ch (on both sides of chain) (16)
Round 2 :
(1sc, inc)*8 (24)
Round 3 :
(3sc, inc)*6 (30)
Round 4 :
2sc, inc, (4sc, inc)*5, 2sc (36)
Round 5-6 :
36sc in the each round (36)
Round 7 :
(5sc, inc)*6 (42)
Round 8 :
5sc, «feather», 3sc, «feather», 3sc, «feather», 3sc, «feather», 24sc (42)
Round 9 :
5sc, «feather», 3sc, «feather», 3sc, «feather», 3sc, «feather», 24sc (42)
Round 10 :
7sc, «feather», 3sc, «feather», 3sc, «feather», 26sc (42)
Round 11 :
7sc, «feather», 3sc, «feather», 3sc, «feather», 26sc (42)
Round 12 :
9sc, «feather», 3sc, «feather», 28sc (42)
Round 13 :
9sc, «feather», 3sc, «feather», 28sc (42)
Round 14 :
11sc, «feather», 30sc (42)
Round 15 :
11sc, «feather», 30sc (42) (pic 44-45)
Info :
Place the cotter pin in the center of the chain (pic 46). Inside the body, put the disk on the cotter pin and tighten the ends (pic 44-46).
Round 16 :
5sc, dec, 4sc, dec, 4sc, dec, 7sc, inc, 5sc, inc, 3sc (42)
Round 18 :
4sc, dec, 4sc, dec, 4sc, dec, 6sc, inc, 6sc, inc, 6sc, inc, 3sc (42)
Round 20 :
3sc, dec, 3sc, dec, 3sc, dec, 7sc, inc, 7sc, inc, 7sc, inc, 3sc (42) (pic 47)
Round 21 :
6sc grabbing loops of the right foot (start with pinned SC) from inside (pic 48), 4sc (pic 49), 6sc grabbing loops of the left foot (start with pinned SC) from inside (pic 50), 26sc (42)
Round 22 :
crochet feet on the other side for the remaining loops, (5sc, dec)*6 (36) (pic 51)
Round 23 :
(1sc, dec)*7, 9sc, (1sc, dec)*2 (27)
Round 24 :
3sc, dc4tog (pic 52-54), 20sc (24)
Round 25 :
1sc, dc5tog, 17sc
Round 27 :
dc5tog, 2sc, sl st (pic 55)
Round 28 :
1sc, 1dc, 1tr, 1dc, 1sc, close the row with sl st (pic 56), fasten yarn and cut off. Join cacao yarn.
Info :
Make inc, 1sc, 1dc, 1tr, 1dc, 1sc (pic 58), turning, 3ch, 2sl st to the chain from the 2nd loop from hook, 1sl st)*5 (pic 59). Fasten the yarn. Finally fill the body of the eagle, pass the yarn on the inside SC, yarn secure and cut off.
— Wings :
Infos :
Use: brown yarn, hook 1.75; wire, pliers, glue
Round 3 :
(3sc, inc)*3 (15)
Round 4 :
2sc, inc, (4sc, inc)*2, 2 (18)
Round 5 :
(5sc, inc)*3 (21)
Round 6 :
3sc, inc, (6sc, inc)*2, 3sc (24)
Round 7 :
(7sc, inc)*3 (27)
Round 8-9 :
27sc in the each round (27)
Round 10 :
2dc, 2tr, 2tr shell, 2tr, 2dc, 18sc (28)
Round 11 :
2dc, 6tr, 2dc, 18sc (28)
Infos :
FOR LEFT WING: 12r: 4sc, sl st. 3ch, 2sc to chain, 1sl st to wing. 8ch, 1sl st, 2sc, 4dc, 1sl st to wing. 7ch, 1sl st, 2sc, 3dc, 1sl st to wing. 6ch, 2sc, 3dc, 1sl st to wing. 5ch, 3sc, 1dc, 1sl st to wing. 4ch, 1sl st, 2sc, 1sl st to wing. 2ch, 1sc to chain, 1sl st to wing.
Infos :
FOR RIGHT WING: 12r: 19sc, sl st. 2ch, 1sc to chain, 1sl st to wing. 4ch, 1sl st, 2sc, 1sl st to wing. 5ch, 3sc, 1dc, 1sl st to wing. 6ch, 2sc, 3dc, 1sl st to wing. 7ch, 1sl st, 2sc, 3dc, 1sl st to wing. 8ch, 1sl st, 2sc, 4dc, 1sl st to wing. 3ch, 2sc to chain, 1sl st to wing.
Info :
The following description will give a common beginning for crocheting wings, but a different continuation for feathers. Be attentive! When making sl stitch at each feather, crochet it through with 1 stitch backward.
Info :
Step 8 loops away from the cacao feathers and place pins. Insert the wire into the body (in places with pins), inserting one end on one side and taking it out on the other (pic 67-68). Install pins in the wings at the fold, 4 rows from magic ring (pic 73). Measure the wing from the pin to the corner with the first feather (pic 69) (I had 5cm/1,96). Cut off the resulting value at both ends, adding 2cm/0,7 on each side to wrap the ends. Wrap the wire with brown yarn and glue in one thin layer (pic 70-72). Put the wings on the wire (pic 74-75). Thread the brown yarn into the needle and make a knot at one end. Fasten the wire in the corner of the wing (see pic 76-78). Thread the yarn with the needle through double crochets (pic 79). Sew the wings to the body where the wires are installed (pic 81). The wings are ready! Now the hardest part is making sure the bird doesnt fly away!
— Candida Diadem :
Infos :
Use: silver metallized floss, hook 1.5; blue bead
Round 1 :
19ch, turning (19)
Round 2 :
1sl st, 3ch, 2dc, 2tr (pic 84), 1ch, 1sl st with bead (pic 85-86), 1ch, 2tr, 2dc, 3ch, 1sl st, turning (pic 87)
Round 3 :
7sl st, 1ch, 1sl st in chain, 2ch, 1sl st in chain, 8sl st, fasten the floss and cut off (pic 88)
— House Crest :
Infos :
Use: bronze & blue yarn, hook 1.75; canvas, orange floss, needle
Round 1 :
Bronze yarn (Yarn E) 10 ch, turning, 9sc (9)
Round 2 :
1ch, turning, 9sc (9)
Round 3 :
1ch, turning, 8sc, inc (10)
Round 4 :
1ch, turning, 10sc (10)
Round 5 :
1ch, turning, 9sc, inc (11)
Round 6 :
1ch, turning, 11sc (11)
Round 7 :
1ch, turning, 10sc, inc (12)
Round 8-9 :
1ch, turning, 12sc (12) Change to blue (Yarn C).
Info :
To get a beautiful line when changing color in the next row crochet the sc in this way - half of the sc with bronze yarn, and the other half with blue (pic 89-90).
Round 11-14 :
Blue yarn 1ch, turning, 12sc (12)
Round 15 :
1ch, turning, 10sc, dec (11)
Round 16 :
1ch, turning, 11sc (11)
Round 17 :
1ch, turning, 9sc, dec (10)
Round 18 :
1ch, turning, 10sc (10)
Round 19 :
1ch, turning, 8sc, dec (9)
Round 20 :
1ch, turning, 9 sl st (9)
Info :
Take another end of the bronze yarn ball and change the yarn. In the next row turn the direction as shown on pic 92 and crochet part of the sc in this way - half of the sc with blue yarn, and the other half with bronze and then vice versa (pic 89). 21r: 10sc (blue + bronze),10 sc (bronze + blue) (20) Cut the bronze yarn.
Round 22 :
1ch, turning, 10sc (blue), 10sc (bronze)* (20) * grab the thread that you leave in the row 10.
Round 23 :
1ch, turning, 10sc (bronze), 10sc (blue) (20)
Round 24 :
1ch, turning, 10sc (blue), 10sc (bronze) (20)
Round 25 :
1ch, turning, 10sc (bronze), 10sc (blue) (20)
Round 26 :
1ch, turning, 10sc (blue), 10sc (bronze) (20)
Round 27 :
1ch, turning, 10sc (bronze), 10sc (blue) (20)
Round 28 :
1ch, turning, dec, 8sc (blue), 8sc, dec (bronze) (18)
Round 29 :
1ch, turning, dec, 7sc (bronze), 7sc, dec (blue) (16)
Round 30 :
1ch, turning, dec, 6sc (blue), 6sc, dec (bronze) (14)
Round 31 :
1ch, turning, dec, 5sc (bronze), 5sc, dec (blue) (12)
Round 32 :
1ch, turning, dec, 4sc (blue), 4sc, dec (bronze) (10)
Round 33 :
1ch, turning, dec, 3sc (bronze), 3sc, dec (blue) (8)
Round 34 :
1ch, turning, dec, 2sc (blue), 2sc, dec (bronze) (6)
Round 35 :
1ch, turning, dec, sc (bronze), sc, dec (blue) (4)
Round 36 :
1ch, turning, dec (blue), dec (bronze) (2)
Round 37 :
1ch, turning, dec. Next crochet the detail around the perimeter in a counter-clockwise direction from the point «Start» using jacquard technique for changing color - 16sc (blue), 19sc (bronze), 19sc (blue), 16sc, sl st in the 1st dec (bronze) (71). Embroider the lines with blue yarn and fix it with blue thread (from floss) to hide the "stages" (pic 94-96).
Info :
On the left is a picture that I used to embroider the letter on the house crest. Add brightness on the screen to maximum, enlarge or reduce the picture so that the size of the letter will be approx. 2.5 cm (1 inch) high. Attach a water soluble cross stitch canvas on it and circle the picture with a pencil (pic 97). Fix the canvas to the right lower side of the house crest with the needle for cutting (pic 98). Get 2 threads of orange thread floss and embroider the outline of the letter using the seam «backstitch» (pic 99). Then embroider the inside of the letter with fill stitches (pic 100). Rinse the embroidery under running water and gently peel off the canvas with your fingers (pic 101). Place the crest on the tablecloth and secure with pins in the corners (pic 102). Cut approx 20cm/7,8 bronze yarn and join it to the house crest with the hook from both sides (pic 103-104).
— Scarf :
Infos :
Use: blue yarn, hook 1.75; bronze yarn, needle
Round 1 :
5ch, turning, 4sc (4)
Round 2-100 :
1ch, turning, 4sc (4)
Info :
Use pins to mark the location of the stripes (pic 105). For the stripes to be at an equal distance, fold the scarf 2-3-4 times (pic 106), depending on its length. Thread the bronze yarn into the needle and make a knot on one of the ends. Pick the wrong side of the scarf yourself and insert the needle into the center, next to the pin. Insert the needle carefully without piercing the scarf. Make two turns (pic 106-107), wrapping the scarf. Take the needle out in the center of the wrong side. Step back two rows and make two more turns around the scarf (pic 109-110). Step back about 10 rows and make the next turn next to the pin. Repeat all steps next to each pin. Fasten the yarn and cut it off (pic 111). Cut 8 strands of blue yarn 6cm/2.4" long for the fringe (pic 112-116).
— Final Assembly & Notes :
Info :
Attach beak to head with pins and sew. Install cotter pin and disk in head and body as instructed. Sew feet to the body using the pinned loops and cotter pins. Insert wire into the wings and wrap with yarn and glue before sliding into body and sewing. Embroider eyes and details and hide thread tails. Fasten all yarn ends and secure joints. Refer to photos for placement and order of assembly (pics throughout pattern).
This Eagle Ravenna pattern brings a little noble friend to life with feathers, a crest and a cozy scarf. Whether you gift it or keep it, this bird is a small treasure of handmade charm. Happy crocheting and may your stitches be even and joyful! 🧶✨