About This Snowman Friends Amigurumi Pattern
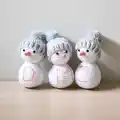
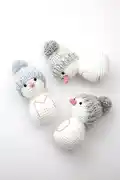
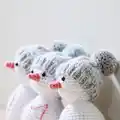
This pattern makes a sweet little snowman amigurumi about 5.6 inches tall, worked in one piece from the top of the head down the body. It features a small crocheted nose and a knitted pom-pom hat for a cozy finish. The instructions include knitting the hat using double-pointed needles for a textured, sparkly look.

Perfect for gifting or seasonal decor, these snowmen are quick to make and customizable with embroidered initials. The pattern uses US terminology and includes materials and abbreviations to get you started.
Why You'll Love This Snowman Friends Amigurumi Pattern
I absolutely love this pattern because it combines simple amigurumi shaping with a sweet knitted hat that gives each snowman personality. I enjoy how quick these little friends are to crochet—perfect for using leftover yarn. The double strand technique in the hat adds a subtle twinkle that feels festive and special. I also love that you can personalize each snowman with embroidered initials or buttons to make them meaningful gifts.
Switch Things Up
I love experimenting with color combinations to make each snowman feel unique; try pastel hats or bright contrasting colors for a playful set.
You can change the size by using a thicker or thinner yarn and adjusting your hook size—bulky yarn with a larger hook makes a chunkier friend.
I sometimes replace safety eyes with embroidered eyes for a softer, baby-safe version—this also gives a handmade look.
Instead of knitting the hat, you can follow the free crochet pom-pom hat variant so everything is crocheted for a single-skill project.
Try adding tiny buttons down the body or a small scarf for seasonal variety and extra charm.
I often embroider initials or small motifs onto the body to personalize these friends as gifts for newborns or couples.
Swap the metallic embroidery thread in the hat for a solid strand if you prefer a matte finish rather than a twinkly effect.
Make mini versions for ornaments or keychain charms by using thinner yarn and a smaller hook for a cute, portable size.
For a posable display, consider inserting a small piece of wire into the hat or neck to help the head tilt slightly—just make sure ends are well wrapped.
I also enjoy creating themed sets by changing nose color, adding tiny felt accessories, or stitching fun faces to match a holiday or event.
Common Mistakes & How to Fix Them
✗ Skipping a stitch marker at the start of rounds can cause you to lose the beginning of the round; place and move a stitch marker at the start of every round to keep accurate counts.
✗ Forgetting to stuff as you work often leads to lumps and awkward shaping; firmly stuff gradually and overstuff slightly before closing to ensure a smooth shape.
✗ Using a different yarn weight without adjusting hook size will change the finished size unexpectedly; if you change yarn weight, swatch and adjust hook size to match gauge and desired size.
✗ Closing the final rounds too loosely can leave a visible hole; thread the tail onto a tapestry needle, weave through remaining stitches, pull tight to close and weave in securely.
✗ Not counting stitches after increases or decreases leads to incorrect shaping; count your stitches at the end of each increase or decrease round to catch mistakes early.