🧢 Beautiful ✨ Detailed πŸ’ Adorable

Easter Bunny Amigurumi Pattern

Easter Bunny Amigurumi Pattern
4.4β˜… Rating
5-7 Hours Time Needed
3.4K Made This
βœ‚οΈ

Intermediate Level

Ideal for those with basic crochet experience, featuring slightly more advanced stitches and techniques to expand your skills.

⏱️

Weekend Treat

Takes 5-7 hours, making it an enjoyable project to finish over a couple of days.

🧸

Cute Companion

An adorable friend to cherish, handcrafted with love to bring comfort and joy for years to come.

About This Easter Bunny Amigurumi Pattern

This pattern creates a seated amigurumi bunny holding a crocheted egg, plus a small basket with six eggs for Easter display. Youll crochet the head and body as one piece, plus separate arms, legs, ears and accessories. The pattern uses simple amigurumi shaping techniques and includes front-loop/back-loop instructions for details.

Easter Bunny Amigurumi Pattern crochet pattern - detailed view of completed project

Perfect for gifting or seasonal decor, this bunny has cute embroidered facial details and a textured basket hanger. Detailed rounds and assembly notes help you finish with a polished look.

Why You'll Love This Easter Bunny Amigurumi Pattern

I absolutely love this pattern because it combines classic amigurumi shaping with playful accessories like the little eggs and basket. I enjoy how the front-loop and back-loop details add subtle texture that makes the outfit and basket pop. The pattern gives you plenty of opportunities to customize colors and size to match your holiday decor or gift plans. I also love how satisfying it is to see the bunny come together as you sew the parts and add embroidered facial features.

Easter Bunny Amigurumi Pattern step 1 - construction progress Easter Bunny Amigurumi Pattern step 2 - assembly progress Easter Bunny Amigurumi Pattern step 3 - details and accessories Easter Bunny Amigurumi Pattern step 4 - final assembly and finishing

Switch Things Up

I love how easy it is to customize the colors for each egg, so I often try pastel shades or bold brights depending on my gifts.

I sometimes change yarn weight and hook size to make larger or smaller versions; thicker yarn makes a chunky, cuddly bunny and thinner yarn makes tiny keychain-sized versions.

I like to embroider different facial expressions β€” moving the eyes and mouth slightly changes the whole personality of the bunny.

Try adding felt accents such as a tiny bow tie or collar instead of crocheting them for a quicker finish.

For the basket, I sometimes use a sturdier cotton yarn to make it hold its shape better and to contrast with the softer amigurumi yarns.

I often experiment with surface crochet or slip stitch stripes on the eggs for extra texture and visual interest.

If you want a poseable bunny, consider inserting a small wire armature into the limbs before stuffing for gentle posability.

I also like to make matching sibling sets by altering color combinations for clothing and eggs to create a coordinated gift set.

Try adding beads or tiny embroidered patterns to the basket rim for a more ornate look and personalized finish.

When giving as a gift, I include a small card explaining the materials used and washing instructions so recipients can care for the handmade item properly.

Common Mistakes & How to Fix Them

βœ— Miscounting increases or decreases during rounds leads to incorrect stitch counts; recount stitches at the end of each round and use a stitch marker to mark the start of the round. βœ— Not stuffing evenly can make the head or body lumpy and misshapen; stuff gradually, shaping as you go and add small amounts of fiberfill to keep a smooth form. βœ— Skipping the front-loop or back-loop instructions will change the texture and fit of collars or sleeves; pay close attention to flo/blo notes and try a small swatch if unsure. βœ— Sewing parts without pinning results in asymmetrical placement; pin each ear, arm, and leg in place and check placement from multiple angles before stitching securely.

Easter Bunny Amigurumi Pattern

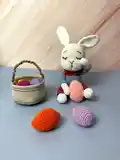
Make a sweet sitting Easter bunny complete with a little basket and six colorful eggs. This pattern guides you step-by-step through crocheting the head, body, arms, legs, ears, eggs and basket with photo references. Youll enjoy creating a charming handmade gift or seasonal decoration with clear round-by-round instructions.

Intermediate 5-7 Hours

Materials Needed for Easter Bunny Amigurumi Pattern

β€” Main Fabric

  • 01
    Yarn - main color White for body and head (small amount)
  • 02
    Yarn - A: Pink for accents/details (small amount)
  • 03
    Yarn - B: Lilac for clothing or accents (small amount)
  • 04
    Yarn - C: Green for small details (small amount)
  • 05
    Additional colors for eggs: Yellow, Orange, Light Pink (small amounts each)
  • 06
    Light brown yarn for basket hanger and basket accents (small amount)

β€” Tools Required

  • 01
    Crochet hook size 2.5 mm or a size that fits your yarn
  • 02
    Scissors
  • 03
    Polyester stuffing
  • 04
    Tapestry/yarn needle for sewing and weaving ends
  • 05
    Stitch markers
  • 06
    Pins for assembly

Progress Tracker

0% Complete

β€” Head & Body :

Rnd 1-6 :

Rnd 1-6 sc in a mr

Rnd 2 :

Rnd 2-6 sc inc(12)

Round 3 :

Rnd 3-(6 times)1 sc into sc next inc(18)

Round 4 :

Rnd 4-(6 times)2 sc into sc next inc(24)

Round 5 :

Rnd 5-(6 times)3 sc into sc next inc(30)

Round 6 :

Rnd 6-(6 times)4 sc into sc next inc(36)

Round 7 :

Rnd 7-(6 times)5 sc into sc next inc(42)

Round 8 :

Rnd 8-(6 times)6 sc into sc next inc(48)

Round 9 :

Rnd 9-(6 times)7 sc into sc next inc(54)

Round 10-19 :

Rnd 10-19-(10 ring)sc into sc(54) Stuff the head tightly. Keep filling as you go.

Round 20 :

Rnd 20-20 sc into sc(14 sc inc)20 sc into sc(68)

Round 21-27 :

Rnd 21-27-(7 ring)sc into sc(68)

Round 28 :

Rnd 28-20 sc into sc(14 sc dec)20 sc into sc(54)

Round 29 :

Rnd 29-(6 times)7 sc into sc next dec(48)

Round 30 :

Rnd 30-(6 times)6 sc into sc next dec(42)

Round 31 :

Rnd 31-(6 times)5 sc into sc next dec(36)

Round 32 :

Rnd 32-(6 times)4 sc into sc next dec(30)

Round 33 :

Rnd 33-(6 times)3 sc into sc next dec(24)

Round 34-36 :

Rnd 34-36-(3 ring)sc into sc(24)

Info :

A color-

Round 37 :

Rnd 37-(6 times)3 sc into sc next inc(30)

Round 38 :

Rnd 38-(6 times)4 sc into sc next inc(36)

Round 39 :

Rnd 39-(6 times)5 sc into sc next inc(42)

Round 40 :

Rnd 40-sc into sc(42)

Round 41 :

Rnd 41-(6 times)6 sc into sc next inc(48)

Round 42-49 :

Rnd 42-49-(8 ring)sc into sc(48)

Info :

B color-

Round 50 :

Rnd 50-in flo sc into sc(48)

Round 51-55 :

Rnd 51-55-(5 ring)sc into sc(48)

Round 56 :

Rnd 56-in flo sc into sc(48)

Round 57 :

Rnd 57-(6 times)6 sc into sc next dec(42)

Round 58 :

Rnd 58-(6 times)5 sc into sc next dec(36)

Round 59 :

Rnd 59-(6 times)4 sc into sc next dec(30)

Round 60 :

Rnd 60-(6 times)3 sc into sc next dec(24)

Round 61 :

Rnd 61-(6 times)2 sc into sc next dec(18)

Round 62 :

Rnd 62-(6 times)1 sc into sc next dec(12)

Info :

Stuff the body tightly.

Round 63 :

Rnd 63-6 sc dec (6)fo.Clean the thread end.

Info :

sweater detail-Rnd-56-in blo sc into sc(48)

β€” Legs :

Rnd 1-6 :

Rnd 1-6 sc in a mr

Rnd 2 :

Rnd 2-6 sc inc(12)

Round 3 :

Rnd 3-(6 times)1 sc into sc next inc(18)

Round 4 :

Rnd 4-(6 times)2 sc into sc next inc(24)

Round 5-7 :

Rnd 5-7-(3 ring)sc into sc(24)

Round 8 :

Rnd 8-6 sc into sc(6 sc dec)6 sc into sc(18)

Round 9 :

Rnd 9-5 sc into sc(4 sc dec)5 sc into sc(14)

Round 10-13 :

Rnd 10-13-(4 ring)sc into sc(14)

Info :

B color- Stuff the legs. Keep filling as you go.

Round 14 :

Rnd 14-sc into sc(14)

Round 15 :

Rnd 15-in flo sc into sc(14)

Round 16 :

Rnd 16-2 sc inc(16)

Round 17-28 :

Rnd 17-28-(12 ring)sc into sc(16)

Round 29 :

Rnd 29-Straighten it. Insert the needle into both layers. 8 sc fo. Leave a long thread end to sew.

Info :

sleeve detail-Rnd 13-in blo sc into sc(14)

Info :

Legs detail-Rnd 14-in blo sc into sc(14)

Info :

Collar -C color-

Collar (Part) :

Rnd 1-30 ch.

Round 2 :

Rnd 2-30 ch into sc(30)turn

Round 3 :

Rnd 3-30 sc inc cr(60 cr)fo.Leave a long thread to sew

β€” Arms :

Rnd 1-6 :

Rnd 1-6 sc in a mr

Round 2 :

Rnd 2-6 sc inc(12)

Round 3 :

Rnd 3-2 sc inc(14)

Round 4-12 :

Rnd 4-12(9 ring)sc into sc(14)

Info :

A color-

Round 13 :

Rnd 13-in flo sc into sc(14)

Round 14-29 :

Rnd 14-29-(15 ring)sc into sc(14)

Round 30 :

Rnd 30-Straighten it. Insert the needle into both layers. 7 sc fo. Leave a long thread end to sew.

β€” Ears :

Info :

MAIN COLOR - MAKE 2

Rnd 1-6 :

Rnd 1-6 sc in a mr

Rnd 2 :

Rnd 2-6 sc inc(12)

Round 3 :

Rnd 3-(2 times)5 sc into sc next inc(14)

Round 4 :

Rnd 4-(2 times)6 sc into sc next inc(16)

Round 5 :

Rnd 5-(2 times)7 sc into sc next inc(18)

Round 6 :

Rnd 6-(2 times)8 sc into sc next inc(20)

Round 7 :

Rnd 7-(2 times)9 sc into sc next inc(22)

Round 8 :

Rnd 8-(2 times)10 sc into sc next inc(24)

Round 9-24 :

Rnd 9-24-(16 ring)sc into sc(24)

Round 25 :

Rnd 25-Straighten it. Insert the needle into both layers 12 sc fo.Leave a long thread end to sew.

β€” Eggs :

Info :

COLORS = YELLOW - GREEN -PINK - ORANGE - LILAC - LIGHT PINK - MAKE 6

Rnd 1-6 :

Rnd 1-6 sc in a mr

Round 2 :

Rnd 2-6 sc inc(12)

Round 3 :

Rnd 3-sc into sc(12)

Round 4 :

Rnd 4-(6 times)1 sc into sc next inc(18)

Round 5 :

Rnd 5-sc into sc(18)

Round 6 :

Rnd 6-(6 times)2sc into sc next inc(24)

Round 7 :

Rnd 7-sc into sc(24)

Round 8 :

Rnd 8-(6 times)3 sc into sc next inc(30)

Round 9 :

Rnd 9-sc into sc(30)

Round 10-17 :

Rnd 10-17-(8 ring)sc into sc(30)

Round 18 :

Rnd 18-(6 times)3 sc into sc next dec(24)

Round 19 :

Rnd 19-sc into sc(24)

Round 20 :

Rnd 20-(6 times)2 sc into sc next dec(18)

Round 21 :

Rnd 21-sc into sc(18)

Info :

Tightly fill the egg. keep filling as you go

Round 22 :

Rnd 22-(6 times)1 sc into sc next dec(12)

Round 23 :

Rnd 23-sc into sc(12)

Round 24 :

Rnd 24-6 sc dec(6)fo.clean the thread end

β€” Basket :

Info :

MAIN COLOR, LIGHT BROWN AND A COLOR

Rnd 1-6 :

Rnd 1-6 sc in a mr

Round 2 :

Rnd 2-6 sc inc(12)

Round 3 :

Rnd 3-(6 times)1 sc into sc next inc(18)

Round 4 :

Rnd 4-(6 times)2 sc into sc next inc(24)

Round 5 :

Rnd 5-(6 times)3 sc into sc next inc(30)

Round 6 :

Rnd 6-(6 times)4 sc into sc next inc(36)

Round 7 :

Rnd 7-(6 times)5 sc into sc next inc(42)

Round 8 :

Rnd 8-(6 times)6 sc into sc next inc(48)

Round 9 :

Rnd 9-(6 times)7 sc into sc next inc(54)

Round 10 :

Rnd 10-(6 times)8 sc into sc next inc(60)

Round 11 :

Rnd 11-(6 times)9 sc into sc next inc(66)

Round 12 :

Rnd 12-(6 times)10 sc into sc next inc(72)

Round 13 :

Rnd13-(6 times)11 sc into sc next inc(78)

Round 14 :

Rnd 14-(6 times)12 sc into sc next inc(84)

Round 15 :

Rnd 15-in flo sc into sc(84)

Round 16-26 :

Rnd 16-26-(11 ring)sc into sc(84)

Round 27 :

Rnd 27-sc into sc(84)

Info :

Main color

Round 28 :

Rnd 28-sc into sc(84)

Info :

A color-

Round 29 :

Rnd 29-sc into sc(84)

Info :

Main color-

Round 30-31 :

Rnd 30-31-(2 ring)sc into sc(84)fo.

Info :

basket hanger-A color-Rnd 1-70 ch.70 ch into sc(70 sc)fo.

β€” Joining Parts :

Info :

Sew the ears to both sides, to Rnd 4.

Info :

Sew sleeves to both sides, to Rnd 37.

Info :

Sew the legs to both sides, between Rnd 51-56.

Assembly Instructions

  • Sew the ears to both sides of the head at around Rnd 4, aligning them symmetrically and using small whipstitches to secure.
  • Attach the sleeves (arm openings) to the body at Rnd 37, pinning each sleeve in place before sewing to ensure even placement.
  • Sew the legs to both sides of the body between Rnd 51-56, spacing them evenly so the doll can sit stably.
  • Insert the needle through both layers to close the ends of limbs as instructed (legs Rnd 29, arms Rnd 30) and leave a long thread end to sew pieces to the body.
  • Embroider facial features onto the head before final assembly so details are neatly positioned and stable.
  • Attach the collar and any decorative details (collar piece made in C color) by sewing along the neckline and hiding ends inside.

Important Notes

  • πŸ’‘Use stitch markers to mark the beginning of each round for accurate stitch counts and easier shaping.
  • πŸ’‘Stuff parts firmly and evenly while you crochet, adding small amounts of stuffing to avoid lumps and preserve shape.
  • πŸ’‘Pin parts in place and check symmetry before sewing to ensure correct placement of arms, legs and ears.
  • πŸ’‘Follow flo/blo instructions carefully for textured details such as sweater edges and basket tops to get the intended look.

This charming Easter Bunny pattern includes the bunny, six colorful eggs and a woven basket for a delightful holiday display. Handcrafted details and simple shaping make it a fun weekend project for gifting or seasonal decor. Enjoy customizing colors and making a collection of tiny eggs for playful displays. 🧢🐰

You ask,

we answer.

FAQs

What size will the finished piece be?

The finished amigurumi measures around 20 cm in circumference and about 10 cm in length as stated in the pattern when using the recommended hook and yarn.

Can I use different yarn weights for this pattern?

Yes, you can use different yarn weights but your finished size will change; choose an appropriate hook for your yarn and expect adjustments in finished dimensions.

Do I need prior crochet experience for this pattern?

This pattern is rated intermediate and requires knowledge of basic amigurumi stitches including working in the round, increases, decreases, and some flo/blo work.

How long does this project typically take to complete?

Most crocheters complete this project in 5-7 hours, though time may vary depending on experience, speed, and how many accessories you make.