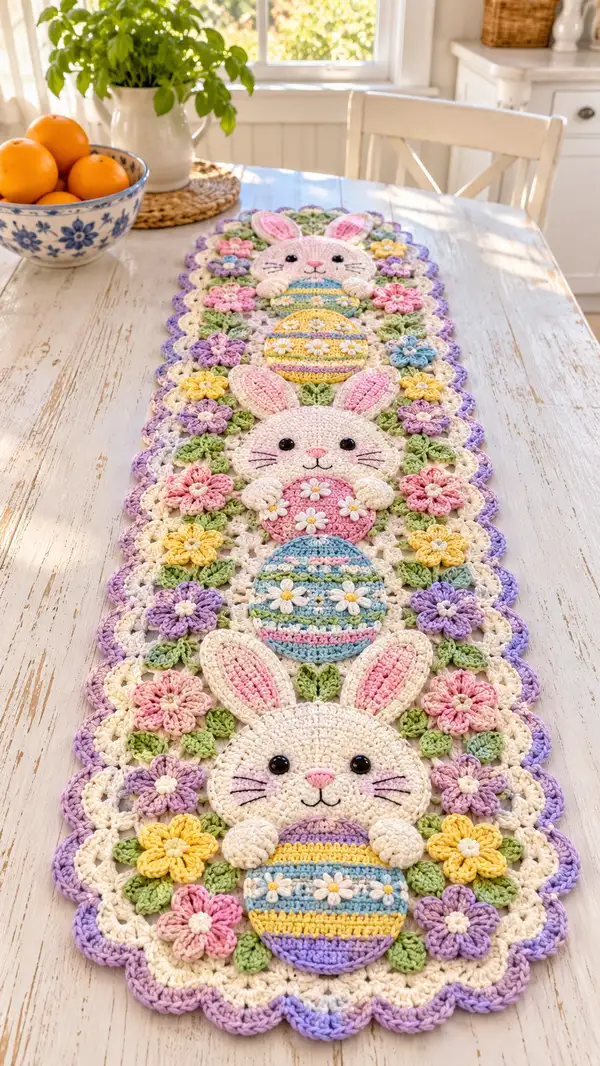
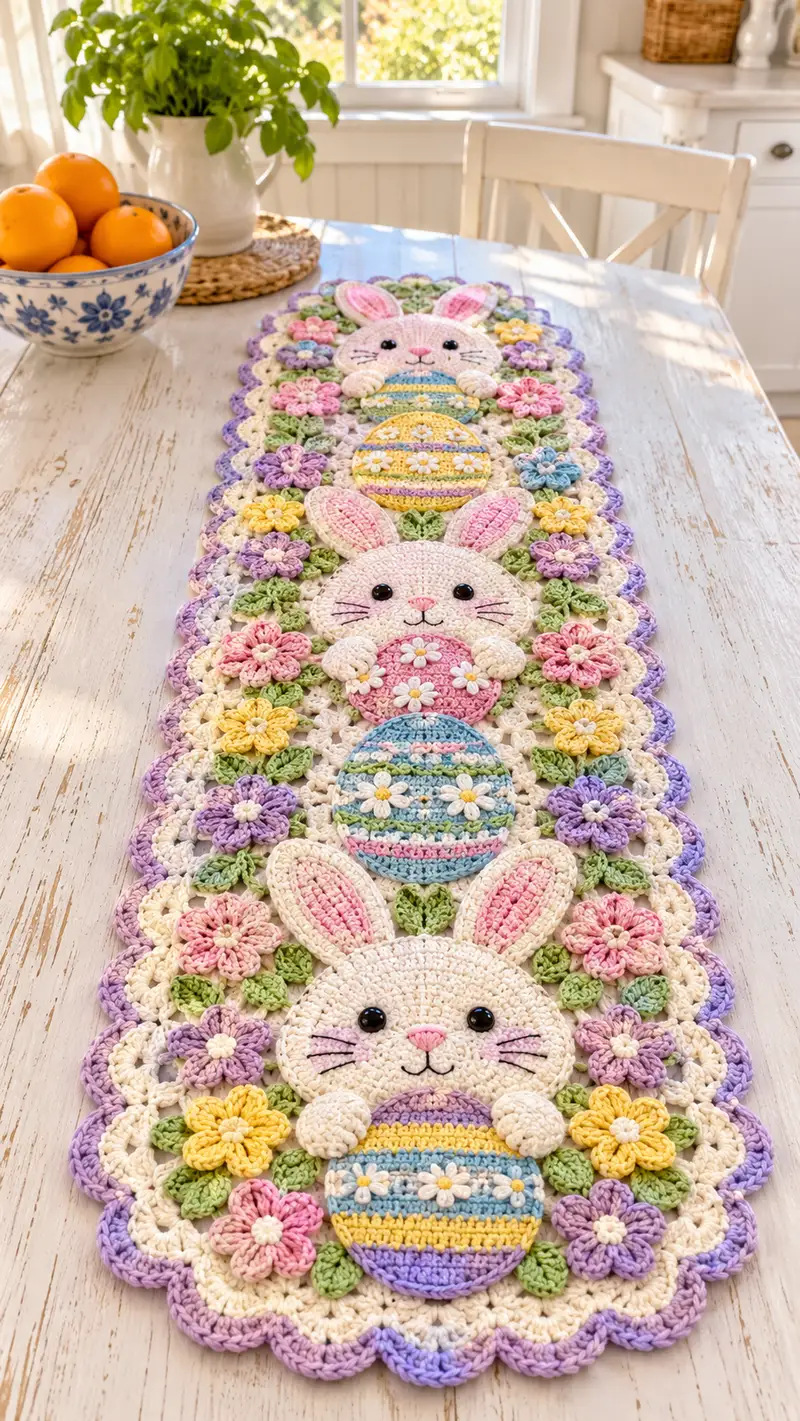
Create a charming pastel table runner featuring three sweet bunny faces, stacked decorated eggs, and a border of scalloped lacy flowers. This spring-themed runner uses soft pastel yarns, layered appliques (bunnies, eggs, flowers, leaves) and a scalloped edge to give a delicate handmade centerpiece for your table. The pattern breaks each motif into clear round-by-round instructions and includes assembly and edging steps so you can recreate the illustrated runner.
Progress Tracker
0% Complete
— Runner Base Panel (Make 1 long central panel by joining 6 square motifs) :
Info :
This runner in the photo is constructed from repeating lacy square motifs joined side-by-side lengthwise to create a long central panel. Each square motif measures approximately 10cm (3.9") before blocking; join six across to reach the photographed length. Make 6-8 motifs depending on your table length and desired overlap. Work each motif flat in rounds as follows.
Round 1 :
Ch 4, sl st to form ring, ch 3 (counts as 1 dc), 11 dc into ring (12 dc total). Join with sl st to top of ch-3. (12)
Round 2 :
Ch 3, dc in same st, ch 1, (2 dc in next st, ch 1) x 11. Join with sl st to top of ch-3. (24 dc, 12 ch-1 sps)
Round 3 :
Sl st into next dc and into next ch-1 sp, ch 3 (counts as dc), 2 dc in same ch-1 sp, ch 2, (3 dc in next ch-1 sp, ch 2) x 11. Join with sl st. (36 dc groups, 12 ch-2 corner sps)
Info :
Round 3 makes the first corners; ch-2 spaces are corner turning points. Keep tension even so motif lies flat.
Round 4 :
Sl st to corner ch-2 sp, ch 3 (counts dc), 2 dc in same ch-2, ch 1, (3 dc, ch1) in next ch-2 sp, [3 dc, ch 2, 3 dc] in corner ch-2 sp; continue around repeating (3 dc, ch1) on sides and (3 dc, ch2, 3 dc) in corners. Join. (approx 48 dc clusters)
Round 5 :
Ch 1, sc into next st and around into side clusters: (sc, ch 3, sc) into each side ch-1 space to create a lacy openwork row. In corner ch-2 spaces work (sc, ch 3, sc). Join. This creates a lacy mesh used to insert flowers and leaves.
Round 6 :
Ch 3, dc into same st, (ch 2, skip next sc, dc in next sc) around to create small arches; work (3 dc, ch 2, 3 dc) in each corner. Join.
Round 7 :
Ch 1, sc into each dc and ch-2 spaces around smoothing the edge, join. Fasten off and weave in ends. Block square flat to 10cm. Make 6-8 motifs.
Info :
Make enough motifs to span your table. The photographed runner uses 6 motifs joined along their long edges. If you want longer, add more motifs and adjust placement of bunny appliques proportionally.
— Joining Panel :
Info :
Lay motifs in a long row with corners aligned. Use whip stitch or join-as-you-go with slip stitches through corresponding side spaces. For a neater back, use mattress stitch (invisible seam) with yarn needle and same color yarn.
Round 1 :
With motifs aligned, use cream yarn and sl st through corresponding ch-1 spaces of adjacent squares to join. Join squares pairwise along long side; then join pairs to form the long panel. Weave ends. (Join stitches equal to number of ch-1 spaces per side)
Info :
Check spacing: the central panel should be wide enough to host a vertical column of motifs (bunny head, egg, bunny head) centered within the width of the panel. Center placement is crucial for symmetrical assembly.
— Bunny Head Applique (Make 3) :
Round 1 :
mr, 6 sc in ring (6)
Round 3 :
(1 sc, inc) x 6 (18)
Round 4 :
(2 sc, inc) x 6 (24)
Round 5 :
(3 sc, inc) x 6 (30)
Info :
Use cream yarn for the face. Keep rounds flat and even; do not stuff the head—this is a flat crocheted applique. Change hook to 3.0mm if you want tighter fabric.
Round 6 :
(4 sc, inc) x 6 (36)
Round 7 :
(5 sc, inc) x 6 (42)
Round 8 :
(6 sc, inc) x 6 (48)
Round 9 :
1 sc in each st around (48)
Round 10 :
1 sc in each st around (48)
Info :
Rounds 9-12 build height for the round bunny face. Add safety eyes between rounds 7-8 about 10-12 stitches apart depending on desired expression. If embroidering eyes, place stitches symmetrically using pins to mark positions.
Round 11 :
1 sc in each st around (48)
Round 12 :
1 sc in each st around (48)
Round 13 :
(6 sc, dec) x 6 (42)
Round 14 :
(5 sc, dec) x 6 (36)
Info :
After Round 14 you can create a very slight flattening for the top of the head by working the next rounds in FLO for a subtle ridge if desired.
Round 15 :
(4 sc, dec) x 6 (30)
Round 16 :
(3 sc, dec) x 6 (24)
Round 17 :
1 sc in each st around (24) - this creates a short neck edge for sewing to the panel
Round 18 :
1 sc in each st around (24). Fasten off leaving long tail for sewing. Weave in end on wrong side.
Info :
Embroider nose and mouth now if you prefer stitched features. Use pink yarn for nose—tiny triangle—and black yarn for mouth whisker lines. Add tiny blush with fabric paint afterwards if desired.
— Bunny Ear (Make 6 - 2 ears per head, inner ear in pink x 3) :
Round 1 :
mr, 6 sc in ring (6)
Round 3 :
(1 sc, inc) x 6 (18)
Round 4 :
(2 sc, inc) x 6 (24)
Round 5 :
1 sc in next 10 sts, 8 hdc separated to slightly elongate, 1 sc in remaining sts to create tapered ear top (24)
Info :
Make outer ear panels in cream and inner ear panels in pale pink. Block flat. Sew inner ear centered onto outer ear using small whip stitches, then sew ear base to top of head between rounds 3-5 for a forward-facing ear.
Round 6 :
Work 1 sc in each st around (24). Fasten off leaving long tail for sewing. Make 2 inner panels in pink and 2 outer panels in cream per head.
— Bunny Paw (Make 6 small paws: 2 per head, 3 heads) :
Round 1 :
mr, 6 sc in ring (6)
Round 3 :
(1 sc, inc) x 6 (18)
Round 4 :
1 sc in each st around (18)
Info :
Flatten the lower edge slightly to form a thumb-like shape. Optional light stuffing: use a few grams of fiberfill at center to give a raised look; do not overstuff. Leave long tail for sewing over egg edge to appear hugging egg.
Round 5 :
Work 1 sc in each st around (18). Fasten off. Make 6 paws total.
— Decorative Easter Egg Applique (Make 3 stacked eggs) :
Round 1 :
mr, 6 sc in ring (6)
Round 3 :
(1 sc, inc) x 6 (18)
Round 4 :
(2 sc, inc) x 6 (24)
Round 5 :
(3 sc, inc) x 6 (30)
Round 6 :
1 sc in each st around (30)
Info :
The eggs are worked flat to be slightly oval. Use stripes by changing colors every round and working in BLO on some rounds to create a subtly ridged stripe effect. Attaching small daisy motifs afterwards make the eggs decorative like the photo.
Round 7 :
(4 sc, inc) x 6 (36)
Round 8 :
Work 1 sc in each st around (36). Change to stripe color as desired; for delicate stripes change color at the last pull-through of the last stitch of a round.
Round 9 :
(5 sc, inc) x 6 (42)
Round 10 :
1 sc in each st around (42)
Round 11 :
(5 sc, dec) x 6 (36)
Round 12 :
(3 sc, dec) x 6 (30)
Round 13 :
(2 sc, dec) x 6 (24)
Round 14 :
1 sc in each st around (24). Fasten off leaving tail for sewing.
Info :
Create three eggs matching the photo's stripes: top egg pastel blue/yellow/green, middle pink/yellow with daisies, bottom blue/purple stripes with daisies. Sew small daisy appliques on top of selected rounds using white for petals and yellow center.
— Small Daisy Motif (Make 18-24) :
Round 1 :
mr, 6 sc in ring, join (6)
Round 2 :
Ch 1, (sc, ch 2, sc) in each st around to create 6 petals base, join (6 ch-2 sps)
Round 3 :
In each ch-2 sp: (sc, hdc, dc, hdc, sc) to form petal. Join, fasten off. Sew a small yellow french knot-like center using yarn or embroider with yellow yarn in single strand.
Info :
Make daisies in white or cream for egg centers and pastel petal colors for surrounding flowers. Use small sewn dots of yellow as centers for a neat finish.
— Layered Flower (Make 18 clusters) :
Round 1 :
mr, 6 sc in ring (6)
Round 2 :
Ch 1, sc in same st, ch 3, skip 1 st, sc in next; rep around to get 6 ch-3 loops. Join.
Round 3 :
In each ch-3 loop work (5 dc) to create a puff petal. Slip to join and fasten off. Make two rounds of petals in different pastel colors for layered look, stacking smaller layer on top of larger for depth.
Info :
Use slightly different petal counts and yarn weight to create varied sizes. Sew small white daisies as top centers for contrast as in the photo.
— Leaf Motif (Make 24-30) :
Round 1 :
Ch 6, sc in 2nd ch from hook, hdc, dc, hdc, sc to form leaf body. Turn and work on opposite side: sc, hdc, dc, hdc, sc back to beginning. Fasten off. (approx 10 sts)
Info :
Make leaves in mint green or light sage. Leaves are sewn between flowers to create a natural filler. Slightly starch leaves if you want them to sit upright between flowers.
— Border Scallop Edging :
Round 1 :
With cream yarn, pick up sts along entire outer edge of joined panel: work 1 sc into each tip of shell and 3 sc across each side arch evenly spaced. Join with sl st.
Round 2 :
Ch 3, 4 dc in same sp, skip 2 sc, sl st into next sc, (5 dc in next sc, sl st into next sc) repeat to create shells around. In corner areas work shells closer together to maintain shape. Join.
Round 3 :
Change to lavender. Sl st to middle of each shell, ch 1, sc in middle, ch 3, sc in same sp to make picot arches. Alternatively work (sc, ch 2, sc) in shell centers to create soft scallop. Join. Fasten off and weave in ends.
Info :
Use color changes in the final scallop to alternate between lavender and cream for subtle pastel ripple as shown. Blocking after edging will even scallops and give a neat finish.
— Additional decorative ridge (optional) :
Round 1 :
Work a surface slip stitch ridge across center column where bunnies and eggs will sit to give a slightly raised outline for sewing appliques. Use contrasting pastel color and work surface slsts following the applique perimeter.
Info :
This ridge is optional but helps hide seam edges when appliques are sewn on and gives a framed look to each stacked bunny+egg set.
— Assembly and Placement Notes :
Info :
Lay the joined panel flat. Measure center points - divide the long panel into three even vertical sections for the three bunny/egg stacks. Place first bunny head centered on lower third, centered horizontally on the panel. Above it, place egg and second bunny head, repeat stacking using pins. Add daisies and layered flowers on either side and stitch down each motif using small whip stitches through back loops only where possible for neater finish.
Info :
Attach paws so they appear to hug the egg: sew paw base to the egg edge and to the face lower edge. Slightly overlap appliques so sewing hides joins.
Info :
When all appliques are in position, sew securely from the back using a yarn needle. Weave tails through multiple stitches and knot securely on wrong side. Trim any visible yarn ends flush with stitches.
Info :
After assembly, lay the runner flat and block again to even edges and make scallops sit uniformly. Use pins to shape scallops; lightly steam if using cotton-blend yarn.
Completing this pastel Easter table runner is such a satisfying project—each layered flower, delicate daisy and rosy ear builds a charming seasonal centerpiece. The modular construction makes progress visible quickly, and the scalloped edging gives a polished finish. 🐰🌸 I loved watching the three bunny stacks come together into one cohesive runner. It’s a wonderful spring decoration or a heartfelt handmade gift. 🧶