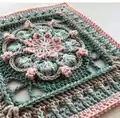
This elegant square pattern captures the layered beauty of blooming flowers and transforms it into a richly textured crochet motif you can use for blankets, cushions, or decorative projects. You will enjoy the mix of stitch textures, popcorns, split-puffs and post-stitch details that bring depth and charm to each round. The pattern is written in US terms and includes colorway notes so you can recreate the sample or choose your own palette.
Progress Tracker
0% Complete
— Pattern Info :
Info :
Hook Used/Finished and blocked Size: 4.5 mm, 11"; 5 mm 12". Crochet Terms: US terminology throughout. Skill Level: Ending intermediate. Yarn and Colors Used: I LOVE THIS COTTON (Worsted Weight), 100% cotton; YARN BEE ~ PIMA SUPREMA (Worsted Weight), 100% cotton; YARN BEE ~ COTTON ET LIN (Worsted Weight), 80% cotton, 20% linen; LOOPS & THREADS ~ Cr?me Cotton (Worsted Weight), 87% cotton, 13% nylon. Colorway 1, A - Bone (Yarn Bee, Pima Suprema); B - Warm Blush (I Love This Cotton); C - Serena Spa (I Love This Cotton); D - Cyan (Yarn Bee, Cotton Et Lin); E - Arctic Ice (I Love This Cotton); F - Chintz (Yarn Bee, Cotton Et Lin). Colorway 2, A - Lace (Yarn Bee, Pima Suprema); B - Smokey Plum (Yarn Bee, Cotton Et Lin); C - Deep Orchid (Loops & Threads, Cr?me Cotton); D - Pale Orchid (Loops & Threads, Cr?me Cotton). Additional Items Needed: Stitch markers and yarn darning needle.
— Stitches Used and Definitions :
Info :
Stitches used and abbreviations as shown: double magic circle; standing stitch; invisible Join (Join); st(s) (Stitch/stitches); sp (Space); ch (Chain); yo (Yarn over); rnd (Round); slst (Slip stitch); sc (Single crochet); FPsc (Front post single crochet); shallow FPsc (Shallow front post single crochet); long sc (Long single crochet); hdc (Half double crochet); dc (Double crochet); BPdc (Back post double crochet); ext-dc (Extended double crochet); FPdc (Front post double crochet); dc3tog (Double crochet three together); tr (Treble crochet); FPtr (Front post treble crochet); 4tr-cluster (Four treble crochet cluster); ext-tr (Extended treble crochet); PC (Popcorn stitch); 2loop-puff; split-puff; 3LP.
Info :
Double magic circle: video links for Right-Handed/Left-Handed provided. Standing stitch: Start with a slip knot on your hook; insert your hook into designated st or ch sp and finish the st as normal. Invisible join: Do not join after completing last st of the rnd; cut yarn; pull yarn tail through st; insert hook from back-to-front of the 2nd st of the rnd; grab yarn and gently pull through. Insert hook from back-to-front and bottom-to-top of the center of the last st of rnd; grab yarn and gently pull through; anchor on backside by drawing through any loops of first and last sts of rnd, and weave in ends. slst: Insert hook into designated st; yo, pull yarn through the st and the loop on hook. sc: Insert hook into designated st, yo and pull up a loop; yo, pull through 2 loops on hook. FPsc: Insert hook from front-to-back-to front around post, so post is in front of hook; yo and pull up a loop; yo, pull through 2 loops on hook. long sc: Insert hook in designated st, yo, and pull up a loop almost to the length of the previous st; yo, pull through 2 loops on hook. hdc: Yo, insert hook into st; yo, pull up a loop; yo, pull through 3 loops on hook. dc: Yo, insert hook into st; yo, pull up a loop; [yo, pull through 2 loops on hook] 2 times. BPdc: Yo, insert hook from back-to-front-to-back around the post, so post is in back of hook; yo, pull up a loop; [yo, pull through 2 loops on hook] 2 times. ext-dc: Yo, insert hook into st; yo, pull up a loop; yo, pull through 1 loop on hook; [yo, pull through 2 loops on hook] 2 times. FPdc: Yo, insert hook from front-to-back-to front around post, so post is in front of hook; yo, pull up a loop; [yo, pull through 2 loops on hook] 2 times. dc3tog: Yo, insert hook into designated st; yo, pull up a loop; yo and pull through 2 loops on hook; [yo, insert hook into next designated st; yo, pull up a loop; yo and pull through 2 loops on hook] 2 times; yo, pull through all 4 loops on hook. tr: Yo 2 times; insert hook into designated st; yo, pull up a loop; [yo, pull through 2 loops] 3 times. FPtr: Yo 2 times, insert hook from front-to-back-to front around post, so post is in front of hook; yo, pull up a loop; [yo, pull through 2 loops on hook] 3 times. 4tr-cluster: Yo 2 times, insert hook into designated st; yo, pull up a loop; [yo, pull through 2 loops on hook] 2 times; yo 2 times, insert hook into same st; yo, pull up a loop; [yo, pull through 2 loops on hook] 2 times; yo 2 times, insert hook into same st; yo, pull up a loop; [yo, pull through 2 loops on hook] 2 times; yo 2 times, insert hook into same st; yo, pull up a loop; [yo, pull through 2 loops on hook] 2 times; yo pull through all 5 loops on hook. ext-tr: Yo 2 times, insert hook into designated st; yo, pull up a loop; Yo, pull through 1 loop on hook; [yo, pull through 2 loops on hook] 3 times. PC: Work 4 dc into same st; drop the loop from hook; insert your hook from front-to-back under the top 2 loops of the 1st dc of group; grab the dropped loop with hook from back-to-front and pull through dc. 2loop-puff: Yo, insert hook into designated st; yo, pull up a long loop; yo, insert hook into same st, pull up a long loop; yo, pull through 4 loops on hook; yo, pull through 2 loops. split-puff: [Yo, insert hook into ch-1 sp or designated area, yo, pull up to height of st] 2 times; sk st, [yo, insert hook into next ch-1 sp or designated area, yo, pull up a loop to height of st] 2 times; (9 loops on hook) yo, pull through 8 loops; (2 loops on hook) yo, pull through 2 loops. 3LP of sc, hdc, dc, tr: sc, hdc, dc and tr sts all have two main loops; the V on top of each st is known as the FL (front loop) and BL (back loop); yo of the sc, and last yo of hdc, dc and tr st create the 3rd loop.
— Rounds :
Round 1 :
Start in double magic circle. ch 5 (as a dc AND ch 2); [dc, ch 1; dc, ch 2] 7 times; dc, ch 1; Join: invisible join to 4th ch of rnd, fasten off. Counts: 16 dc, 8 ch-1 sp, 8 ch-2 sp (40 total)
Round 2 :
Start in any ch-2 sp, *4tr-cluster in ch-2 sp; ch 5, sk dc, ch-1 sp AND dc*; REPEAT FROM * TO * 7 MORE TIMES; Join: invisible join to 1st ch of rnd, fasten off. Counts: 8 4tr-cluster, 8 ch-5 sp (48 total)
Round 3 :
Start in any ch-1 sp of rnd 1, *fold ch-5 to the back, tr in ch-1 sp of rnd 1; ch 2, sk ch-5 sp; shallow FPsc around 4tr-cluster, ch 2*; REPEAT FROM * TO * 7 MORE TIMES; Join: invisible join to 1st ch of rnd, fasten off. Counts: 8 shallow FPsc, 8 tr, 16 ch-2 sp (48 total)
Round 4 :
Start in ch-2 sp after any shallow FPsc, *sc in ch-2 sp; long sc around same ch-2 sp AND ch-5 sp of rnd 2 as one; sc in previously worked ch-2 sp of rnd 3; ch 2, sk tr; sc in ch-2 sp; long sc around same ch-2 sp AND ch-5 sp of rnd 2 as one; sc in previously worked ch-2 sp; ch 2, sk shallow FPsc*; REPEAT FROM * TO * 7 MORE TIMES; Join: invisible join to 1st long sc of rnd, fasten off. Counts: 32 sc, 16 long sc, 16 ch-2 sp (80 total)
Round 5 :
Note: work in rnd 3 only and in front of ch-2 sps of rnd 4. Start in any tr of rnd 3, *([dc, ch 1] 4 times, dc) in tr of rnd 3; sk to next shallow FPsc of rnd 3, sc in shallow FPsc; sk to next tr of rnd 3*; REPEAT FROM * TO * 7 MORE TIMES; Join: invisible join to 1st ch of rnd, fasten off. Counts: 8 sc, 40 dc, 32 ch-1 sp (80 total)
Round 6 :
Note: read instructions for split-puff before starting this rnd. Start between any sc and dc, *split-puff - between sc and dc, and next ch-1 sp, place st marker in 1st st; [ch 1, split-puff – using previously worked ch-1 sp, and next ch-1 sp] 3 times; ch 1, split-puff - using previously worked ch-1 sp, and between next dc and sc; sk sc*; REPEAT FROM * TO * 7 MORE TIMES; Join: invisible join to 1st ch of rnd, fasten off. Counts: 40 split-puff, 32 ch-1 sp (72 total)
Round 7 :
Start in ch-1 sp after marked st of rnd 6, *[(2 hdc) in ch-1 sp, sk split-puff] 4 times-remove marker; ch 1, FPdc around sc of rnd 5 that sits between 2 split-puffs; ch 1, sk split-puff*; REPEAT FROM * TO * 7 MORE TIMES; Join: invisible join to 2nd hdc of rnd, fasten off. Counts: 64 hdc, 8 FPdc, 16 ch-1 sp (88 total)
Round 8 :
Start in any FPdc, *PC in FPdc, ch 4; sk to 3rd split-puff of rnd 6, slst in BL and 3LP of split-puff as one; ch 4, sk to next FPdc of rnd 7*; REPEAT FROM * TO * 7 MORE TIMES; Join: invisible join to 1st ch of rnd, fasten off. Counts: 8 slst, 8 PC, 16 ch-4 sp (80 total)
Round 9 :
Note: Before starting, read the information about slst join and starting the next rnd. Start in hdc of rnd 7 immediately before any PC and always in front of ch-4 sps of rnd 8, *dc in 3LP of hdc; FPsc around PC; dc in 3LP of hdc; hdc in 3LP of 3 hdc; dc in 3LP of 2 hdc; ext-dc in 3LP of hdc; tr in 3LP of hdc; FPsc around PC; tr in 3LP of hdc; ext-dc in 3LP of hdc; dc in 3LP of 2 hdc; hdc in 3LP of 3 hdc*; REPEAT FROM * TO * 3 MORE TIMES; Join: slst to dc OR invisible join to 1st FPsc of rnd, fasten off. Counts: 8 FPsc, 24 hdc, 24 dc, 8 ext-dc, 8 tr (72 total)
Round 10 :
Start in any FPsc between 2 dc OR slst into FPsc and ch 2 (as 1st hdc of rnd), *hdc in FPsc, dc AND 2 hdc; dc in hdc AND 2 dc; ch 3, sk ext-dc AND tr; (ext-tr, ch 5 as a corner; ext-tr) in FPsc; ch 3, sk tr AND ext-dc; dc in 2 dc AND hdc; hdc in 2 hdc AND dc*; REPEAT FROM * TO * 3 MORE TIMES; Join: invisible join to 2nd hdc of rnd, fasten off. Counts: 28 hdc, 24 dc, 8 ext-tr, 8 ch-3 sp, 4 ch-5 corner sp (84 total/21 per side)
Round 11 :
Start in any ch-5 corner sp, *(3 hdc, ch 2, 3 hdc) in ch-5 corner sp; hdc in ext-tr; (2 hdc) in ch-3 sp; hdc in 3 dc, 7 hdc AND next 3 dc; (2 hdc) in ch-3 sp; hdc in ext-tr*; REPEAT FROM * TO * 3 MORE TIMES; Join: invisible join to 2nd hdc of rnd, fasten off. Counts: 100 hdc, 4 ch-2 corner sp (100 total/25 per side)
Round 12 :
Start in any ch-2 corner sp, *[(2loop-puff, ch 1) 3 times; BPdc around 25 hdc, ch 1]*; REPEAT FROM * TO * 3 MORE TIMES; Join: invisible join to 1st ch of rnd, fasten off. Counts: 100 BPdc, 12 2loop-puff, 16 ch-1 sp (128 total/32 per side)
Round 13 :
Start in ch-1 sp after 1st 2loop-puff of any corner, *(2loop-puff, ch 1, 2loop-puff) in ch-1 sp; ch 3 as a corner, sk 2loop-puff; (2loop-puff, ch 1, 2loop-puff) in ch-1 sp; ch 1, sk 2loop-puff; dc3tog, using ch-1 sp and next 2 BPdc, ch 2; [dc3tog using next 3 BPdc, ch 2] 7 times; dc3tog using next 2 BPdc and ch-1 sp; ch 1, sk 2loop-puff*; REPEAT FROM * TO * 3 MORE TIMES; Join: invisible join to 1st ch of rnd, fasten off. Counts: 36 dc3tog, 16 2loop-puff, 16 ch-1 sp, 32 ch-2 sp, 4 ch-3 corner sp (132 total/33 per side)
Round 14 :
Start in any ch-3 corner sp, *(2 ext-dc, ch 2, 2 ext-dc) in ch-3 corner sp; sk 2loop-puff, 2 ext-dc in ch-1 sp; sk 2loop-puff; ext-dc in ch-1 sp; FPtr around 2nd partial dc of dc3tog; (2 ext-dc) in ch-2 sp] 8 times; FPtr around 2nd partial dc of dc3tog; ext-dc in ch-1 sp; sk 2loop-puff; 2 ext-dc in ch-1 sp; sk 2loop-puff*; REPEAT FROM * TO * 3 MORE TIMES; Join: invisible join to 2nd dc of rnd, fasten off. Counts: 104 ext-dc, 36 FPtr, 4 ch-2 corner sp (140 total/35 per side)
Round 15 :
Start in any ch-2 corner sp, *(2 dc, ch 2, 2 dc) in ch-2 corner sp; dc in 35 sts*; REPEAT FROM * TO * 3 MORE TIMES; Join: invisible join to 2nd dc of rnd, fasten off. Counts: 156 dc, 4 ch-2 corner sp (156 total/39 per side)
Info :
Blocking is a great way to put the finishing touches on your square. It allows you to reach your final shape and size. You can either wet block or steam block, but always make sure you are careful when steam blocking acrylic yarn. This pattern and all pictures are copyright protected. You may only print a copy of this pattern for your own use. You may sell items made with this pattern, but please link back to the designer's website and credit the design as requested in the pattern.
This Efflorescent Square pattern is a lovely, textured floral square perfect for blankets, cushions, or standout motifs in your next project. The layered puff and post stitch details create depth and visual interest while remaining approachable for intermediate crocheters. Enjoy experimenting with colorways to make a set of matching or contrasting squares. 🧶🌸