🧢 Beautiful ✨ Detailed πŸ’ Adorable

Dove Amigurumi Pattern

Dove Amigurumi Pattern
4.1β˜… Rating
5-7 Hours Time Needed
1.8K Made This
βœ‚οΈ

Intermediate Level

Ideal for those with basic crochet experience, featuring slightly more advanced stitches and techniques to expand your skills.

⏱️

Weekend Treat

Takes 5-7 hours, making it an enjoyable project to finish over a couple of days.

πŸ₯

Charming Critter

Delightful animal designs with sweet details that capture the essence of your favorite woodland and farmyard friends.

About This Dove Amigurumi Pattern

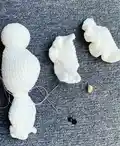
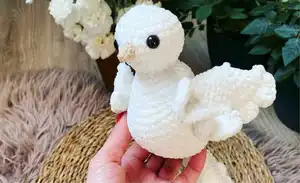
This pattern creates an adorable plush dove crocheted mostly in the round using plush and denim-weight yarns for detail. The design is made in a continuous 'snail' method with clear row counts and shaping notes. You will create the body, tail, wings and a small beak, then sew and finish for a symmetrical, soft result.

Dove Amigurumi Pattern crochet pattern - detailed view of completed project

Suitable for intermediate crocheters, the pattern includes hook sizes and materials for two yarn types. Full step-by-step rounds and finishing instructions are provided to help you assemble the final dove.

Why You'll Love This Dove Amigurumi Pattern

I absolutely love this pattern because it turns two contrasting yarns into a cohesive and tactile dove with personality. I enjoyed designing the fold-and-sew wing technique that gives the wings lovely volume and shape. I love how the plush Dolphin Baby yarn makes the body soft and cloud-like, perfect for gifting to a new baby or as a home accent. I find the beak made with Jeans yarn is a charming tiny detail that adds character without complicating the process.

Dove Amigurumi Pattern step 1 - construction progress Dove Amigurumi Pattern step 2 - assembly progress Dove Amigurumi Pattern step 3 - details and accessories Dove Amigurumi Pattern step 4 - final assembly and finishing

Switch Things Up

I love how easy it is to customize the dove by changing yarn colors; try pastel shades for a baby-friendly version or soft greys for a realistic dove.

I often make a tiny scarf or wreath to add seasonal charm β€” you can crochet a small accessory using leftover yarn.

I sometimes swap the safety eyes for embroidered eyes for a fully washable toy and a softer face finish.

I also experiment with different yarn weights and hooks to change the finished size; bulky yarn creates a chunky, huggable dove while thinner yarns make a delicate mini.

I like adding a tiny stitched heart on the chest for a personalized gift; use a contrast yarn and a few backstitches for a simple detail.

I sometimes make the wings removable by sewing small snaps in place so outfits and decorations can be changed.

I suggest trying eyelash yarn for a textured effect on the wings or tail edges if you enjoy more decorative finishes.

I recommend using a darker Yarn Art Jeans color for the beak if you want more contrast against the plush body.

I also add a light scent sachet inside holiday versions to create a special sensory gift experience for guests or children.

I enjoy creating a family set by crocheting the pattern in a small, medium and large scale β€” change hooks and yarn weight accordingly for coordinated sets.

Common Mistakes & How to Fix Them
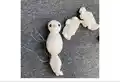
βœ— Skipping the thin thread markers for the start of each row can cause you to lose track of the beginning; place a thin thread or marker in the first stitch of every row and remove it after finishing. βœ— Forgetting to start stuffing at the indicated round can make shaping difficult later; begin filling at the specified 'start fill up' round and add stuffing gradually to keep the shape even. βœ— Overstuffing the piece will distort the shaping and make seams hard to close; stuff firmly but in small amounts and shape as you go to maintain smooth curves. βœ— Not folding and aligning the wing edges precisely will produce asymmetrical wings; fold each wing element carefully, pin them in place and compare both sides before sewing. βœ— Using the wrong hook for the Jeans yarn for the beak will create oversized stitches; use a smaller 1.75 mm hook for the Yarn Art Jeans beak to keep the detail compact.

Dove Amigurumi Pattern

Make a soft, cuddly dove amigurumi using plush chenille yarn and simple shaping techniques. This pattern guides you through a continuous crocheting method to create the head, body, tail, wings and beak. You will learn folding, joining and finishing tips to assemble a charming handcrafted bird perfect for gifts or decor.

Intermediate 5-7 Hours

Materials Needed for Dove Amigurumi Pattern

β€” Main Fabric

  • 01
    Himalaya Dolphin Baby yarn (plush chenille) - main body yarn (white) as listed in pattern
  • 02
    Yarn Art Jeans yarn - thin cotton/jeans yarn for beak and small details
  • 03
    Polyester filling / stuffing - amount as needed to shape body and tail
  • 04
    Safety eyes 10 mm (2 pieces) - for the dove's eyes
  • 05
    Needle and thread for sewing wings and beak

β€” Tools Required

  • 01
    Crochet hook 3.0 mm (for Himalaya Dolphin Baby yarn)
  • 02
    Crochet hook 1.75 mm (for Yarn Art Jeans yarn)
  • 03
    10 mm safety eyes (2 pieces)
  • 04
    Yarn needle for sewing parts
  • 05
    Sewing needle and thread for attaching wings and beak
  • 06
    Scissors
  • 07
    Stitch markers or thin thread markers
  • 08
    Polyester stuffing
  • 09
    Fabric glue (optional) for eyes

Progress Tracker

0% Complete

β€” Head, Body, Tail :

Round 1 :

6sc in MR(6)

Round 2 :

(inc)x6 (12)

Round 3 :

(1sc, inc)x6 (18)

Round 4 :

(2sc, inc)x6 (24)

Round 5 :

(3sc, inc)x6 (30sc)

Round 6 :

30sc

Round 7 :

30sc

Round 8 :

30sc

Round 9 :

(3sc, dec)x6 (24)

Round 10 :

(2sc, dec)x6 (18)

Round 11 :

(1sc, dec)x6 (12)

Round 12 :

(1sc, inc)x6 (18)

Round 13 :

2sc, inc, 4sc, (inc)x4, 4sc, inc, 2sc (24)

Round 14 :

3sc, inc, 5sc, inc, (1sc, inc)x3, 4sc, inc, 3sc (30sc)

Round 15 :

13sc, (inc)x4, 13sc (34) start fill up

Round 16 :

15sc, (inc)x4, 15sc (38)

Round 17 :

38sc

Round 18 :

38sc

Round 19 :

38sc

Round 20 :

38sc

Round 21 :

38sc

Round 22 :

15sc, (dec)x4, 15sc (34)

Round 23 :

34sc

Round 24 :

13sc, (dec)x4, 13sc (30sc)

Round 25 :

30sc

Round 26 :

dec, 11sc, (dec)x2, 11sc, dec (26)

Round 27 :

dec, 10scp, dec, 12sc (24)

Round 28 :

(2sc, dec)x6 (18)

Round 29 :

(1sc, dec)x6 (12) fill up

Round 30 :

3sc, fold in half, connect front to back making 6sc

Round 31 :

ch, turn the piece, for the front loops of 6 sc - work 6sc, turn the piece, on the remaining six stitches work 6sc (12)

Round 32 :

(inc, 5sc)x2 (14)

Round 33 :

(inc, 6sc)x2 (16)

Round 34 :

(inc, 7sc)x2 (18)

Round 35 :

(inc)x2, 7sc, (inc)x2, 7sc (22)

Round 36 :

2sc, inc, 10sc, inc, 8sc (24)

Round 37 :

24sc

Round 38 :

24sc

Round 39 :

24sc

Round 40 :

(2sc, dec)x6 (18)

Round 41 :

18sc

Round 42 :

18sc do not fill the tail

Round 43 :

(1sc, dec)x6 (12)

Round 44 :

12sc

Round 45 :

3sc, fold in half, connect front to back making 6sc

Round 46 :

ch, piece rotation. In each of the 6 sc, work 3 dc in one stitch. Finish

β€” Wings :

Info :

Do 2 elements:

Round 1 :

6sc in MR(6)

Round 2 :

(inc)x6 (12)

Round 3 :

(1sc, inc)x6 (18)

Round 4 :

(2sc, inc)x6 (24)

Round 5 :

(3sc, inc)x6 (30sc)

Round 6 :

(4sc, inc)x6 (36)

Round 7 :

Fold in half, close front and back with 9sc, a circle of 18 sc remains. Continue on it:

Round 7.1 :

18sc

Round 7.2 :

18sc

Info :

Then fold in half, close front to back doing: 4sc, 5 dc. Next: ch, the rotation of the work. There are 18 sc in the closing row.

β€” Beak :

Info :

Yarn Art Jeans crochet 1,75

Round 1 :

5sc in MR(5)

Round 2 :

5sc

Round 3 :

inc, 5sc (6)

Round 4 :

inc, 6sc (7) finish

Info :

Sew the beak, glue the eyes. Attach the wings with a needle and thread. Remember to be symmetrical.

Assembly Instructions

  • Sew the beak to the front center of the head after finishing the beak rounds; glue the safety eyes beside the beak and secure with the safety back or glue as desired.
  • Attach each wing to the sides of the body by positioning them symmetrically, then sew them in place with needle and thread making sure both wings match in height and angle.
  • Start stuffing the body at Round 15 when indicated 'start fill up' and continue adding polyester stuffing before closing the pieces at the specified 'fill up' rounds; do not fill the tail (Round 42) as instructed.
  • Fold and join front to back at the tail and wing attachment points by aligning edges carefully and connecting with single crochet or whipstitch to form smooth seams.
  • Weave in all yarn ends securely and check symmetry of eyes, beak and wings before finishing; adjust stuffing if needed to perfect the shape.

Important Notes

  • πŸ’‘Use a thin thread marker in the first stitch of each round to help you locate the start of the round while working the continuous 'snail' method.
  • πŸ’‘Begin stuffing at the pattern note 'start fill up' and stuff gradually to achieve the correct shape without lumps; avoid stuffing the tail as noted.
  • πŸ’‘Fold wings and tail elements before joining so you can align edges precisely and sew them symmetrically for a balanced final look.
  • πŸ’‘Use the specified smaller hook for Yarn Art Jeans when making the beak to keep stitches tight and details neat.

This fluffy Dove pattern brings a gentle, handmade bird to life with soft plush yarn and thoughtful shaping. Perfect as a nursery accent or a heartfelt gift, each stitch adds warmth to your home. Make one today and enjoy the calming process of crochet. πŸ§ΆπŸ•ŠοΈ

You ask,

we answer.

FAQs

What size will the finished piece be?

The finished amigurumi measures approximately 20-25 cm tall depending on stuffing and tension when using the recommended yarns and hook sizes.

Can I use different yarn weights for this pattern?

Yes, you can use different yarn weights, but this will affect the final size and texture; use an appropriate hook for your chosen yarn and adjust stuffing accordingly.

Do I need prior crochet experience for this pattern?

This pattern is rated intermediate, so basic knowledge of single crochet, increases, decreases and working in the round is recommended.

How long does this project typically take to complete?

Most crocheters complete this project in 5-7 hours, though time may vary based on experience level and working pace.