🧶 Beautiful ✨ Detailed 💝 Adorable

Elephant Amigurumi Pattern

Elephant Amigurumi Pattern
4.8★ Rating
5-7 Hours Time Needed
2.4K Made This
✂️

Intermediate Level

Ideal for those with basic crochet experience, featuring slightly more advanced stitches and techniques to expand your skills.

⏱️

Weekend Treat

Takes 5-7 hours, making it an enjoyable project to finish over a couple of days.

🧸

Cute Companion

An adorable friend to cherish, handcrafted with love to bring comfort and joy for years to come.

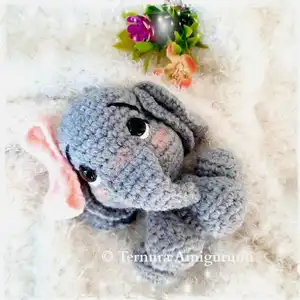
About This Elephant Amigurumi Pattern

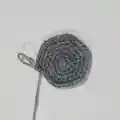
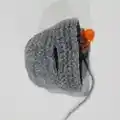
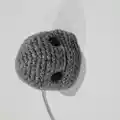
This pattern shows how to crochet a small, charming elephant amigurumi complete with trunk, ears, legs, and a decorative ribbon. Instructions include every round and visual guidance for assembly and facial shaping. You will learn how to join pieces seamlessly and embroider eyes and eyebrows for a playful expression.

Elephant Amigurumi Pattern crochet pattern - detailed view of completed project

Designed for intermediate crocheters who enjoy character work and assembly. The pattern includes detailed step-by-step rounds and helpful images to guide shaping and finishing.

Why You'll Love This Elephant Amigurumi Pattern

I absolutely love this pattern because it transforms simple stitches into a sweet, expressive elephant with lots of personality. I enjoy the shaping challenges—especially forming the trunk and expressive eyebrows—which make each finished piece unique. The combination of small parts and step-by-step assembly keeps the process engaging from start to finish. I take particular joy in adding the little ribbon and blush details that bring warmth and charm to the finished amigurumi.

Elephant Amigurumi Pattern step 1 - construction progress Elephant Amigurumi Pattern step 2 - assembly progress Elephant Amigurumi Pattern step 3 - details and accessories Elephant Amigurumi Pattern step 4 - final assembly and finishing

Switch Things Up

I love experimenting with different yarns to change the feel of this elephant; try a fluffy yarn for a soft, cuddly look or a smooth cotton for a neater finish.

I often make a mini version by using a finer yarn and smaller hook to create a tiny keychain-sized elephant.

You can also scale up the pattern by using bulky yarn and a larger hook to make a huggable plush version for kids.

I like to swap the ribbon color or pattern to match seasons or personalize it as a gift; pastel pinks, blues, or polka dots all look charming.

I sometimes embroider different mouth shapes or change eyebrow placement to alter the elephant's expression and personality.

Try felt or safety eye sizes different from the pattern to create varied facial looks; larger eyes give a more baby-like appearance.

I add tiny crocheted accessories like a little hat or a scarf to turn the elephant into a themed character for holidays.

For posability, I occasionally insert a thin wire into the arms before stuffing so they can be posed forward or hugging a small object.

I recommend practicing the trunk join on a spare scrap first; you can change how deep the trunk sits to create different silhouettes.

When sewing pieces together, I always pin and photograph placement before final sewing so I can compare symmetry and make adjustments easily.

Common Mistakes & How to Fix Them

✗ Not using a consistent spiral weave causes gaps and mismatched rounds; maintain an even spiral and use a stitch marker to track your beginning of round. ✗ Forgetting to leave a long yarn tail for sewing makes assembly difficult; always leave the long tail indicated so you can sew parts together securely. ✗ Overstuffing early will distort shaping and cause bumps; stuff gradually and evenly, shaping as you go so the head and body stay smooth. ✗ Placing safety eyes too late can create misaligned features; follow the instruction to place eyes in Round Nº10 to ensure correct spacing and symmetry. ✗ Skipping the back loop instruction for legs or arms changes the shape drastically; take the back chain when specified to obtain the correct flat shape for limbs.

Elephant Amigurumi Pattern

Create an adorable mini elephant amigurumi with clear step-by-step instructions you can follow at home. This pattern includes every round, materials list, and assembly guidance so you can sew and shape the plush exactly like the photos. Perfect for gifting or keeping as a sweet handmade companion, you will enjoy stitching the charming trunk, floppy ears, and ribbon detail.

Intermediate 5-7 Hours

Materials Needed for Elephant Amigurumi Pattern

— Main Fabric

  • 01
    Cotton or wool thread: Grey - amount as needed for main body
  • 02
    Cotton or wool thread: White - small amount for details
  • 03
    Cotton or wool thread: Black - small amount for embroidery details
  • 04
    Cotton or wool thread: Pink - small amount for ribbon and blush
  • 05
    Fiberfill or padding of your choice for stuffing

— Tools Required

  • 01
    Crochet hook no. 2.5mm
  • 02
    Wool needle
  • 03
    Plastic eyes N°10
  • 04
    Fiberfill or padding of your choice

Progress Tracker

0% Complete

— Head + Body :

Info :

Weave spiral

Round 1 :

Magic ring 6sc (6)

Round 2 :

1inc at all stitches (12)

Round 3 :

(1sc, 1inc) x6 (18)

Round 4 :

(2sc, 1inc) x6 (24)

Round 5 :

(3sc, 1inc) x6 (30)

Round 6 :

(4sc, 1inc) x6 (36)

Round 7 - 11 :

36sc (36)

Round 12 :

9sc, (1inc) x3, 3sc, 6ch (leave 6 free stitches), 3sc, (1inc) x3, 9sc (42)

Round 13 - 15 :

42sc (42)

Round 16 :

(5sc, 1dec) x6 (36)

Info :

Place eyes in Round Nº10, on the sides of the opening made.

Round 17 :

(4sc, 1dec) x6 (30)

Round 18 :

(3sc, 1dec) x6 (24)

Round 19 :

(2sc, 1dec) x6 (18). Fill

Round 20 :

(1sc, 1dec) x6 (12)

Round 21 :

(1sc, 1inc) x6 (18)

Round 22 :

(2sc, 1inc) x6 (24)

Round 23 - 28 :

24sc (24)

Round 29 :

(2sc, 1dec) x6 (18). Fill

Round 30 :

(1sc, 1dec) x6 (12)

Round 31 :

(1dec) x6 (6). Fasten off

— Trunk :

Round 1 :

Magic ring 4sc (4)

Round 2 :

(1sc, 1inc) x2 (6)

Round 3 :

6sc (6)

Round 4 :

(2sc, 1inc) x2 (8)

Round 5 :

8sc (8)

Round 6 :

(3sc, 1inc) x2 (10)

Round 7 :

10sc (10)

Round 8 :

(4sc, 1inc) x2 (12). Do not fill

Info :

Leave a long yarn for sewing. Join the edge of the trunk as shown in the images.

Info :

Join the trunk to the face in the opening that we left previously.

Info :

Embroider the eyes and eyebrows as shown in the images.

Info :

Shape the face as shown in the images.

— Ears (x2) :

Round 1 :

Magic ring 6sc (6)

Round 2 :

1inc at all stitches (12)

Round 3 :

(1sc, 1inc) x6 (18)

Round 4 :

(2sc, 1inc) x6 (24)

Round 5 :

(3sc, 1inc) x6 (30)

Round 6 :

(1dec) x2, 1sc, (3sc in the same stitch) x22, 1sc, (1dec) x2 (66)

Info :

Leave a long yarn for sewing. Pin the top to shape the ear, then pin the ears to the head.

— Legs (x2) :

Round 1 :

Magic ring 6sc (6)

Round 2 :

1inc at all stitches (12)

Round 3 :

(1sc, 1inc) x6 (18)

Round 4 :

Taking the back chain: 18sc (18)

Round 5 :

(1sc, 1dec) x6 (12). Fill

Round 6 :

(1dec) x6 (6)

Round 7 :

6sc (6)

Info :

Leave a long yarn for sewing.

Info :

Join the legs to the body from Round Nº25.

— Arms (x2) :

Round 1 :

Magic ring 6sc (6)

Round 2 :

1inc at all stitches (12)

Round 3 :

(1sc, 1inc) x6 (18)

Round 4 :

Taking the back chain: 18sc (18)

Round 5 :

(1sc, 1dec) x6 (12). Fill

Round 6 :

(2sc, 1dec) x3 (9)

Round 7 :

9sc (9)

Round 8 :

(1sc, 1dec) x3 (6)

Round 9 :

6sc (6)

Info :

Leave a long yarn for sewing. Join the arms to the body from Round Nº21.

— Tail :

Round 1 :

8ch

Round 2 :

8st

Info :

Attach the tail to the body.

— Ribbon :

Round 1 :

Ring of 26ch

Round 2 :

26sc (26)

Round 3 - 5 :

26sc (26)

Round 6 :

8ch

Info :

Shape the ribbon by joining the last chain with the first chain as shown in the images.

Info :

Apply blush on the cheeks and on the trunk as seen in the images.

Info :

Join the ribbon to the head.

Assembly Instructions

  • Join the edge of the trunk and sew the trunk into the opening left in the face, aligning the seam so the trunk sits centered and secure it with hidden stitches.
  • Pin and sew the ears to the head after shaping the top of each ear; position them symmetrically on either side of the head and secure with whipstitch.
  • Position and join the arms to the body starting from Round Nº21, attaching each arm securely and hiding the yarn tails inside as you sew.
  • Attach the legs to the body from Round Nº25, spacing them evenly and sewing through the body rounds for a stable base.
  • Attach the tail to the lower back of the body, securing with several stitches so it sits firmly in place.
  • Shape and join the ribbon to the head, then apply blush to the cheeks and trunk as shown in the images for the final finishing touch.

Important Notes

  • 💡Use a stitch marker to mark the beginning of each spiral round so you do not lose track of rounds during shaping.
  • 💡Leave long yarn tails for sewing on the trunk, ears, legs, and arms to make assembly easier and neater.
  • 💡Stuff parts gradually and evenly; fill the head and limbs to the point that they hold shape without overstuffing.
  • 💡Pin pieces in place and check symmetry before sewing to ensure balanced placement for ears, arms, and legs.

This delightful Elephant amigurumi pattern brings a tiny, loving companion to life with careful shaping and sweet details. Whether you make it as a gift or a keepsake, the finished elephant is full of charm and personality. Happy crocheting and enjoy every stitch! 🧶 🐘

You ask,

we answer.

FAQs

What size will the finished piece be?

The finished amigurumi measures approximately 10 cm tall when using the recommended 2.5mm hook and similar yarn thickness.

Can I use different yarn weights for this pattern?

Yes, you can use different yarn weights but the final size will change; choose an appropriate hook and adjust stuffing and eye size accordingly.

Do I need prior crochet experience for this pattern?

This pattern is rated intermediate, so basic knowledge of single crochet, increases and decreases, and working in spiral is recommended.

How long does this project typically take to complete?

Most crocheters complete this project in 5-7 hours, though time can vary depending on experience and how carefully you do assembly and finishing.

When should I place the safety eyes?

Place the safety eyes in Round Nº10 on the sides of the opening, as specified, to ensure correct placement and expression.