About This Ninja Turtle Amigurumi Pattern
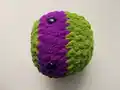
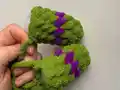
This pattern creates a soft, chenille Ninja Turtle amigurumi complete with mask, shell, belly, and waist strap. It uses blanket chenille yarn for a plush texture and a 7mm hook for quick, squishy stitches. You will follow clear round-by-round instructions, color change notes, and helpful assembly tips to finish a polished toy.

Perfect for gift-making or display, the turtle measures about 28cm (11 inches) with the recommended yarn and hook. Mask colours are interchangeable (Red, Purple, Orange, Blue) so you can make all four turtles.
Why You'll Love This Ninja Turtle Amigurumi Pattern
I absolutely love this pattern because it turns simple stitches into a squishy, character-filled friend that you can customize. I enjoy how quickly the chenille yarn builds volume, giving the turtle a cuddly feel in just a few rounds. The interchangeable mask colours let me make a whole set with the same body pattern, which is so satisfying. I also appreciate the clear assembly tips—using knitting needles to hold pieces in place makes sewing so much easier. Sharing this pattern lets me see other crocheters add their own touches and whimsical details.
Switch Things Up
I love customizing this pattern by changing mask colours and stripe placements to create unique personalities for each turtle.
I sometimes swap the chenille yarn for a slightly thinner plush yarn and use a smaller hook to make a smaller, cuter turtle.
I also experiment with embroidering smiles or different eye shapes to change the expression and character of the face.
I like to make matching accessories like tiny crocheted weapons or a little scarf for seasonal variations.
I often add wire inside the arms for posability, especially when I want the turtles to hold small props.
I recommend trying different safety eye sizes to alter the look — bigger eyes give a more whimsical feel.
I sometimes make the shell in two colours or add surface embroidery to mimic shell patterns for a realistic twist.
I will add a small loop at the top of the head to turn this into a hanging ornament or bag charm if desired.
I enjoy varying the waist strap length and knot style to personalize each turtle’s outfit and presentation.
I encourage you to mix and match colours, yarn textures, and tiny accessories to make each finished amigurumi truly one-of-a-kind.
Common Mistakes & How to Fix Them
✗ Skipping stitch markers during rounds can cause you to lose track of the beginning of the round; use a stitch marker at the first stitch of every round to stay aligned.
✗ Stuffing too late or unevenly will cause awkward shaping and lumps; stuff gradually as instructed and shape firmly but not overstuffed.
✗ Changing colours without securing tails can leave loose ends showing; weave in ends or trap them with subsequent rounds to secure colour changes.
✗ Not counting stitches after increases or decreases results in incorrect shaping; count stitches at the end of each round to ensure the correct stitch total.
✗ Closing the body circle too early will prevent sewing the head and shell easily; leave a tail for sewing as instructed and do not close the circle until assembly.
✗ Sewing parts without pinning leads to misaligned features; use knitting needles or pins to hold pieces in place before you sew them on.