🧢 Beautiful ✨ Detailed πŸ’ Adorable

Face Mask Crochet Pattern

Face Mask Crochet Pattern
4.6β˜… Rating
2-3 Hours Time Needed
3.9K Made This
βœ‚οΈ

Beginner Friendly Level

Perfect for those just starting their crochet journey, with clear instructions and simple techniques

⏱️

Bite-Sized Project

Finishes in 2-4 hoursβ€”perfect for an afternoon of creative relaxation.

🧣

Snug Essential

Everyday comfort with practical charm, designed for both functionality and style through changing seasons.

About This Face Mask Crochet Pattern

This pattern creates a fitted crochet face mask worked flat with back-loop single crochet ridges to give a contoured central curve. The instructions are beginner-friendly and use basic stitches with clear marker placement for shaping. Youll get a finished central section about 6 inches (15-16 cm) across, plus webbed ear straps you can customize.

Face Mask Crochet Pattern crochet pattern - detailed view of completed project

The pattern includes a materials list, full round-by-round instructions, trim/strap steps, and blocking tips for a polished finish. Follow the video link for a visual walkthrough if you prefer guided help.

Why You'll Love This Face Mask Crochet Pattern

I absolutely love this pattern because it transforms simple single crochet stitches into a beautifully shaped mask with minimal fuss. I enjoy how the back-loop texture creates a natural central curve without complicated shaping. I also appreciate that it is quick to work up, so you can make multiple masks in different colors in a short time. I designed it to be beginner-friendly while still producing a professional-looking result that I am proud to wear.

Face Mask Crochet Pattern step 1 - construction progress Face Mask Crochet Pattern step 2 - assembly progress Face Mask Crochet Pattern step 3 - details and accessories Face Mask Crochet Pattern step 4 - final assembly and finishing

Switch Things Up

I love how easy it is to customize this pattern by changing yarn color and texture; try a speckled or variegated yarn for subtle stripes.

To make the mask larger or smaller I often change the hook size and yarn weight; bulky yarn with a larger hook creates a chunkier, larger mask while finer yarn and a smaller hook makes a sleeker, smaller result.

I sometimes add a soft fabric lining for extra comfort and filtration; sew a matching cotton lining to the underside before finishing the straps.

You can replace the crocheted ear straps with elastic or adjustable toggles for faster on-and-off wear and easier fit adjustments.

I like to embroider small motifs or initials on one corner of the mask to personalize it as a gift or identifier.

For a breathable, layered option, create a pocket by adding a narrow row at the top and bottom edges to tuck in a replaceable filter.

Try alternating rows of different stitch textures (for example HDC or DC rows) to change the look while keeping the same shaping principles.

If you want a seasonal version, choose holiday or pastel colors and even add a small crocheted flower or button as decoration.

I also sometimes adjust the number of chains for the ear straps depending on head size and comfort β€” always measure on the intended wearer before finishing.

Finally, experiment with blocking techniques: damp-block or steam-block through a damp cloth to get the exact curve and neat edges that make a handmade mask look professional.

Common Mistakes & How to Fix Them

βœ— Skipping placing markers at the 10th, 17th and 24th stitches; attach markers as instructed to maintain the central shaping and avoid off-center increases. βœ— Forgetting to crochet into the back loop only for SlSt and SC rows; always work into the back loop only to create the correct ridge texture and shaping. βœ— Not rearranging markers when instructed during increases and decreases; move the markers to the central stitch when asked to keep symmetry and accurate shaping. βœ— Cutting the thread too early after round 27; leave the thread attached as instructed so you can continue directly to the trim and strap steps without rejoining.

Face Mask Crochet Pattern

Make a comfortable, fitted crochet face mask using a simple back-loop single crochet technique. This beginner-friendly pattern guides you step-by-step with clear rounds, markers placement, and finishing instructions so you can create a neat, shaped mask. Youll get a reusable cotton or cotton-blend mask with a flattering central curve and secure ear straps. Perfect for gifting or making a few in different colors to match your outfits.

Beginner Friendly 2-3 Hours

Materials Needed for Face Mask Crochet Pattern

β€” Main Fabric

  • 01
    Any yarn cotton or acrylic + cotton, 160m/50gr (1.76 Oz / 174 yds) β€” example: Yarn Art Jeans, 1/2 skein (approximate amount for one mask)

β€” Tools Required

  • 01
    Crochet hook N3 (3mm)
  • 02
    3 stitch markers
  • 03
    Scissors
  • 04
    Iron and damp cloth for blocking

Progress Tracker

0% Complete

β€” Crochet canvas :

Info :

Crochet 34 CH

Round 1 :

With the second loop from the hook crochet 33 SC, 1CH. Attach markers to the 10th, 17th and 24th SC. Turn material on another side.

Round 2 :

8SlSt, SC, Inc, 5SC, Dec, 5SC, Inc, SC, 8SlSt (35), CH, rearrange markers to the central stitch Ins and Dec, and repeat in the each row. Turn.

Round 3 :

8SlSt, 2SC, Inc, 5SC, Dec, 5SC, Inc, 2SC, 8SlSt (37), CH, turn,

Round 4 :

8SlSt, 3SC, Inc, 5SC, Dec, 5SC, Inc, 3SC, 8SlSt (39), CH, turn,

Round 5 :

8SlSt, 4SC, Inc, 5SC, Dec, 5SC, Inc, 4SC, 8SlSt (41), CH, turn,

Round 6 :

8SlSt, 5SC, Inc, 5SC, Dec, 5SC, Inc, 5SC, 8SlSt (43), CH, turn,

Round 7 :

8SlSt, 6SC, Inc, 5SC, Dec, 5SC, Inc, 6SC, 8SlSt (45), CH, turn,

Round 8 :

8SlSt, 7SC, Inc, 5SC, Dec, 5SC, Inc, 7SC, 8SlSt (47), CH, turn,

Round 9 :

8SlSt, 8SC, Inc, 5SC, Dec, 5SC, Inc, 8SC, 8SlSt (49), CH, turn,

Round 10 :

8SlSt, 9SC, Inc, 5SC, Dec, 5SC, Inc, 9SC, 8SlSt (51), CH, turn,

Round 11 :

8SlSt, 10SC, Inc, 5SC, Dec, 5SC, Inc, 10SC, 8SlSt (53), CH, turn,

Round 12 :

8SlSt, 11SC, Inc, 5SC, Dec, 5SC, Inc, 11SC, 8SlSt (55), CH, turn,

Round 13 :

8SlSt, 12SC, Inc, 5SC, Dec, 5SC, Inc, 12SC, 8SlSt (57), CH, turn,

Round 14 :

8SlSt, 13SC, Inc, 5SC, Dec, 5SC, Inc, 13SC, 8SlSt (59), CH, turn,

Round 15 :

8SlSt, 14SC, Inc, 5SC, Dec, 5SC, Inc, 14SC, 8SlSt (61), CH, turn,

Round 16 :

8SlSt, 15SC, Inc, 5SC, Dec, 5SC, Inc, 15SC, 8SlSt (63), CH, turn,

Round 17 :

8SlSt, 16SC, Inc, 5SC, Dec, 5SC, Inc, 16SC, 8SlSt (65), CH, turn,

Round 18 :

8SlSt, 17SC, Inc, 5SC, Dec, 5SC, Inc, 17SC, 8SlSt (67), CH, turn,

Round 19 :

8SlSt, 18SC, Inc, 5SC, Dec, 5SC, Inc, 18SC, 8SlSt (69), CH, turn. Leave one marker in the middle

Round 20 :

8SlSt, 25SC, Dec, 25SC, 8SlSt (67), CH, rearrange markers to the central stitch

Info :

Dec, and repeat in the each row. Turn.

Round 21 :

8SlSt, 24SC, Dec, 24SC, 8SlSt (65), CH, turn,

Round 22 :

8SlSt, 23SC, Dec, 23SC, 8SlSt (63), CH, turn,

Round 23 :

8SlSt, 22SC, Dec, 22SC, 8SlSt (61), CH, turn,

Round 24 :

8SlSt, 21SC, Dec, 21SC, 8SlSt (59), CH, turn,

Round 25 :

8SlSt, 20SC, Dec, 20SC, 8SlSt (57), CH, turn,

Round 26 :

8SlSt, 19SC, Dec, 19SC, 8SlSt (55), CH, turn,

Round 27 :

8SlSt, 18SC, Dec, 18SC, 8SlSt (53), CH, turn. The thread is not cut.
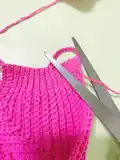
β€” Trim canvas :

Info :

You need to make CH. It will be a webbing. I measured myself, so I got a 40CH. You must measure by the person for whom the mask is intended.

Info :

Next, you need to attach this chain to the beginning of the mask in the 1th loop and do SlSc.

Info :

Crochet 33SlSt in the underside of the mask. After, make the CH again the same length for the strap for the 2th ear. I have 40 CH.

Info :

Attach this chain to the opposite side. Finish crocheting using SlSt. Cut the thread. Hide the end along the stitches with a hook.

β€” Finishing :

Info :

The mask must be blocking: release iron through damp cloth
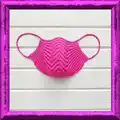
Info :

Your cute mask is ready!

Assembly Instructions

  • Attach the first ear strap chain to the beginning of the mask in the first loop and secure with slip stitches (SlSt) along the underside.
  • Crochet 33 SlSt across the underside of the mask to anchor the strap area, then make a second chain the same length for the opposite ear strap and attach in the same manner.
  • Finish crocheting the second strap with SlSt, cut the thread, and hide the ends along the stitches using a hook or yarn needle for a tidy finish.
  • Block the finished mask by applying a steam/release iron through a damp cloth to set the shape and smooth the central curve.

Important Notes

  • πŸ’‘Use stitch markers on the 10th, 17th and 24th SC in round 1 and rearrange them when instructed to keep shaping accurate.
  • πŸ’‘Work all specified SlSt and SC into the back loop only to achieve the textured ridges used for the central shaping.
  • πŸ’‘Measure ear strap chain length for the wearer; the pattern author used 40 CH but adjust for comfort and fit.
  • πŸ’‘Do not cut the working yarn after round 27 until you have completed the trim and strap steps so you can continue without joining.

This mask pattern is a fast and satisfying project that turns basic stitches into a neat, contoured face mask. Make a few in different colors to match your wardrobe and share them with friends. Have fun customizing straps and colors while you crochet! 🧢✨

You ask,

we answer.

FAQs

What size will the finished piece be?

If you crochet the mask following the instructions and recommended yarn, the central part will be about 6 inches (15-16 cm) across.

Can I use different yarn weights for this pattern?

Yes, you can use other yarns, but the final size and drape will change; choose an appropriate hook size and check gauge to adjust the fit.

Do I need prior crochet experience for this pattern?

This pattern is beginner friendly and uses basic stitches like chain, single crochet and slip stitch, but familiarity with working into the back loop is helpful.

How long does this project typically take to complete?

Most crocheters finish this bite-sized project in about 2-3 hours, though time may vary depending on pace and customization.