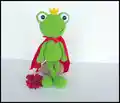
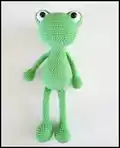
About This Frog Prince Amigurumi Pattern
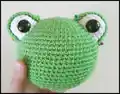
This pattern creates a Frog Prince amigurumi approximately 17 inches tall from bottom to top of head using worsted weight yarn. You will make separate pieces for the head, body, eyes, eyelids, arms, legs and a small crown, then assemble them for a finished toy. The pattern uses basic amigurumi techniques including magic ring, increases, decreases and simple shaping. Photo references and an assembly section help place the features accurately.

Includes full materials list, abbreviations, and step-by-step rounds for each piece. Great for crafters comfortable with continuous spiral rounds and stitching parts together.
Why You'll Love This Frog Prince Amigurumi Pattern
I absolutely love this pattern because it turns simple stitches into a whimsical character with charm and personality. I enjoy how the shaping creates an expressive head and elongated body that gives the frog a sweet, storybook look. The separate eyelids and crown are small details I add because they give the finished amigurumi character and a playful personality. I hope you find the process as rewarding as I do when assembling and finishing each tiny element.
Switch Things Up
I love customizing this pattern by switching yarn colors for unique character variations; try soft pastels for a sleepy frog or neon greens for a playful version.
I often change the yarn weight and hook size to make different sizes: bulky yarn with a larger hook creates a chunky cuddle buddy, while sport weight creates a smaller collectible.
I sometimes replace safety eyes with embroidered eyes or smaller buttons if the amigurumi is for a baby to make it safer.
I like to add tiny crocheted accessories like scarves, bow ties, or suspenders to give each frog its own personality.
For a different look I experiment with facial expression by changing the placement of the eyelids and embroidery for the mouth.
I add a bit of wire inside the limbs if I want posable arms and legs; it helps create playful poses while still being soft.
To make a themed set, I create multiple frogs with different crowns and cape colors — they look great displayed together.
I sometimes embroider patches or textures on the belly to imitate spots or a vest for more character detail.
Try mixing yarn textures, like cotton for a crisp finish or acrylic for easy washing — each gives a different final feel.
I recommend experimenting with stuffing levels: slightly firmer stuffing gives stability while softer stuffing makes the toy more cuddly and floppy.
Common Mistakes & How to Fix Them
✗ Skipping stitch markers during the spiral rounds causes you to lose track of the beginning of each round; always place a marker and move it at the end of each round to stay on track.
✗ Overstuffing limbs and the body will distort shaping and make seams difficult to close neatly; stuff gradually, shaping as you go and stop stuffing before closed seams.
✗ Not counting stitches after increases and decreases leads to uneven shaping and mismatched pieces; count every round, especially at increases/decreases and after repeating patterns.
✗ Placing safety eyes without pinning first can result in uneven spacing or misaligned features; pin and check placement from multiple angles before securing the eyes.
✗ Sewing pieces without pinning can produce lopsided assembly and awkward limb positions; always pin pieces in place, check symmetry, then sew with small invisible stitches for a clean finish.