๐Ÿงถ Beautiful โœจ Detailed ๐Ÿ’ Adorable

Feather Locklear the Chick Amigurumi Pattern

Feather Locklear the Chick Amigurumi Pattern
4.7โ˜… Rating
5-7 Hours Time Needed
3.9K Made This
โœ‚๏ธ

Intermediate Level

Ideal for those with basic crochet experience, featuring slightly more advanced stitches and techniques to expand your skills.

โฑ๏ธ

Weekend Treat

Takes 5-7 hours, making it an enjoyable project to finish over a couple of days.

๐Ÿงธ

Cute Companion

An adorable friend to cherish, handcrafted with love to bring comfort and joy for years to come.

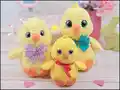
About This Feather Locklear the Chick Amigurumi Pattern

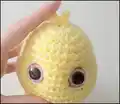
This pattern creates a charming 6-inch crocheted chick worked from the top of the head to the bottom of the body. It includes complete round-by-round instructions for the head, body, wings, feet, tail, beak and optional hair tuft. You will learn eye placement techniques, shaping using increases and decreases, and how to assemble and embroider facial details.

Feather Locklear the Chick Amigurumi Pattern crochet pattern - detailed view of completed project

The pattern also lists alternate yarn and eye size options for fluffy or chenille versions and provides helpful photo guides for eye placement and finishing. You will receive clear tips for stuffing, sewing pieces in place, and customizing your chick.

Why You'll Love This Feather Locklear the Chick Amigurumi Pattern

I absolutely love this pattern because it captures a playful personality in a small, satisfying project. I designed the round-by-round shaping so the chick has a soft, plump body and an expressive face that makes everyone smile. I enjoy the simple construction worked in a continuous spiral โ€” it keeps the process steady and meditative for me. The eye placement technique included is one of my favorite tips because it gives so much life to the finished piece.

Feather Locklear the Chick Amigurumi Pattern step 1 - construction progress Feather Locklear the Chick Amigurumi Pattern step 2 - assembly progress Feather Locklear the Chick Amigurumi Pattern step 3 - details and accessories Feather Locklear the Chick Amigurumi Pattern step 4 - final assembly and finishing

Switch Things Up

I love customizing this chick by changing yarn texture; try fluffy yarn for a soft, cuddly look or chenille for a velvety finish.

I sometimes use brighter or pastel yellows to match a seasonal theme โ€” swap Color A to make spring or baby-themed chicks.

If you want a mini keychain version, use a thinner yarn and a much smaller hook, then replace safety eyes with embroidered eyes for safety.

I adjust eye sizes to change personality: larger eyes give a cuter, more whimsical expression while smaller eyes look more realistic.

For a rustic style, use natural fiber yarns and muted tones; you can also add small crocheted accessories like bows or scarves.

I like to embroider eyelids or cheeks for extra expression โ€” use short strands of yarn and a small needle to make delicate details.

To make a posable chick, I add thin wire inside the wings or neck, but be sure to wrap wire well and use caution for child-safe toys.

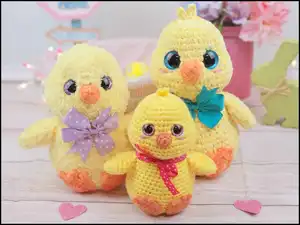
I sometimes create a family set by changing yarn weights and hook sizes to make small, medium and large chicks with matching features.

For a textured foot or beak, experiment with surface stitches or a slip-stitch edging before sewing pieces on for a little extra definition.

I also enjoy making themed chicks by adding tiny felt accessories, embroidered initials, or miniature hats to create personalized gifts.

Common Mistakes & How to Fix Them

โœ— Skipping stitch markers during continuous spiral work can cause you to lose the beginning of rounds; place and move a stitch marker at the start of every round to keep your stitch counts accurate.
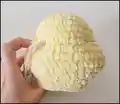
 โœ— Not stuffing gradually can create lumps or an uneven shape; stuff a little at a time and shape as you go, focusing stuffing toward the front of the head before finishing the body.
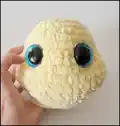
 โœ— Placing safety eyes without checking spacing may give an unbalanced face; follow the pattern instructions for rounds and use pins to test eye placement before securing or adding washers. โœ— Pulling yarn too tightly when adjusting eyes or embroidering can warp stitches and distort shaping; use gentle, even tension when pulling yarn through holes and adjust slowly until you reach the desired look. โœ— Using a different yarn weight without adjusting hook or eye placement will change finished size and proportions; if you change yarn weight or hook, test gauge with a small sample and adjust eye spacing accordingly.

Feather Locklear the Chick Amigurumi Pattern

Make your own adorable Feather Locklear chick with this approachable intermediate amigurumi pattern. You will crochet a sweet 6" chick from top of head to bottom with full round-by-round instructions, materials list, and assembly guidance. The pattern uses worsted weight yarn and includes tips for eye placement, different yarn versions, and finishing touches. Perfect for gifting or keeping as a cuddly companion.

Intermediate 5-7 Hours

Materials Needed for Feather Locklear the Chick Amigurumi Pattern

โ€” Main Fabric

  • 01
    Worsted weight yarn (#4), approximately 50g main color (Color A: Yellow)
  • 02
    Worsted weight yarn (#4), approximately 20g accent color (Color B: Orange)
  • 03
    Alternate fluffy yarn option: Little Bunny Yellow or Parfait Mango for fluffy chick (see Helpful Tips)
  • 04
    Alternate chenille option: Parfait Yellow, Parfait Mango and Flecks yarn loops (double stranded for chenille version)
  • 05
    Small amounts of pink or white yarn for embroidered cheeks and eye highlights

โ€” Tools Required

  • 01
    Crochet hook size D / 3.25 mm (recommended for main version)
  • 02
    F hook (used for fluffy and chenille versions; use hook listed in Helpful Tips for those versions)
  • 03
    Safety eyes 18 mm (standard for main pattern)
  • 04
    Optional safety eyes 23 mm (fluffy version) and 28 mm (chenille version as noted in Helpful Tips)
  • 05
    Scissors
  • 06
    Sewing needle for finishing and assembly
  • 07
    Stitch marker
  • 08
    Polyester fiberfill stuffing
  • 09
    Pins for assembly and placement

Progress Tracker

0% Complete

โ€” Head and Body :

Round 1 :

Make 12 sc into a magic ring= 12

Round 2 :

Increase in each st around= 24

Round 3 :

(3 sc, inc) x 6= 30

Round 4 :

sc in each st around

Round 5 :

(4 sc, inc) x 6= 36

Round 6-8 :

sc in each st around

Info :

Mark the 6th and 7th inc with a st marker on round 9 for placement of eyes

Round 9 :

inc x 6, 6 sc, inc x 6, 18 sc= 48

Round 10-12 :

sc in each st around

Round 13 :

dec x 6, 6 sc, dec x 6, 18 sc= 36

Round 14 :

sc in each st around

Round 15 :

(dec, 4 sc) x 6= 30

Info :

Place eyes between rounds 8 and 9, leaving 9 holes between them. With the eyes facing you, the left eye will be placed before the stitch marker between rounds 8 and 9. The right eye will be placed after the stitch marker. If you want the sunken eye look, do not place the backs of the eyes on until round 29.

Round 16 :

(dec, 3 sc) x 6= 24

Round 17 :

sc in each st around

Info :

Now for the eyes. Stuff the head well. Cut a long piece of yarn and remove the eyes. Place the needle in the hole where the first eye was and insert the needle into a hole next to the eye hole. Go back and forth between each eye hole repeating the process from the first eye. Pull slightly on the yarn after going through each hole. Do this about 3 times on each side until you reach the look you want. Follow the pictures on pg. 5 for help. There is also a youtube video I have for extra help on this process. https://www.youtube.com/watch?v=9XoBnTY6k70&t=55s

โ€” Head and Body Continued :

Info :

To place the backs of the eyes you will need to remove most of the stuffing to place the washers on the eyes, then re stuff it.

Round 18 :

(inc, 3 sc) x 6= 30

Round 19 :

(inc, 4 sc) x 6= 36

Round 20 :

sc in each st around

Info :

Stuff the body as you work

Round 21 :

(inc, 11 sc) x 3= 39

Round 22 :

sc in each st around

Round 23 :

(inc, 12 sc) x 3= 42

Round 24 :

sc in each st around

Round 25 :

(6 sc, inc) x 6= 48

Round 26 :

(7 sc, inc) x 6= 54

Round 27-29 :

sc in each st around

Round 30 :

(7 sc, dec) x 6= 48

Round 31 :

(6 sc, dec) x 6= 42

Round 32 :

(5 sc, dec) x 6= 36

Round 33 :

(4 sc, dec) x 6= 30

Round 34 :

(3 sc, dec) x 6= 24

Round 35 :

(2 sc, dec) x 6= 18

Round 36 :

(sc, dec) x 6= 12

Round 37 :

dec x 6 = 6

Info :

F/O and sew the hole closed

โ€” Beak :

Round 1 :

With Color B: Make 6 sc into a magic ring= 6

Round 2 :

(sc, inc) x 3= 9

Info :

F/O and leave a long tail for sewing

โ€” Wings (Make 2) :

Round 1 :

With Color A: Make 6 sc into a magic ring= 6

Round 2 :

(sc, inc) x 3= 9

Round 3 :

(2 sc, inc) x 3= 12

Round 4 :

sc in each st around

Info :

Do not stuff the wings

Round 5 :

(sc, inc) x 6= 18

Round 6 :

sc in each st around

Round 7 :

(sc, dec) x 6= 12

Round 8 :

(2 sc, dec) x 3= 9

Round 9 :

(sc, dec) x 3= 6

Info :

Fold the wings in half and sc the opening closed. F/O and leave a long tail for sewing

โ€” Tail :

Round 1 :

With Color A: Make 6 sc into a magic ring= 6

Round 2 :

(sc, inc) x 3= 9

Round 3 :

Inc x 3, 6 sc= 12

Info :

F/O and leave a long tail for sewing

โ€” Feet (Make 2) :

Round 1 :

With Color B: Make 6 sc into a magic ring= 6

Round 2 :

Increase in each st around= 12

Round 3 :

(sc, inc) x 6= 18

Round 4 :

(ch 3, sl st in 2nd ch from hook, sl st in next ch, sl st in next 2 sts on circle) x 3

Info :

F/O and leave a long tail for sewing

โ€” Hair on Head (optional) :

Info :

With Color A: Attach yarn in the magic ring with a sl st

Instruction :

(Ch 4, sl st in 2nd ch from hook and across) x 2

Info :

F/O and weave in the tail end

Assembly Instructions

  • Attach facial highlights: Thread a long strand of white yarn and insert the needle into a hole between the eyes. Bring the needle to the lower corner of the eye, wrap around the outside, insert into a hole on top of the eye and pull slightly to create a highlight; repeat for second eye.
  • Optional eyelid: With a long strand of yellow yarn, insert the needle into a hole on the head, bring it up to a corner of the eye and wrap in front to form an eyelid. Repeat once more on each eye and weave in ends.
  • Pin and sew the beak in the center front of the face between the eyes; the pattern author did not stuff the beak, so sew it flat and securely using the long tail.
  • Pin wings to the sides of the body approximately between rounds 18 and 19, then sew each wing to the body, ensuring even spacing and symmetrical placement.
  • Pin the two feet to the front bottom of the body, position evenly and sew them on firmly using the long tails for secure attachment.
  • Pin the tail onto the back of the body in the center, then sew the tail onto the body and weave in all loose ends to finish.

Important Notes

  • ๐Ÿ’กDo not join rounds unless stated; work in a continuous spiral for smooth shaping and even stitch flow.
  • ๐Ÿ’กUse a stitch marker to mark the beginning of each round and move it up each round to maintain correct stitch counts.
  • ๐Ÿ’กStuff firmly but evenly while shaping the head and body; remove stuffing temporarily to attach eye washers and re-stuff before closing.
  • ๐Ÿ’กPin all parts (beak, wings, feet, tail) in place before sewing to check placement and symmetry and avoid uneven assembly.

This little Feather Locklear chick is designed to bring smiles and handmade warmth to your home. It makes a lovely gift or a sweet addition to your amigurumi collection. Customize yarn and eyes to create fluffy or chenille looks and make each chick uniquely yours. ๐Ÿฅ๐Ÿงถ

You ask,

we answer.

FAQs

What size will the finished piece be?

The finished amigurumi measures approximately 6 inches from the bottom to the top of the head when using worsted weight #4 yarn and a 3.25 mm hook.

Can I use different yarn weights for this pattern?

Yes, you can use different yarn weights, but this will change the final size and may require altering hook size and eye placement. The pattern includes helpful notes for fluffy and chenille yarn variants.

Do I need prior crochet experience for this pattern?

This pattern is rated intermediate, so basic crochet skills and experience with continuous spiral amigurumi are recommended for best results.

How long does this project typically take to complete?

Most crocheters complete this project in 5-7 hours, though time may vary based on experience level, yarn choice, and how much time you spend on assembly and finishing.